Download

1 / 49
530 likes | 1.59k Views
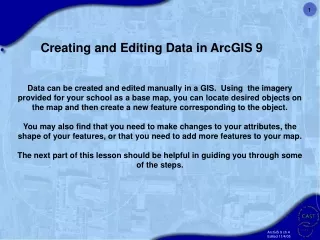
Located at: \covagssrvgis commonarcgistrainingPowerPoint -or- \covagssrvGIS CommonarcgisArcGIS_HELP_TIPSdefault.htm (Select ArcGIS PowerPoint Slides) Basic Editing in ArcGIS Start Editing Set the Target Layer To Edit Set your Selectable Layers

E N D
Located at: \\covagssrv\gis common\arcgis\training\PowerPoint -or- \\covagssrv\GIS Common\arcgis\ArcGIS_HELP_TIPS\default.htm (Select ArcGIS PowerPoint Slides) Basic Editing in ArcGIS
Select a Feature to Delete by using one of the Select Tools and Delete Options (Delete Key or Tool).
Now, Change to Target Layer to Polygons and Merge the Features.
Now we will try to make the same edits using the Topology Layer and Toolbar.
First we will select our two polygon features. (Make sure the Polygons are Selectable.)
Now we will validate the edit in the Current Extent to show the error.
Use the Fix Topology Error Tool to fix the error by subtracting the arc feature. Right-Click on the Feature to get the context menu.
Notice the arc has been removed from mun400_arc. To end, Validate, Save edits, and Stop Editing.
Constructing Features with Topology Editing Toolbar First, set the Snapping Environment.
Use the Sketch Tool (Pencil) to add a new line that will split the polygon feature.
When snapping is set, you will notice the light blue dot as you hover over another feature with the sketch tool. This is where the snap will take place.
Sketch the new line by clicking on the line features to snap to, then right-click and select Finish Sketch.
Now make sure your Target Layer is Mun400_poly and construct the new polygon features.
In the dialog you can change the default Cluster Tolerance that was originally set in the Cities_Topology layer.
Clear the selected features and turn off the drawing for the mun400_arcs to see the new polygons created.
You can also use the cut polygon tool to split a polygon and create arcs.
Select the polygon feature you want to split. (Remember to set the selectable layer.)
Use the Sketch Tool (Pencil) to draw a line, then right-click and select Finish Sketch to split the feature.
Now, validate the topology and use the Fix Topology Error Tool to generate the arc. Right-Click on the error And select Create Feature.
Validate the topology again to clear the error and see the new arc feature.
You now should be seeing some advantages of using Topology for editing. • Just remember what the trade offs are and if you really need it. • The previous Topology Edits were made using two simple Rules: • Arcs must cover polygon feature boundaries. • Polygon Feature boundaries must cover arcs. • As you saw earlier, we were able to do virtually the same edits with or • without topology rules. However, the rules enforce data integrity and in • some cases make the job easier.
Attribute the new features using the attribute tool and dialog. You can select the feature you want to attribute here.
You can attribute all selected features at once by selecting the feature class name and typing in the value.
You can also add attributes directly in the table or by calculate them this way. Right Click on the Field Name to bring up the Field Calculator.
Use the Trace Tool to trace any selected feature(s) to create new features in the Target Layer. Remember to set your task.
Use the mouse to start your trace sketch here, and follow the selected features you want to trace, and Right-click and select Finish Sketch.
Turn of the layer you were tracing to see the new feature. You can now validate and construct features to generate your polygons from the new arc. (Be sure to set your Target Layer to mun400_poly.)
Use the Help button and click on the Planarize Tool to see what it does.
You can use Map Topology and the Topology Edit Tool to Modify and Reshape shared edges. This is good to use when you need a feature to follow another but they are not in a topology layer together.
Good for editing irregular features like water bodies. Using the Topology Edit Tool, double-click on the shared features to edit. Select a node and drag to its new position. The Arcs and Polys will move accordingly.