Download
1 / 45
450 likes | 615 Views
NMU Voicemail. Welcome to . This presentation will walk you through the setup and use of the NMU Voicemail system. Follow the step by step instructions on the following slides. If you have any problems, contact the telecom helpdesk @ 227-1995.

E N D
NMU Voicemail Welcome to
This presentation will walk you through the setup and use of the NMU Voicemail system. Follow the step by step instructions on the following slides. If you have any problems, contact the telecom helpdesk @ 227-1995.
If you have not done so, you will need to contact the Telephone Department X1995 to have your voicemail account setup to work with your phone. You can have your calls go to voice mail after 1 to 6 rings.
The following slide shows a handout that will walk you through the setup procedure for the NMU Voicemail system. If a copy is not available, please contact the Telephone Dept. for a copy of this handout @ 227-1995.
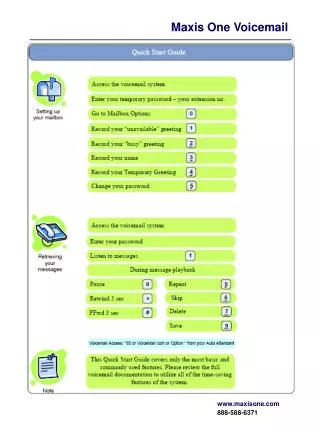
First go to https://voicemail.nmu.edu/ (If you are trying this from home, you must log into the VPN first.) This will bring you to the following screen.Note: Instructions will be in red each page.
Enter your NMU ID And Password, ie: wwilly, your email password And your extension, (4 digit NMU extension without the 227). Click Submit
This will bring you to this screen Click on the Settings on the left side.
First enter your password, this is the 5 or more numeric password you will use to retrieve your messages from a telephone. Enter it in again to confirm password. Then click update to save your changes. .
You will notice the box “Enable Extended Email Options” is already checked. This will allow you to type in your email address so you can get you voicemail as part of your email.
Next enter your Email address. then fill out the “Email Notifications Only To:” box with your cell phone email address. ‘ if you wish to be notified on your cell phone as a text message that you have new messages Now Check the box that says “Email voicemail as attachment”. , Next click “Update”.
To receive voicemail notification on your cell phone: Alltel users 906869xxxx@message.alltel.com CellularOne users 906360xxxx@mobile.celloneusa.com Note: There may be a charge from your cell phone company if you use this feature.
Next enter your zero out Extension. This is the number that people will get if they press 0 while they are listening to your greeting.
The next box will delete your voicemails automatically after they are sent to your email address. Use this feature only if you are going to use your email feature only. Note:Your message waiting light will not light if this feature is checked. The last two boxes are to include header information to your voicemail that you listen to over the telephone. Click Update.
Next you will have to set up 2 more items through your telephone. Dial 1122 (227-1122 from off campus) Enter your extension and # Enter your password and # Press 0 (zero) Press 1 to record your unavailable greeting Press 3 to record your name. Your voicemail is completely set up. Note: The settings page can be changed at any time
3 ways to get your voice mail 1. Via the telephone 2. Web based using a web browser. 3. Email based
First using the telephone (227-1122) Or 1122 on campus
The following slide shows a handout of a flow chart for NMU Voicemail options. This will walk you through using the telephone to get your voicemails. Again, if a copy is not available, please contact the Telephone Dept. for a copy of this handout @ 227-1995.
Getting your messages over the telephone Dial 1122 (227-1122 from off campus) Enter your extension and # Enter your password and # This will bring you to the main menu Press 1 to listen to your messages. Press 2 to change folders Press 3 for advanced features Press 0 for mailbox options Press * for help Press # to exit
To get your messages by telephone - cont. Press 1 to listen to your messages. Press 3 for advanced options Press 4 to play previous message Press 5 to repeat message Press 6 to skip to the next message Press 7 to delete / undelete message Press 8 to forward message to other users Press 9 to save message to a folder.
Folders (Press 2) Folders are used to save messages You have the following folders 0 New folder 1 Old folder 2 Work folder 3 Family folder 4 Friends folder # to cancel You can move and save messages in different folders.
Advanced features (Press 3) 4 Transfer to any 4 digit extension. * To return to the main menu
Mailbox Options (Press 0 Zero). For changing passwords and greetings. Press 1 To Record Unavailable Greeting Press 2 To Record Busy Greeting (Presently does not work) Press 3 To Record Name Press 4 To Record, Change, Delete Temporary Greeting Press 5 To Change password. Press * To return to the main menu
More Options. Press * for Help or to return to the main menu Press # to exit. Note: If you create a Temporary Greeting and except it It will automatically play. To go back to your Unavailable Greeting, you must delete your Temporary Greeting Press 0 (Zero) for mailbox options Press 4 (to record, change or delete a temporary greeting) Then press 1 to record your temporary greeting Or press 2 to delete your temporary greeting Note: If you use call forwarding to voicemail, use *2 6222 to activate and #2 to cancel
Next getting messages using a Web Browser (https://voicemail.nmu.edu)
First go to https://voicemail.nmu.edu/ (If you are trying this from home, you must log into the VPN first.) If this brings you to a Login page, enter your NMU ID and password.
To play your message just click on the play on the right side under message.
To delete, check the box in front of the message you wish to delete and click on delete on the menu bar. This will move your voice mail to your Trash folder. Trash will stay until you delete it.
| To move to a folder like friends or old, check the box in front of the message, go to the folders pull down menu, and select the folder you wish to move it to, then click on “move_to” button.
To forward to another user, select the voice mail you want to send and check the box on the left of the message. Then type in the extension or the persons email address in the box to the right of the “forward_to” button, then click on the “forward_to” button. Note: It will give you an error message if they do not have a voicemail box.
To search for a voicemail from someone, just put their number in the search box and click search. This will bring up all voicemails from this person in the folders on the left. Click on the folder.
All of these voicemails are from 1987. Click play to listen
When finished you can logout on the left or just close out your web browser using the X in the upper right corner.
First go to your e-mail program Set up a folder for Voice Mail Set up subfolders for all of the mailboxes you wish to have Including an “Inbox” Set up filters so your voicemail gets sent to the “inbox” If you wish to save any messages, you can drag and drop them into the different folders.
Remember, the 3rd box will delete your voicemails automatically after they are sent to your email address. Note: This will delete them completely not put them in the trash. Note: Your message waiting light will not light if this feature is checked. If you use your cell phone for the email notification, your cell phone can act as your Message waiting lamp. Charges by your cellular company provider may apply.
Header information Attached audio file
Advanced Features Receiving faxes through your voicemail. If you want to have your voicemail box setup to receive faxes, first contact the telecom department @1995 to have a number setup as a fax number. There is a change for this service.
If you have faxing setup on your voicemail, your settings screen will have an extra box with it. You will have a choice of receiving your faxes either in a TIFF or PDF format. You will have to select the format you wish to receive, then check “Update”.
Faxes will be received by your email program with the subject as “NMU Fax Message” with an attached PDF or TIFF file. Click on Attached file to open. Your message waiting will not light for a fax since it only comes in to your email.
If you have any problems or questions concerning your voice mail, contact the telecom helpdesk @ 227-1995. Remember, any problems with your email or browser, contact the computer helpdesk @ 227-2468
Enter your NMU ID and Password, ie: wwilly, your email password and your extension, (4 digit NMU extension without the 227). Click Submit.