Download
1 / 11
420 likes | 896 Views
Creating Sales and Purchase vouchers in Tally is extremely easy and simple. They are often referred to as purchase entry in Tally and sales entry in Tally. Learn how to do it in this video by Attitude Academy Yamuna vihar, Delhi.

E N D
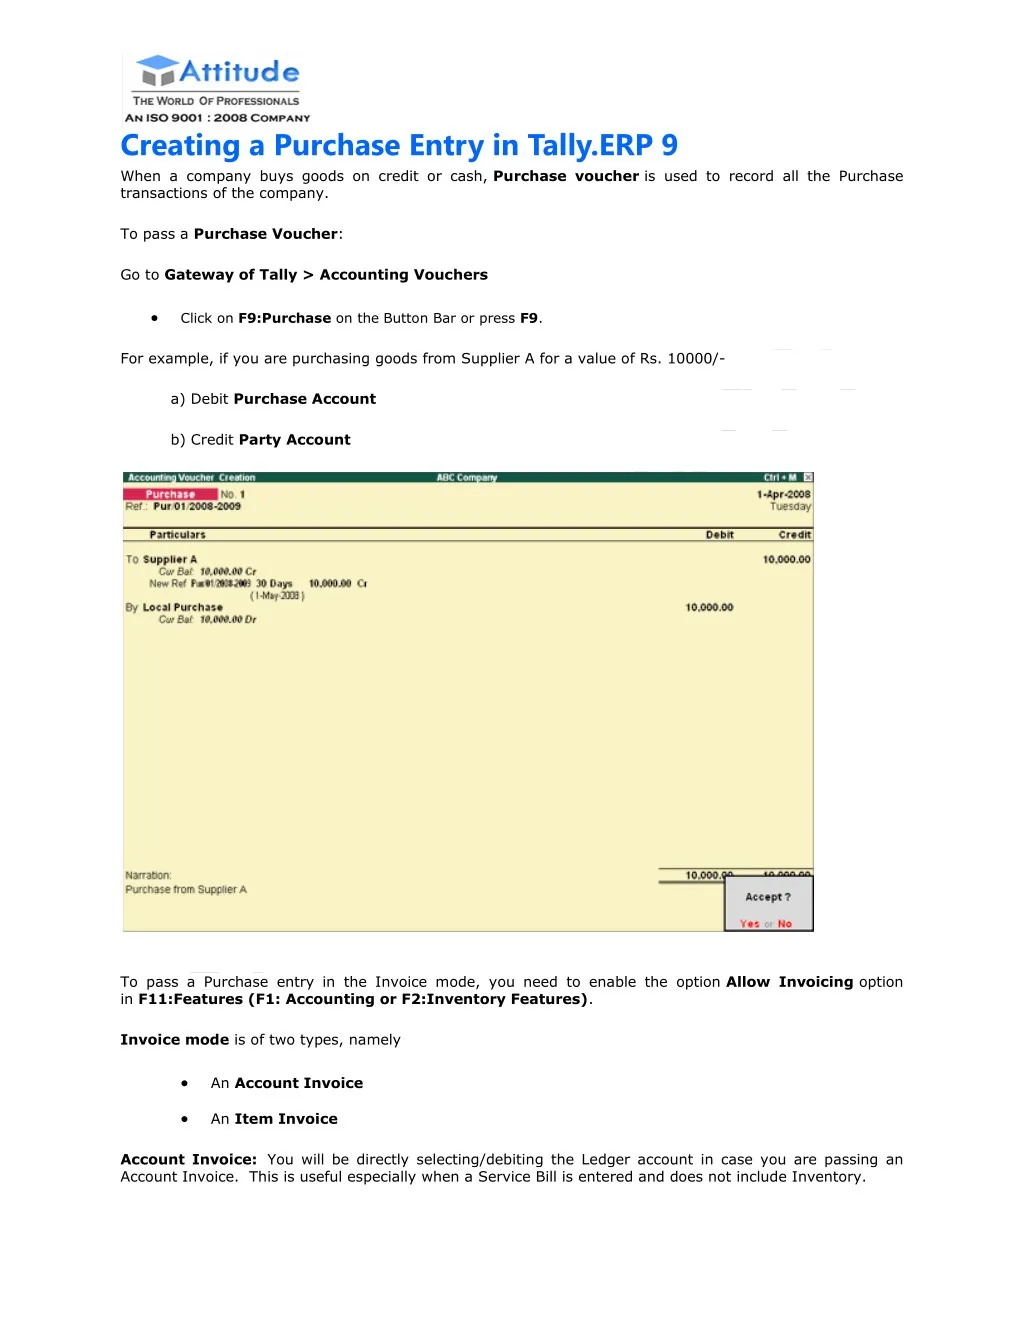
Creating a Purchase Entry in Tally.ERP 9 When a company buys goods on credit or cash, Purchase voucher is used to record all the Purchase transactions of the company. To pass a Purchase Voucher: Go to Gateway of Tally > Accounting Vouchers Click on F9:Purchase on the Button Bar or press F9. For example, if you are purchasing goods from Supplier A for a value of Rs. 10000/- a) Debit Purchase Account b) Credit Party Account To pass a Purchase entry in the Invoice mode, you need to enable the option Allow Invoicing option in F11:Features (F1: Accounting or F2:Inventory Features). Invoice mode is of two types, namely An Account Invoice An Item Invoice Account Invoice: You will be directly selecting/debiting the Ledger account in case you are passing an Account Invoice. This is useful especially when a Service Bill is entered and does not include Inventory.
Pass a purchase Invoice for Service availed from XYZ Couriers. Item Invoice: You will be first selecting the Inventory and then allocating the same to the relevant Ledger account. This is useful to record all the Inventory movements in books of account. Pass a Purchase Invoice against purchase of Item A – 100 Nos. @ Rs. 10/= per quantity from LMN & Company.
Configuring a Invoice Before creating the Purchase Invoice, you can set your Invoice Configurations from F12 configure: Go to Gateway of Tally > Accounting Vouchers > F9: Purchases (As Invoice) Select F12 Configure.
Set the options, as required. Purchase Invoice Configuration 1. Accept Supplementary Details: Set this option to Yes to specify the Despatch Details. If this option is set to No, Print Default Name and Address of Party will be enabled for configuring. Here it captures the default name and address present in the ledger. Allow separate Buyer and Consignee names: Customers who are into consignment business and would like to have the Consignee details on the Invoice, have to set this option to Yes. Use Common Ledger A/c for Item Allocation: If you would like to allocate all the Items to a single Purchase Ledger in the Invoice, you need to set this option to Yes for faster data entry. Allow Expenses/Fixed Assets for Accounting Allocation: If you want to use Expense or Fixed Assets ledgers while recording a Purchase entry, set this option to Yes. Use Defaults for Bill Allocations: Setting this option to Yes will allocate the Bill Numbers automatically as defined in voucher type master in ascending order. Use Additional Description(s) for Item Name: If you would like to specify any additional description for item during entry, this option has to be enabled. 2. 3. 4. 5. 6.
7. Use Additional Description(s) for Ledger Name: If you would like to specify any additional description for ledger during entry, this option has to be enabled. Consolidate Stock Items with same rates: If you would like to consolidate the stock items having same rates in Invoice, set this option to Yes. Show Compound Unit of Item based on Rate: By enabling this option, you will be allowed to show the compound unit of item based on the unit provided in the Rate Per column. For more details, click here. 10.Show Full Details of Compound Unit: Enabling this option will display full details of compound unit in the Quantity field. For more details, click here. 11.Confirm each Cheque before Print: When you set this option to Yes, a conformation screen will appear for every cheque used for the transaction before it is printed. 12.Use Defaults for Bank Allocation: Setting this option to Yes, the Bank Allocations will have default allocations in which, the Transaction type is Cheque, Voucher date as Instrument Date. the Cheque Range and Cheque Number will be Blank if it is not defined. 13.Use Auto Cheque Numbering: To fetch cheque numbers automatically to the Bank Allocation, set this option to Yes. The first Cheque Range defined for the Bank ledger will be taken as default. 14.Allow Selection of Cheque Ranges: Setting this option to Yes, allows you to select any cheque range defined for a bank. 15.Show Remarks in Bank Allocation Details: A new field - Remarks, will appear in the Bank Allocation screen where you can enter your remarks, when this option is set to Yes. 16.Importer’s Options: This is useful for import transactions. 17.Show turnover achieved with Customer: This option will help to view the turnover details during entry. 18.Allow modification of ALL fields during entry: Default order/delivery note entries appearing in the Invoice can be changed during Invoice entry. Set this option to Yes to permit modification of all fields. 19.Warn on Negative Stock Balance: Tally.ERP 9 will display a warning message Negative Stock with quantity details. You can then check which item is having negative stock balance. 20.Honor Expiry Dates usage for Batches: You can restrict or allow the usage of Expired stocks for selection during entry by configuring this option. 21.Show batches with Zero Quantity: On setting this to Yes the batches with zero quantity will be available for selection during entry. 22.Calculate Tax on current Sub-Total: This option should be enabled if the tax needs to be calculated after considering the additional Expenses. 8. 9. For more details on Purchase Voucher mode configurations refer Voucher Entry Configuration Special Keys on the Button Bar: When you are passing an Item Invoice in Invoice mode, the following options will be available in the Button Bar. Alt+I – Acct Invoice– You can toggle between Item Invoice and Account Invoice, by clicking on this option on the Button Bar or pressing Alt+I or vice-versa. Ctrl+V – As Voucher– You can toggle between Invoice mode and Voucher mode, by clicking on this option on the Button Bar or pressing Ctrl+V or vice-versa. Special Keys for Voucher Narration Field ALT+R: Recalls the Last narration saved for the first ledger in the voucher, irrespective of the voucher type. CTRL+R: Recalls the Last narration saved for a specific voucher type, irrespective of the ledger.
Creating a Sales Entry in Tally.ERP 9 When a company sells goods on credit or cash, Sales voucher is used to record all the Sales transactions of the company. To pass a Sales Voucher: Go to Gateway of Tally > Accounting Vouchers Click on F8:Sales on the Button Bar or press F8. For example, if you are selling goods to Debtor A for a value of Rs. 10000/- a) Debit Customer’s Account b) Credit Sales Account Creating a Sales Invoice in Tally.ERP 9 When a sales transaction is made, a document detailing the transaction (item name, tax, etc) has to be given to the buyer or debtor as proof of purchase by him. This document is called Invoice or Bill or Cash Memo. Tally.ERP 9 provides the option of creating Invoices. Invoice mode is of two types. It may be: An Account Invoice An Item Invoice
Account Invoice Sales Account Invoice is generally used by professionals such as doctors and consultants who require to issue an invoice for certain services provided such as consultancy charges, professional fees, etc. Trading and manufacturing organizations also use the Account Invoice for invoicing service charges. On the Sales entry screen, click on Acct Invoice button, which is displayed on the Button Bar on the right- hand side of the screen to display the Sales Account Invoice screen as shown. Pass a Sales Account Invoice for Service provided to Debtor B: Tally.ERP's Account Invoice mode displays the list of ledger accounts, which can be invoiced as required. This is unlike Item Invoice where Tally.ERP 9 displays the list of stock items. Item Invoice Invoicing is generally used for sale of stock where the details of the items sold are listed. Selecting the Item Invoice allows you to select the stock items that need to be invoiced. Trading and manufacturing organizations commonly use this format. On the Sales invoice screen, click on the button Item Invoice, which is displayed on the Button Bar on the right side of the screen and the Sales Item Invoice appears as shown below: Pass a Sales Invoice against sale of Item A – 50 Nos. @ Rs. 15/= per quantity to Debtor C:
Tally.ERP's Item Invoice mode displays the list of stock items, which can be invoiced as required. Special Keys for Voucher Narration Field ALT+R: Recalls the Last narration saved for the first ledger in the voucher, irrespective of the voucher type. CTRL+R: Recalls the Last narration saved for a specific voucher type, irrespective of the ledger.
Concept of Debit & Credit Note The need for debit note and credit note arises most of the time when there is a Return of Goods. Usually when there is a return of goods, the person does not directly give the cash for the returned goods. He issues Credit Note if he is a seller. And the buyer issues a Debit Note for the same transaction to the seller from whom he has received credit note. Debit Note As I issued a Credit Note, at the same time Amit will issue Debit Note to me for the same transaction. Amit has returned goods worth ₹5,000 to me and he will issue a debit note for that amount. Therefore Amit will show debit balance (Debit = Assets) of me in his books. This is because Amit has already paid for the goods, but has returned some of them. On the other hand, I will show credit balance (Credit = Liabilities) of Amit in my books. The reason for credit balance is because I have received the goods in return as well as money for that goods from Amit. So, now I am liable to pay the money or goods to Amit. This is the real crux behind debit and credit note. Debit and Credit Notes in Tally For using debit and credit notes in Tally, you would have enable them. To enable the option for debit and credit notes in Tally, follow the steps below. From Gateway of Tally, press F11 – Shortcut for Company Features Now select, Accounting Features. Under Invoicing, set the option Use debit/credit notes to YES. Also set YES for: oUse invoice mode for credit notes
oUse invoice mode for debit notes Enabling Debit and Credit Notes in Tally
Ctrl+F9 For Debit Note Ctrl+F8 For Credit Note