Download
1 / 71
710 likes | 726 Views
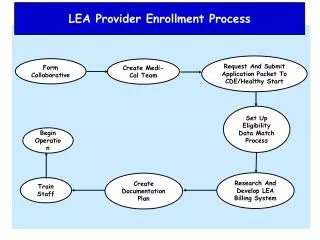
ILLINOIS PROVIDER ENROLLMENT. Atypical Agencies HBS Service Facilitation Supported Employment Personal Support, agency- based Adult Day Care Home & Vehicle Modification, Adaptive Equipment & Assistive Technology Emergency Home Response Transportation, agency-based. Agenda.

E N D
ILLINOIS PROVIDER ENROLLMENT Atypical Agencies HBS Service Facilitation Supported Employment Personal Support, agency- based Adult Day Care Home & Vehicle Modification, Adaptive Equipment & Assistive Technology Emergency Home Response Transportation, agency-based
Agenda • Introduction to IMPACT and Key Terms • Application Process • Resuming an Application • Starting a New Application • The Business Process Wizard (BPW) • Completing the Application using BPW • Reviewing Submitted Application • Resources • Questions & Answers
Introduction and Key Terms IMPACT is a multi-agency effort to replace Illinois’ 30-year-old Medicaid Management Information System (MMIS) with a web-based system that meets federal requirements. Key Terms: • Facility, Agency, Organization (FAO): An entity that provides health care services such as, hospitals, nursing facilities and laboratories. A type 2 NPI and licensing is required. This includes Community Integrated Living Arrangements (CILA), Community Living Facilities (CLF), Child Group Homes and Developmental Training (DT) providers. • Atypical Agencies(AA): A facility, agency, or organization that is not required to obtain an NPI (National Provider Identifier) in order to enroll in the IMPACT system. • Revalidation:Any provider who was enrolled in the MMIS system and whose information was transferred to IMPACT. • Billing Agent/Provider: Submits Medicaid HIPAA compliant transactions or exchanges EPHI with Medicaid providers or other authorized parties. Also known as Clearing House, Software Vendor or Value Added Network (VAN). • All DDD Medicaid Waiver providers will be required to associate to DHS DDD as their billing agent due to submitting claims to DDD. Providers will also need to associate to any additional billing agents, billing providers, clearinghouses, etc that the providers uses to submit claims and/or receive payments on their behalf. • MCO Plan: Health care plans that provide health care through a provider network. • DHS DDD is considered a “pseudo-MCO” in the IMPACT system. All DDD Medicaid waiver providers will need to associate with the DHS DDD MCO in order to enroll in our waiver programs. NOTE: In order for a provider to associate to an FAO, the FAO application must be approved in IMPACT.
New providers will need to choose their enrollment type based on the requirement to have an NPI. The IMPACT system has assigned the enrollment type for providers that are revalidating. Agencies that had an NPI in the former MMIS system will automatically be considered Facilities, Organizations, Agencies (FAO). Agencies that did not have an NPI in the legacy system will automatically be determined Atypical Agencies (AA). • CILA, Community Living Facilities, Child Group Homes and Developmental Training Providers are required to obtain an NPI in order to revalidate in IMPACT. For information about obtaining an NPI visit the NPPES website at: https://nppes.cms.hhs.gov/NPPES/Welcome.do • Revalidating Providers will need to start the revalidation process by entering the application ID. Once the application ID is entered, the provider’s name and enrollment type will be listed a the top of the screen. Providers determined to be an AA will not be able to enter an NPI on the “Basic Information” screen. Also they will not be able to add any services that require an NPI on the “Add Specialty” screen. • If an agency’s enrollment type is an FAO and the agency is enrolling to provide services that are determined to be atypical, the agency will not have a problem with completing the enrollment or revalidation. FAOs can enroll to provide services that are atypical. • Any provider that is enrolling or revalidating for services that require an NPI must be an FAO. Revalidating providers that are considered an AA in IMPACT and need to enroll in services that require a FAO enrollment type will need to contact Janene VanBebber. She can be reached at 217-782-3719 or via email at Janene.VanBebber@illinois.gov. • In order to change the enrollment type, HFS may delete the current revalidation information in IMPACT. This will only result in the provider’s information not being pre-populated in IMPACT. This will not create a gap in the agency’s enrollment or cause any delays in claiming.
Application Process Step 1: Provider Basic Information Step 2: Add Locations Step 3: Add Specialties Step 4: Licenses/Certifications/Other Step 5: Mode of Claim Submission Step 6: Associate Billing Agent tep 4: Add Licenses and Certifications Step 7: Add Ownership Details Step 8: Add Taxonomy Details Step 9: Associate MCO Plan Pressing this button on any screen will bring you back to this menu. Step 10: 835/ERA Enrollment Form Step 11: Enrollment Checklist Step 12: Submit Application Pressing any of the buttons below will skip to that step of the presentation 1 2 3 4 5 6 7 8 9 10 11 12 Shortcut to Step:
Application Process • After completing the sign-on, click on IMPACT Provider Enrollment. • In regards to completing an application, there are two options: New Enrollment or Resuming an application. 1 2 3 4 5 6 7 8 9 10 11 12 Shortcut to Step:
Resume an Application • To resume (or revalidate) an application, click on Track Application. • The application number was either mailed out on a yellow card (revalidation) or sent to the listed email address (In-process application). • Enter the Application ID for the application you want to access. • After entering the ID number, click Submit. • This process will then go directly to the Business Process Wizard (BPW). 1 2 3 4 5 6 7 8 9 10 11 12 Shortcut to Step:
Start New Application • If completing a new application, click on New Enrollment. • Use the radio buttons to select your enrollment type, then click on Submit in the lower left corner. 1 2 3 4 5 6 7 8 9 10 11 12 Shortcut to Step:
Start New Application (Step 1: Basic Provider Information) Please complete all fields. At a minimum, all fields with an * are required. • After all the information has been entered click Confirm. • Click Finish in the bottom right corner to complete this step. 1 2 3 4 5 6 7 8 9 10 11 12 Shortcut to Step:
Start New Application (Step 1: Basic Provider Information) • Application ID: systematically generated. • Name: should reflect name from Basic Information. • The system will generate an application ID after the successful completion of the Basic Information screen; the application number is a 14-digit number that has the following components: • The system date in yyyymmdd format • A 6-digit system generated random number • Example: 20130514412598 • Application IDs are valid for 30 calendar days; applications must be completed and submitted to the state for review during this 30 day period or the application will be DELETED. • The application ID will be used to access the application before submission to the state for review and will be used to track the status of your submitted application until it is marked approved. • After documenting the ID number, click OK. 1 2 3 4 5 6 7 8 9 10 11 12 Shortcut to Step:
Using the Business Process Wizard (BPW) The BPW serves as the “Control Center” of the application. • Required: Steps listed as Optionalmay change to Requiredbased upon previous steps. • Dates: Entered by the system; Start Date is the date each step is opened, the End Date is the date each step is completed. • Status: When a step is completed the Statuswill be updated to Complete; answering some checklist questions may change a prior step’s status back to Incomplete. • Remarks: Remarks are systematically generated throughout the enrollment process. 1 2 3 4 5 6 7 8 9 10 11 12 Shortcut to Step:
Completing the Application Using BPW • Once you have documented your Application ID, you have completed Step 1: Provider Basic Information. The system will place the current date in the End Date field and will place Complete in the corresponding Status field. • Steps 1, 2 and 3 must be completed in sequential order before attempting any of the later steps. • Click on Step 2: Add Locations to continue completing your application. 1 2 3 4 5 6 7 8 9 10 11 12 Shortcut to Step:
Step 2: Add Locations • Click Addto input the Primary Practice Location address details. 1 2 3 4 5 6 7 8 9 10 11 12 Shortcut to Step:
Step 2: Add Locations Please complete all fields. At a minimum, all fields with an * are required. • Enter the street address and zip code, then click Validate Address. • When all information has been entered, click OKat the lower right corner. 1 2 3 4 5 6 7 8 9 10 11 12 Shortcut to Step:
Step 2: Add Locations • Click on the Primary Practice Location hyperlink to add each address for this location. • The Primary Practice Location address requires a Correspondence and a Pay To address. 1 2 3 4 5 6 7 8 9 10 11 12 Shortcut to Step:
Step 2: Add Locations • Click on Add Address to input the additional addresses for the Primary Practice Location. 1 2 3 4 5 6 7 8 9 10 11 12 Shortcut to Step:
Step 2: Add Locations • Choose type of address from the drop down menu. • If the address you are entering is the same as the Location Address, then click the radio icon next to Copy This Location Address. • After entering the street address and zip code, click on Validate address. • When all the information has been entered, click OK. • Repeat these steps for each additional address type. 1 2 3 4 5 6 7 8 9 10 11 12 Shortcut to Step:
Step 2: Add Locations • After all addresses have been entered click onOK. 1 2 3 4 5 6 7 8 9 10 11 12 Shortcut to Step:
Step 2: Add Locations • To list an Other Servicing Location address, click on Addand enter the address information for that location. • For Other Servicing Location, in addition to the location address itself, a Correspondence address is also required. • Once all location addresses have been entered, click on Close. 1 2 3 4 5 6 7 8 9 10 11 12 Shortcut to Step:
Business Process Wizard (BPW) • You have completed Step 2: Add Locations. The system will place the current date in the End Date field and will place Complete in the corresponding Status field. • Click on Step 3: Add Specialties to continue your application. 1 2 3 4 5 6 7 8 9 10 11 12 Shortcut to Step:
Step 3: Add Specialties • Click on the Addbutton in the upper left corner. • Provider types, specialty and subspecialty information can be found on the Provider mapping spreadsheet . Pleases see the DD Provider Enrollment web page. http://www.dhs.state.il.us/page.aspx?item=47336 1 2 3 4 5 6 7 8 9 10 11 12 Shortcut to Step:
Step 3: Add Specialties • Select your Provider Type from the drop down. • Select your Specialty from the drop down. • If applicable, choose Board Certified or Not Board Certified. • Provider types, specialty and subspecialty information by service can be found on the Provider mapping spreadsheet on the DD Provider Enrollment web page.
Step 3: Add Specialties • Once the Provider Type and the Specialty are selected, the Subspecialties will populate at the bottom of the screen in the Available Subspecialties box. • The Provider must choose at least one Available Subspecialty (or No Subspecialty) if multiple selections are available. • If only one choice is available, the system will preselect that selection. • Once all desired selections are moved to the Associated Subspecialties box, click OK in the bottom right corner Click on the Subspecialties then click on the double arrows to move the Subspecialties over to the Associated Subspecialties box. 1 2 3 4 5 6 7 8 9 10 11 12 Shortcut to Step:
Step 3: Add Specialties • If you have another Specialty to enter click the Add button in the top left corner and repeat the steps as needed. • When all the Specialty information has been entered, click on Close to return to the Business Process Word (BPW). 1 2 3 4 5 6 7 8 9 10 11 12 Shortcut to Step:
Business Process Wizard (BPW) • You have completed Step 3: Add Specialties. The system will place the current date in the End Date field and will place Complete in the corresponding Status field. • Click on Step 4: Add Licenses/Certifications/Other to continue your application. 1 2 3 4 5 6 7 8 9 10 11 12 Shortcut to Step:
Step 4: Add Licenses/Certifications/Other • Click on the Addbutton to begin adding Licenses and Certifications. 1 2 3 4 5 6 7 8 9 10 11 12 Shortcut to Step:
Step 4: Add Licenses/Certifications/Other • Click the drop down menu next to License/Certification Type to select your License/Certification, then enter the License/Certification Number and Effective Date in the appropriate fields. Leave the End Datefield blank. • After all information is entered, click on Confirm License/Certification. • Clicking this button will result in the License/Certification being validated and update the Valid Flag to Yes if it is verified to be authentic. • Click Ok. 1 2 3 4 5 6 7 8 9 10 11 12 Shortcut to Step:
Step 4: Add Licenses/Certifications/Other • If any additional Licenses/Certifications, click on the Add button in the top left corner and repeat the steps. • Click Closeonce all Licenses/Certifications have been entered to return to the BPW. 1 2 3 4 5 6 7 8 9 10 11 12 Shortcut to Step:
Business Process Wizard (BPW) • You have completed Step 4: Add Licenses/Certifications/Other. The system will place the current date in the End Date field and will place Complete in the corresponding Status field. • Click on Step 5: Add Mode of Claim Submission to continue your application. 1 2 3 4 5 6 7 8 9 10 11 12 Shortcut to Step:
Step 5: Mode of Claim Submission EDI Exchange • A New Enrollment will need to complete the necessary documentation to obtain access to the DHS billing software: http://www.dhs.state.il.us/page.aspx?item=32575 P P • Select billing agent and then click OK. 1 2 3 4 5 6 7 8 9 10 11 12 Shortcut to Step:
Business Process Wizard (BPW) • You have completed Step 5: Add Mode of Claim SubmissionThe system will place the current date in the End Date field and will place Complete in the corresponding Status field. • Click on Step 6: Associate Billing Agent to continue your application. 1 2 3 4 5 6 7 8 9 10 11 12 Shortcut to Step:
Step 6: Associate Billing Agent • Click Addto input DHS DDD as the billing agent. 1 2 3 4 5 6 7 8 9 10 11 12 Shortcut to Step:
Step 6: Associate Billing Agent • Complete the Billing Agent information by entering the DHS DDD billing provider ID number 7094718 then click Confirm/Search Billing Agentand verify that the Billing Agent Name field that is auto-populated is correct. • ClickOKto return to the billing agent list. • If the Billing Agent info is not known, click on Confirm/Search Billing Agent to locate the desired Billing Agent from the list. 1 2 3 4 5 6 7 8 9 10 11 12 Shortcut to Step:
Step 6: Associate Billing Agent • If the Billing Agent ID number is not known, use the Filter By drop down and choose an option to filter the list of available billing agents. (% is the wild card function) • After the desired Billing Agent is shown on the list, click the check box for that option, then click Select. 1 2 3 4 5 6 7 8 9 10 11 12 Shortcut to Step:
Step 6: Associate Billing Agent • Add any additional billing agents or providers that the FAO may be using in addition to DHS DDD billing provider. This would include any clearing houses, billing vendors, etc • To associate to an additional Billing Agent, click Add and repeat the steps. • When all billing agents have been entered, click Closeto return to the BPW. 1 2 3 4 5 6 7 8 9 10 11 12 Shortcut to Step:
Business Process Wizard (BPW) • You have completed Step 6:Associate Billing Agent The system will place the current date in the End Date field and will place Complete in the corresponding Status field. • Click on Step 7: Add Provider Controlling Interest/Ownership Details to continue your application. 1 2 3 4 5 6 7 8 9 10 11 12 Shortcut to Step:
Step 7: Controlling Interest/Ownership • Ownership entries must include at least one Managing Employee and one other Ownership type. • To add Ownership listings, click on Add. 1 2 3 4 5 6 7 8 9 10 11 12 Shortcut to Step:
Step 7: Controlling Interest/Ownership Please complete all fields. At a minimum, all fields with an * are required. or • Either your SSN or EIN/TIN must be entered. • Enter Percentage Owned as a whole number. • Enter the street address and zip code information, then click Validate Address. • When all details are entered, click OK. 1 2 3 4 5 6 7 8 9 10 11 12 Shortcut to Step:
Step 7: Controlling Interest/Ownership • Click Add and repeat the previous steps to list additional owners • After all ownerships have been added, click the hyperlink for the owner listed to complete the relationship and adverse legal disclosure. • This will need to be repeated for each listed owner. 1 2 3 4 5 6 7 8 9 10 11 12 Shortcut to Step:
Step 7: Controlling Interest/Ownership • Scroll down to the relationship section then, click Add. • From the first drop down list of Owner Name, choose an owner name. • From the second drop down list of Relationships, choose how the chosen owner is related to the listed owner. • Repeat this step until the relationship is set for each owner. • When completed, click OK to return to the ownership listing. 1 2 3 4 5 6 7 8 9 10 11 12 Shortcut to Step:
Step 7: Controlling Interest/Ownership • Scroll down and click on the Final Adverse Legal Actions/Convictions Disclosure hyperlink. 1 2 3 4 5 6 7 8 9 10 11 12 Shortcut to Step:
Step 7: Controlling Interest/Ownership • With regards to the chosen Owner, read through the listed information and answer the question and enter comments if desired. • Click OK when completed. • Repeat these steps for each listed Owner. 1 2 3 4 5 6 7 8 9 10 11 12 Shortcut to Step:
Step 7: Controlling Interest/Ownership • It is required that ownership of 5% or more in any other Medicaid/Medicare entity be entered. • To enter Ownership details in another Medicaid/Medicare Entity, click on Add Other Owned Entity. 1 2 3 4 5 6 7 8 9 10 11 12 Shortcut to Step:
Step 7: Controlling Interest/Ownership • After entering the street address and zip code, click Validate Address. • When all information is complete, click OK. • Repeat these steps to add ownership in another Medicaid/Medicare Entity. 1 2 3 4 5 6 7 8 9 10 11 12 Shortcut to Step:
Step 7: Controlling Interest/Ownership • When all ownerships for this location and ownership information in other entities is complete, click Close. 1 2 3 4 5 6 7 8 9 10 11 12 Shortcut to Step:
Business Process Wizard (BPW) • You have completed Step 7: Add Provider Controlling Interest/Ownership Details . The system will place the current date in the End Date field and will place Complete in the corresponding Status field. • Step 8: Add Taxonomy Details is optional. 1 2 3 4 5 6 7 8 9 10 11 12 Shortcut to Step:
Step 8: Add Taxonomy Details • This step is not necessary for Atypical Agencies. • To add new Taxonomy Details, enter the Taxonomy Code and the Start Date. • Click on Confirm Taxonomyand verify Description is populated correctly. • Click on OK to finalize the submission. • The taxonomy code used must be associated with the NPI registered with the National Plan and Provider Enumeration System. You can verify the taxonomy code(s) associated with the NPI number, by visiting the NPPES NPI Registry. The web link for the NPI registry is https://nppes.cms.hhs.gov/NPPESRegistry/NPIRegistryHome.do
Step 8: Add Taxonomy Details • This step is not necessary for atypical agencies. • If the code is not known, click on the t to the right of the box to access The National Uniform Claim Committee Taxonomy Code list. This will open a web browser window. • At least one of the Taxonomy Codes entered in IMPACT must be the Taxonomy Code registered with the National Plan and Provider Enumeration System (NPPES). 1 2 3 4 5 6 7 8 9 10 11 12 Shortcut to Step:
Step 8: Add Taxonomy Details • In the web browser window that opens will be a list of provider types. • Click + next to the appropriate provider type for your enrollment. 1 2 3 4 5 6 7 8 9 10 11 12 Shortcut to Step:
Step 8: Add Taxonomy Details • Click on the + next to the appropriate profession listed under the heading which you previously selected. 1 2 3 4 5 6 7 8 9 10 11 12 Shortcut to Step: