Download
1 / 10
100 likes | 189 Views
Using ODS Regions to Create Custom Reports. Kate Morrow, M.S. Statistician Vermont Oxford Network, Burlington, VT. Background. Vermont Oxford Network is a non-profit membership organization of hospitals with neonatal intensive care units The Network has over 900 members worldwide

E N D
Using ODS Regions to Create Custom Reports Kate Morrow, M.S. Statistician Vermont Oxford Network, Burlington, VT
Background • Vermont Oxford Network is a non-profit membership organization of hospitals with neonatal intensive care units • The Network has over 900 members worldwide • Reporting team was asked to produce a concise and attractive data report for members • ODS was used to pull together several different objects created in SAS to output a cohesive report • The code presented is meant to provide a template for reports that can be easily modified as needed
ODS Setup ods escapechar='^'; *For use in inline formatting; ods listing close; *Turn the listing output off; ods pdf file=“<filepath>.pdf" notoc uniform style=journal; *Output file (notoc=No table of contents in PDF, uniform=Keeps the width of output tables constant across pages); %annomac; *Compiles Annotate macros; options nodate nonumber orientation=landscape; ods layout start width=11 in height=8.5 in; *Page Size;
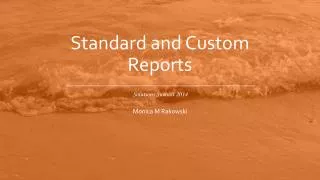
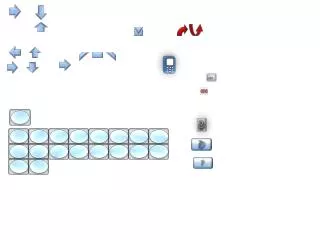
Example Report 3 2 1 4 5
1. ODS PDF Text goptions reset=all transparency; *Transparency removes the background color from the text box.; ods region width=2.1 in height=8 in x=25 y=100; *The width and height statements determine the size of the space allotted for the ‘object’ (here a line of text). The x and y statements determine placement on the page. (0,0) denotes the upper left corner.; ods pdf text="^S={just=l font=('Helvetica', 14pt)}Sparklines are shown by overlaying plots on empty columns in proc repot. ^n^n^nThe sparklines depict the rates for a hospital in a given quarter (green dots) compared to network first and third quartiles (grey bar upper and lower limits) and averages (black line). ^n^n^nThis report combines text, shapes, tables, graphs, and images. ODS Region allows you to do truly custom reporting."; *S={} is the style statement justifying the text to the left and determining the ‘font’, font size, and style.; *^n uses ODS ESCHAPECHAR to break to a new line.;
2. Lines and Shapes Lines ods region width=10.5 in height=8.5 in x=0 y=55; dataannolines; length function color $10; retain xsys ysys '5'; * Syntax for the LINE macro; *LINE (x1, y1, x2, y2, color, line_type, size); %line(0,100,100,100,vig,1,2) run; procgslide anno=annolines; * Use the annotate data set; run; quit; *proc gslide uses the annotate data set and draws the line based on the data on the page; Shapes ods region width=2.4 in height=8 in x=0 y=55; *Because the object is a box, it will fill the entire 2.4inx8in space.; goptions reset=all; goptions cback=CXE2E2E2; *Custom color in RBG format.; procgslide; run; quit; *Draws the box.;
3. Proc Report ods region width = 8 in height = 9 in x = 360 y = 180; procreport data=dummy (where=(q=1)) nofs style(header)=[background=CXE2E2E2bordertopcolor=vigfont_face='Helvitica' font_size=8] style(column)=[bordertopcolor=white borderbottomcolor=white font_face='Helvitica' font_size=6 height=0.7in]; column ("Outcome" varno) total ("Quarter" fill1-fill4); define varno /" " order order=internal ' ' format=ofmt. style(header)=[bordertopcolor=CXE2E2E2] style(column)=[font_weight=bold just=left width=495vjust=b]; define total/'N' style(header)=[bordertopcolor=CXE2E2E2] style(column)=[width=90 just=center vjust=b rightmargin=10]; define fill1/'1' style(header)=[bordertopcolor=CXE2E2E2] style(column)=[color=white width=125]; define fill2/'2' style(header)=[bordertopcolor=CXE2E2E2] style(column)=[color=white width=125]; define fill3/'3' style(header)=[bordertopcolor=CXE2E2E2] style(column)=[color=white width=125]; define fill4/'4' style(header)=[bordertopcolor=CXE2E2E2] style(column)=[color=white width=125]; run; quit; *The define statements are column specific so any style changes must be done to all columns; b a b c a b c d c* e e e d
4. Sparklines * Macro to create sparklines; %macrotrends; %let y=330; /* Starting y value for ODS Region */ %do i=1 %to 5; axis1 label=none major=none minor=none style=0 value=none order=(1 to 4 by 1); axis2 label=none major=none minor=none style=0 value=none; symbol1 c=gray i=join l=1 w=1; symbol2 c=gray i=join l=1 w=1; symbol3 c=black i=join l=1 w=3; symbol4 c=vig v=dot h=2; pattern1 c=white v=solid; pattern2 c=ligr v=solid; ods region width = 2.75 in height =0.75 in x=1050 y=&y; proc gplot data=dummy (where=(varno=&i )); plot (firstq thirdq allavg hospavg)*q/areas=2 overlay vaxis=axis2 haxis=axis1; run; quit; %let y=%sysevalf(&y + 160); *Adds to the y value so the next sparkline plot falls under the previous one.; %end; %mend trends; goptions device=gif transparency; %trends;
5. Pictures goptions device=tiffp noborder transparency; ods region width=1.14 in height=0.4 in x=1500 y=1150; filename logo <filepath>.tif"; procgslideiframe=logo cframe=vig imagestyle=fit; run; quit; *cframe changes the color of the border around the picture and imagestyle=fit forces the image to fit in the region provided