Download
1 / 87
870 likes | 897 Views
Chassis / Drive Train 101. Tom Milnes Team 2199 Systems Mentor Principal Mathematician JHU/APL. Chassis / Drive Train. Chassis / Drive Train are foundational elements of your robot Without the chassis you have no where to place manipulators / drive system and electrical components

E N D
Chassis / Drive Train 101 Tom Milnes Team 2199 Systems Mentor Principal Mathematician JHU/APL
Chassis / Drive Train • Chassis / Drive Train are foundational elements of your robot • Without the chassis you have no where to place manipulators / drive system and electrical components • Without drive train the robot doesn’t move • Impossible to score any points • Often it is possible to score points by moving past a line in autonomous
What is a Chassis / Drive Train? • Chassis (Merriam Webster Online) • The supporting frame of a structure (as an automobile, television, or robot) • Drive Train (Mr. Milnes’ Definition) • The assembled parts including motors, gearboxes, gears, chains, belts, wheels that make a vehicle move
Chassis The Foundation for Everything!
Chassis Shape • Rectangular is the #1 choice of FIRST teams • Simple to construct yet gives plenty of options • Biggest decision is • Narrow Robot – Wheels placed on longest sides • Wide Robot – Wheels placed on shortest sides Direction of Travel Direction of Travel
Narrow or Wide? • Depends on the Game Being Played • Want chassis that will allow you to score the greatest number of points / game • Need to figure out your game strategy / manipulators to implement first • Example 2014 Game • Had a 24” diameter ball which you probably wanted to get on your robot so you could transport it and score it in a goal • Had a perimeter limit of 112”
Narrow or Wide? 1” 25” 24” 27” 2 x 27” + 2 x w <= 112” Max Perimeter w <= 29”
Narrow, Wide, Square? • Everything being equal here are Pros / Cons for Narrow / Wide • Narrow • Harder to block going forward but harder to block other robots • Can segment robot into manipulator section (FWD) and electronics / pneumatics section (AFT) • Less precise turning but quicker • Will pick up fewer objects at a time (objects back to back) • Wide • More precise turning but slower • Manipulator section in center of robot electronics / pneumatics on side • Easier to block other robots and vice versa • Will pick up more objects at a time (objects side to side) • Square • Game element is large and with comparable length and width
Chassis Material • Must be strong enough to hold everything else in place • Must be light enough so you can add drive train and manipulators and stay within weight limit (120 pounds) • Options • Steel – Strong but Too Heavy! • Wood – Light but Too Fragile! • Aluminum – Just Right!! • Exotica – Graphite, Fiberglass, … • Not a good idea for an inexperienced team! • Not a good idea if you haven’t mastered the technology in the offseason (including reliability testing) • Must be able to be repaired!
Chassis – Custom or COTS? • Custom • Machined from CAD drawing • Constructed by hand from square or rectangular tubing • COTS – Commercial Off The Shelf • Robot Parts or Manufacturing Retailers • 80-20 - https://8020.net/ “Industrial Erector Set” • AndyMark - http://www.andymark.com • Vexpro - https://www.vexrobotics.com/vexpro
Custom-CAD? • Machined from CAD drawing – ONLY IF • You have several CAD experts • You have a dedicated machine shop that works quickly • You have successfully done this in previous years or in the offseason
Custom-By Hand? • Constructed from square, rectangular and C channel aluminum tubing which is hand drilled • Quickly available at Home Depot except C-Channel • Not recommended – slow to build and imprecise Square and Rectangular C Channel
COTS Chassis Parts • Dedicated Robotics or Engineering supplier • Recommended for rookie, inexperienced, small or under-resourced teams • Lots of good options from • 80-20, AndyMark, Vexpro
80-20 Chassis Parts 1010 Profile 80-20 1”x1” profile .51 pounds / ft Generally utilizes ¼”-20 bolts for fastening but has #10-32 options 80-20 Robot Chassis
80-20 Fastening 100’s of fastening Options with 80/20 T-Nut
80-20 Parts 80-20 has parts for chassis and manipulator construction including L-Bracket Pivoting Assembly Roller Set (Linear Motion) And 1000’s more!
AndyMark Chassis Parts – Rev Robotics* Extrusion 4’ Rev Robotics 1” Extrusion 1”x1” profile .44 pounds / inch Uses #10-32 bolts with jam nuts (#10 = .2”) *Founded by Greg Needel – FIRST Chesapeake Alumni http://www.revrobotics.com
AndyMark Chassis Parts – Rev Robotics* Extrusion Rev has parts for chassis and manipulator construction including L-Bracket Linear Motion Pillow Block And 10’s more, but several which are made specifically for FRC
AndyMark Chassis Parts – C-Channel Also 72” C-Channel am-3052 30” C-Channel am-2222 .41 pounds / ft .43 pounds / ft • ¼” holes every 1”, 1/8” thick • 1.25” x 1.125” exterior profile • 1” x 1” interior profiles – plays well with 80-20 or Rev 1” Extrusion
AndyMark Chassis Parts – Nano Tubes • Combines chassis, gearbox (single speed only), and chain/gears/belts • However interior free versions are available • Comprise the inner two rails in a rectangular drive system • Come in 20” and 31” sizes, with two motor inputs • Linear density of about .9 pounds / foot for chassis components
AndyMark Chassis Parts – Nano Tubes 31 Inch Nano Tube Chassis Only 31 Inch Nano Tube Gear Drive 20 Inch Nano Tube Chained Drive
AndyMark Chassis Parts – Nano Tube Robot* *Outer Chassis Required
AndyMark Kit Chassis Options AndyMark C-Base AndyMark AM14U 9 pounds 11.3 pounds for max size Both Kits have holes that cause the center wheels in 6 wheel tank drives to be lower than forward and rear wheels
VexProVersaChassis No kit available but all the parts! Plays well with VexPro equipment Requires lots of drilling For Wheels and Gearboxes 2”x1” VersaFrame Stock .66 pound / ft .1”thick walls Uses #8-32 (.177”) bolts and nuts Lighter duty compared To 80-20 or AndyMark
Chassis Pan • Placing a rectangular sheet on the bottom of the chassis adds to rigidity of frame and is a good mounting location for battery, electrical components, Robo-Rio, Compressor, Air Tanks, …
Chassis Pan Options White Pegboard AndyMark PVC Pegboard ¼” holes every inch Approximately $3.5 / sq. ft. ¼” holes every inch $1 / sq. ft. at Home Depot Both are electrical insulators
Open Chassis • If the game requires you to pick up game pieces off the floor an open chassis is a good option. • You’ll probably need some way to reinforce the open end of the robot so both sides don’t wiggle • Stuff that would have gone in chassis pan need to be placed elsewhere, ideally light weight stuff X
Open Chassis • Stuff that would have gone in chassis pan need to be placed elsewhere, ideally light weight stuff • Vertical mounting planes preferable to horizontal
Center of Mass • Robot naturally translates and rotates about its center of mass • The 3-D balance point • Stability and Mobility increases when CM is low and centered • Put light parts high as needed • Keep heavy parts low Battery motors pump, etc. Ms. Mobile Battery motors pump, etc. Mr. Tippy
Center of Mass • Ideally for a closed chassis robot battery would be in the center of the robot on the chassis pan • If not possible (many open chassis designs) compensate by moving other heavy objects to counterbalance battery • For instance drive gearboxes and motors • Always keep battery low!!
Chassis Summary • Choose Narrow or Wide Chassis based on your chosen game strategy / chosen manipulators • Construct chassis out of aluminum parts • Choose COTS or Custom (CAD / Machine Shop) based on your team’s experience level • Avoid trying something you haven’t already done in previous years or in the offseason • Place pan at bottom of chassis for mounting stuff if closed chassis • Consider open chassis when game pieces are on floor • Place electronics / pneumatics on vertical planes • Keep center of mass low and centered
Drive Train Let’s Make That Robot Move!
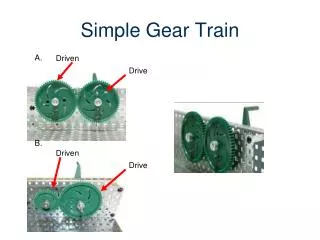
Drive Train – Components • Motors • Converts electrical power to mechanical power at low torque and high speed • Gearbox • Converts mechanical power to higher torque and lower speed • Chain, Belt, or Gears • Transmits mechanical power to wheels • Wheels, Tracks • Rotate to move the robot
Drive System - Motors • CIM • #1 Choice – Rugged and made for continuous usage • Other alternatives • RS 775 or 550 with CIM-ile adaptor or Mini-CIM • Used when some CIMs are needed for heavy duty manipulators • Used to increase robot traction if not needed for manipulators CIM Motor RS 550 CIMile Mini CIM
Drive System - Gearboxes • COTS • AndyMark and VexPro • Single Speed or Dual Speed (shifting) • 2 or 3 motor versions • Custom • Only if you have already built one in the off-season • Can have parts custom machined quickly • Not recommended for small, rookie, or inexperienced teams!!
Single Speed vs. Shifting • Single Speed Gear Boxes are simpler • But you have to choose a single speed / torque range • Fast speed and low torque – offensive robot • Medium speed / medium torque – compromise robot • Low speed / high torque – defensive robot • Shifting is more complicated because of the need for pneumatic or electrical actuators • But can shift from high speed / low torque to low speed / high torque • Can play offense and defense equally well
AndyMark Single Speed Gearboxes LJ Bevel Box CIMple Box Toughbox Mini $110 $59 $89 Nano Tube 31 Nano Tube 20 EVO Slim 2 $286 $281 $129
AndyMark • Lots of Choices • AndyMark gearboxes generally use US Digital Encoders • US Digital encoders can be finicky!!
US Digital Encoder • Some people swear by them! • Some people swear about them! $42
VexPro Single Speed Gearboxes Single Speed Double Reduction Single Speed Single Reduction 2 CIM Only $60 $65 Single Speed West Coast Drive $90
VexPro SS Gearboxes • Not as heavy duty as the Toughbox • Support long shafts!! • But very affordable!! • Use Greyhill 63R Mechanical Encoder • Very reliable and easy to use $56
VexPro Single Reduction Clamping Gearbox • Have to use 1” x 2” Versaframe tube or equivalent. • If so, may be a good choice in a single speed gearbox since it is very light
AndyMark Shifting Gearboxes Extremely Rugged Designs • Sonic Shifter • 2 CIM only • Multiple Gear Ratios • Sells for $279 • Super Sonic Shifter • 2 or 3 CIM • Simple Rectangular • Bolt pattern • Fixed High / Low • Ratios • Sells for $319 • EVO Shifter • 2 or 3 CIM Variants • Machined to AM14U • Bolt Pattern • Multiple Gear Ratios • Sells for $325
AndyMark Shifting Gearboxes • Very Heavy Duty • Typically don’t need shaft support • Use US Digital Encoders • Light Duty • Servo and Pneumatic Shifting • Servo will not support shifting on the fly
VexPro Shifting Gearboxes West Coast Products Dog Shifter 3 CIM Ball Shifter $110 $240 More Affordable than AndyMark two speed shifters, but lighter duty
VexPro Shifting Gearboxes • Not as heavy duty as AndyMark • Very attractively priced • Will have to support long shafts! • Pneumatic Shifting Only • Guaranteed shift on the fly • Uses Mechanical Greyhill 63R Encoder • Very reliable and easy to use
Power Transmission • Belts • Efficient and grease free • Can’t change length • Use either canned design (AM14U) or be very precise in designing (flexible wheel location) • Requires pulleys that match belts used • Chains • Can “break chain” to change length • Difficult to get perfect length even using half links -> • Chain Tensioner • Axle Position Adjuster • FRC Specific • Pillow Blocks
Chain Tensioners Ring or Sprocket Tensioner Floating Chain Tensioner Adjustable Arm Chain Tensioner Available at McMaster Carr https://www.mcmaster.com The “Industrial Wal-Mart”
Axle Position Adjusters for FRC 221 Robotics RockBox Chassis VexPro Drive Bearing Block Cam Bolt