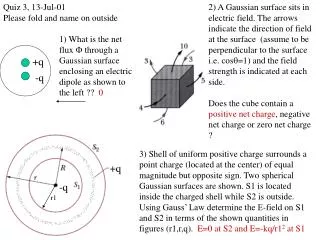
Download

1 / 22
240 likes | 527 Views
Under the Surface: Creating Accurate Surfaces in Civil 3D. Scott Wagner, P.E. Business Development Manager. Introduction. Who am I? Why this is important to me? Poll Handouts/Questions Objectives. Objectives. Understand how to make a surface in Civil 3D

E N D
Under the Surface: Creating Accurate Surfaces in Civil 3D Scott Wagner, P.E. Business Development Manager
Introduction • Who am I? • Why this is important to me? • Poll • Handouts/Questions • Objectives
Objectives • Understand how to make a surface in Civil 3D • Understand the theory behind making a surface in Civil 3D • Understand how to perform surface edits • Understand how to apply surface masks • Understand an overall strategy on how to create an accurate surface.
Agenda • Differences between Land Desktop Surfaces and Civil 3D Surfaces • Create a Surface from Point Group • Types of Surfaces • Create a Surface from Contours, Point Files & DEM • Surface Evaluation Process
Under the Surface: Land Desktop vs. Civil 3D I’ll Race You….And I’ll Win!
Under the Surface: Land Desktop vs. Civil 3D Land Desktop 2007 Demonstration
Under the Surface: Create a Surface from Point Groups Creating and Viewing Surfaces in Civil 3D
Under the Surface: Create a Surface from Point Groups Civil 3D 2007 Demonstration
Under the Surface: Types of Surfaces Tin Surface, Grid Surface and Volume Surfaces
Contour Line 543 TIN Lines TIN SurfaceThe Most Common Surface Type • TIN surfaces provide an accurate surface model that is widely used. • TIN Surface- Triangular Irregular Network. A TIN surface is the most common method of interpolating elevation data. The points are connected into triangles that are used to interpolate for contours, and to generate profiles and cross-sections. The lines that make up the surface triangulation are called TIN lines. (Civil 3D Help) 543.5 543.5 542.0 542.5
Grid SurfaceThe Other Method • Grid surfaces provide an accurate surface model that is largely used with DEM files. • Grid Surface- A type of surface created from a DEM or SDTS file, or imported from a LandXML file. A grid surface consists of a sampled array of elevations for a number of ground positions at regularly spaced intervals. (Civil 3D Help) “…It is a grid spaced surface in which each regularly spaced cell is assigned a single elevation.” (Autodesk Education Curriculum for Civil 3D 2006)
Volume SurfaceThe Surface needed to do Volume Calculations • Volume Surfaces can either be TIN or Grid. • TIN Volume Surface- A differential surface created from a composite of points based on base and comparison surface. (Civil 3D Help) • Grid Volume Surface- A differential grid surface based on user-specified base and comparison surfaces. The grid method of volume calculation measures the difference in elevation between two surfaces at each intersection in a user-defined grid. (Civil 3D Help)
Under the Surface: Create a Surface from Contours, Point Files, and DEM Files Time to go Deeper
Under the Surface: Create a Surface from Contours Civil 3D 2007 Demonstration
Under the Surface: Create a Surface from a Point File Civil 3D 2007 Demonstration
Under the Surface: Create a Surface from a DEM File Civil 3D 2007 Demonstration
Under the Surface: Surface Evaluation Process A good process yields good results.
Surface Evaluation Process • Create the Surface • With TIN lines on, View the Surface in 3D to look for Spikes • Use Contours, Flow Arrows and Gradients to Verify Slopes • Look at Boundary Conditions – Add boundaries where Needed • Look for Areas where Breaklines can be Added
Surface Evaluation Process (cont.) • Look for Flat Areas, or where Triangles edges need to be Swapped • Apply Masks for Better Performance • Peer Review • Export to Land XML for Archive of Finished, Ready to use Surface
Conclusion • Differences between Land Desktop Surfaces and Civil 3D Surfaces • Create a Surface from Point Group • Types of Surfaces • Create a Surface from Contours, Point Files & DEM • Surface Evaluation Process
Contact InformationScott Wagner, P.E. • E-mail Address scott.wagner@ideateinc.com • Ideate Website Address www.ideateinc.com • Additional Civil 3D Webcasts www.ideateinc.com/ideas/webcasts.html