Download
1 / 25
270 likes | 293 Views
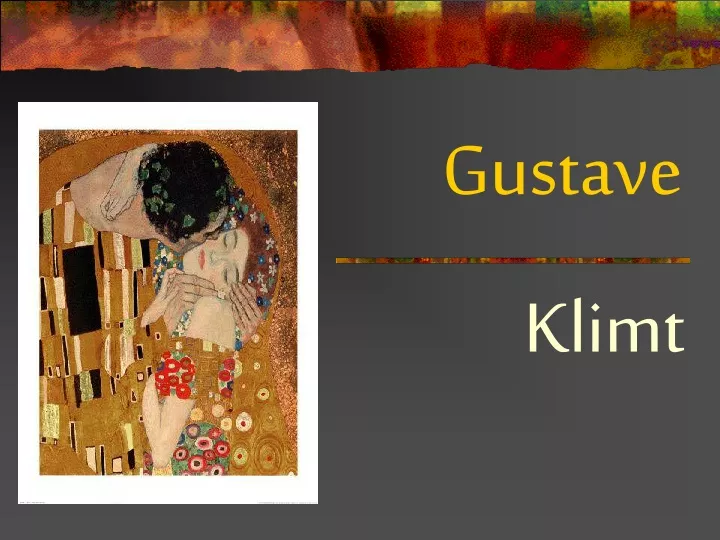
Gustave. Klimt. Who was Gustave Klimt?. An Austrian painter Responsible for founding the Austrian school of painting known as the Vienna Secession In the 1880s and 1890s he produced murals for public buildings. Who was Gustave Klimt?.

E N D
Gustave Klimt
Who was Gustave Klimt? • An Austrian painter • Responsible for founding the Austrian school of painting known as the Vienna Secession • In the 1880s and 1890s he produced murals for public buildings
Who was Gustave Klimt? • Experimented with fantastical imagery and bold, decorative styles • Rebelled against the traditional academic art style and became part of the Art Nouveau movement
Elements of Design • Line
Elements of Design • Line • Shape
Elements of Design • Line • Shape • Colour
Principles of Design • Pattern
Principles of Design • Pattern • Movement
Principles of Design • Pattern • Movement • Variety
Principles of Design • Pattern • Movement • Variety • Unity
The Style of Gustave Klimt • characterized by his use of organic, ornamental shapes and patterns, and his use of gold and silver colours
Your Art Assignment • You will use Klimt’s work “Tree of Life” as your inspiration for your artwork
Step One • Create a drawing with pencil that incorporates an ornamental, decorative tree as the base for your work • Use the piece of white drawing paper provided
Step Two • Design the patterns of shapes that will overlay on the trunk, branches and the ground below the tree
Step Three • Place your pencil drawing over the Scratch Board provided • Attach at the top and bottom with a tiny piece of tape • Trace the drawing. The image will transfer onto the black surface • Remove the drawing paper
Things to Remember • Use a creative and decorative line pattern when designing your tree
Things to Remember • Use a creative and decorative line pattern when designing your tree • Patterns of shape and line will add the interest to your final work, so use a variety
Things to Remember • Use a creative and decorative line pattern when designing your tree • Patterns of shape and line will add the interest to your final work, so use a variety • Craftsmanship is very important, take your time to create a pleasing composition
Things to Remember • Use a creative and decorative line pattern when designing your tree • Patterns of shape and colour will add the interest to your final work, so use a variety • Craftsmanship is very important, take your time to create a pleasing composition • Fill the space
Step Four • Using a pointed stylus tool, begin to scratch in your design. • The scratch marks will reveal the gold underneath the black • BE PATIENT AND WORK CAREFULLY TO HAVE THE BEST RESULT. • Put your name on the back, very lightly, so that it does not show through on the front.