Download
1 / 45
960 likes | 2.27k Views
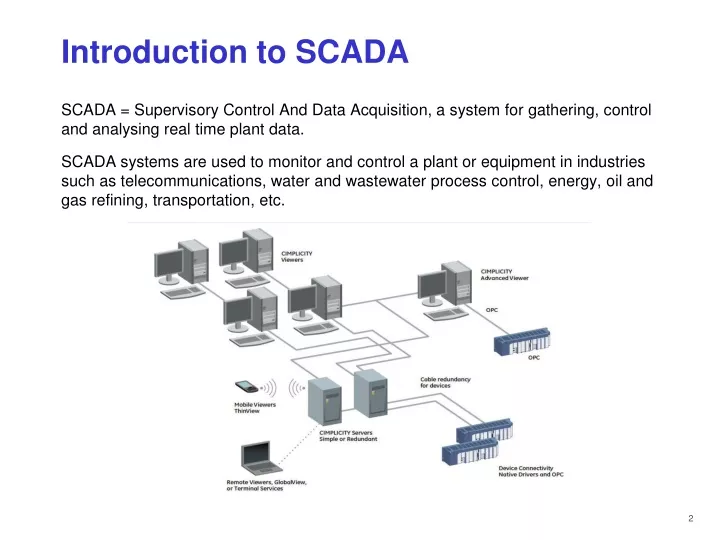
Introduction to SCADA. SCADA = Supervisory Control And Data Acquisition, a system for gathering, control and analysing real time plant data.

E N D
Introduction to SCADA SCADA = Supervisory Control And Data Acquisition, a system for gathering, control and analysing real time plant data. SCADA systems are used to monitor and control a plant or equipment in industries such as telecommunications, water and wastewater process control, energy, oil and gas refining, transportation, etc.
Introduction to iFix HMI/SCADA • Scallable and Fully Networked HMI/SCADA : • Data Acquisition • Data Display • AlarmManagement • Trending • Database Logger • Scripting • Recipe • Network
System Architecture Based on Client-Server architecture : • V = Viewer (iClient) • Connect to Server • Monitor and Control • S = Server • Has all Viewer Functionality • Data Collection from Industrial Controller • Data Calculation and Data Storage • Development • C = Industrial Controller Server and Viewer can be easily networked together to seamlessly share data.
Project Components Project Picture Database System Config Controller IO Driver Controller Controller Each iFIX Project must (at least) contains of above components.
Creating Project - Steps • System Configuration • Database Configuration • Picture Development • Alarm Configuration • Trend Configuration • Security Configuration • Introduction to Script (VBA) • Backup and Restore • Application Shortcut
System Configuration – Creating New Project Access : Start | Proficy HMI SCADA – iFIX 5.5 | System Configuration Steps : • File | New • Configure | Path • Configure | SCADA • Configure | Task • Configure | Local Startup • File | Save
System Configuration – 1. Path Configuration Configure place to hold project files. Steps: • Change Project Path • Click “Change Project” button • Answer “Yes” for Generate iFIX Default Files • Answer “Create All” for next dialog • Answer “Proceed” for next dialog • Wait until finish and path configuration will be closed project path change project
System Configuration – 2. SCADA Configuration Configure Protocol. Steps: • Enable the SCADA support • Click the IO Driver to select Driver • Click OK when IO Driver selected • Ignore others entries • Click OK when all drivers are selected select driver • Answer “Yes” when this dialog appeared
System Configuration – 2. SCADA Configuration In most cases, you need Simulation Driver (SIM & SIM2) for these purposes : • Simulation / Internal (Local) : 0000 – 9999 (analog) or register:bit (digital) • Random Value : RG • Ramp Value : RA
System Configuration – 3. Task Configuration Configure tasks to be started when project are started. Some default listed tasks are mandatory, can not be eliminated, such as : IOCNTRL, WSACTASK, SUMQDEL. There is one mandatory task that we have to add into the list : WORKSPACE. • Select the filename Find WORKSPACE.EXE • Set the Start Up Mode to Normal • Click Add button to confirm • Click OK when finish
System Configuration – 4. Local Start Up Configure Node Name and Project Configuration File. Steps : • Local Node Name : Node Name (Mandatory, max 8 chars) • Logical Node Name : optional, for redundancy purpose • Configuration File : project configuration file, * should be located at <project folder>\LOCAL, * should be named as project name, * always has SCU extention. • Ignore the other options • Click OK when finish • Click yes when this dialog appears.
System Configuration – 5. Save Config File • You should always save the config file under \<Project>\Local folder • Named the config file as same name as your project name LOCAL folder Filename
Database Block – Fundamental Database = Central repository that manages : Data Acquisition, Alarm, Analog Scaling. Another popular term is TAG. In most cases, iFIX uses term BLOCK.
Database Block – Block Fields All block fields use a common naming convention: format _ name The name indicates the specific information in the field. For example, the current value of a block is identified by the name:CV The format indicates the type of data that the field stores. The following table lists the available formats: The combination of the field format and the field name provides you with the information you want. For example, if you want the current value of a block displayed as a number, you select the field F_CV. If you want the current value of a block displayed as text, you select the field A_CV.
Primary tools for Database = Database Manager Set the Option as follows : Database Block – Tools Clik here for option Save database exit On Scan after modify Auto refresh
Database Block – Creation Steps: • Click Add or (Ctrl-A) • Select block type : Analog Alarm • Fill TagName and I/O Address • Click Save
Database Block – Delete Steps: • Select block that you want to delete • Click Delete • Answer YES to delete or CANCEL to cancel
Database Block – Modify Steps: Select block that you want to modify Click Modify The Block Definisiwil be appeared, modify necessary field Click Save to Save.
Picture Development – Workspace In iFix, Screen that contains symbol and other visual object is called PICTURE. WORKSPACE, is the integrated tools for Picture Development. Besides picture development, from Workspace we can access other tools, such as : Database Manager, I/O Driver Configuration, Alarm History Viewer, Electronic Books, etc. Ribbon Menu Picture Area System Tree
Picture Development – New Picure Steps: Right Click On Picture, select New Picture Select ‘Create Default Untitled Picture Click Finish
Picture Development – Mode Switching In Workspace, there are 2 ModesSteps, RUN and CONFIGURE : You can set AUTOSAVE for pictures when switch to RUN MODE : Home Menu, Settings, User Preference Check ‘Auto Save Documents……’ Click OK when finish
Picture Development – Basic Configuration User Preference Auto Save – Ribbon Interface Toolbars
Picture Development Displaying Numeric Data DataLink Object : F_CV : Floating Point Format
Picture DevelopmentDisplaying ASCII/String Data DataLink Object : A_CV : ASCII Format
Picture DevelopmentManipulating (DataEntry) Tag Value DataLink Object : F_CV : Floating Point Format Select Data Entry Type
Picture Development Push Button Click Animation Click Animation Available Actions Tag Selection
Picture Development Color Animation Place a Oval or Rectangle shape Foregound Color Tag Selection
Picture Development Fill Percentage Animation Place a Rectange shape. Tag Selection Fill Percentage
Picture Development Movement-Position Animation Place a Rectange shape. Tag Selection Movement
Picture Development Movement-Rotate Animation Place a Rectange shape. Tag Selection Rotate
Picture Development Visibility Animation Place a Oval shape. Tag Selection Visibility
Alarm ConfigurationTag Settings Use Database Manager to Configure Alarm Enable Alarm Alarm Condition
Alarm ConfigurationDisplaying Alarm Summary Use Alarm Summary to Display Alarm Alarm Summary
Trend ConfigurationReal Time Trending Use Standard Chart to display realtime trend. Refresh Rate Tag Selection
Trend ConfigurationHistorical Trending Open the Historical Assignment Configuration Set the Cyclic Period and Purging Days
Trend ConfigurationHistorical Trending From Group | Add, Open the Group Configuration. Log Rate TagName
Trend ConfigurationHistorical Trending Open the Mission Control. Start HTC Task. Add HTC.EXE task to Task Configuration as background process
Trend ConfigurationHistorical Trending Select the Tags from Historical tab
Security ConfigurationConfiguration Editor Can be accessed from SCU or System Tree Configuration Editor
Security ConfigurationConfiguration Steps Steps : User Account : Create New User User Account : Assign Group Membership User Account : Assign Security Area User Account : Assign Application Features Configuration : Enabled Security Option AutoLogin : Add User Security Area (Optional) Save New User Group Membership App. Features Security Area
Security ConfigurationConfiguration Steps Enabled Security AutoLogin
Security ConfigurationImplementing : Database (Tag) and Picture Tag Setting Tag Access Error Picture Setting Picture Access Error
Introduction to Script (VBA) How to Explore : Place one Push Button and assign Toggle Digital Tag Right click the Push Button and select Edit Script To Explore more deeply, open the iBook from Help | iFix Automation Help.