Download
1 / 13
140 likes | 205 Views
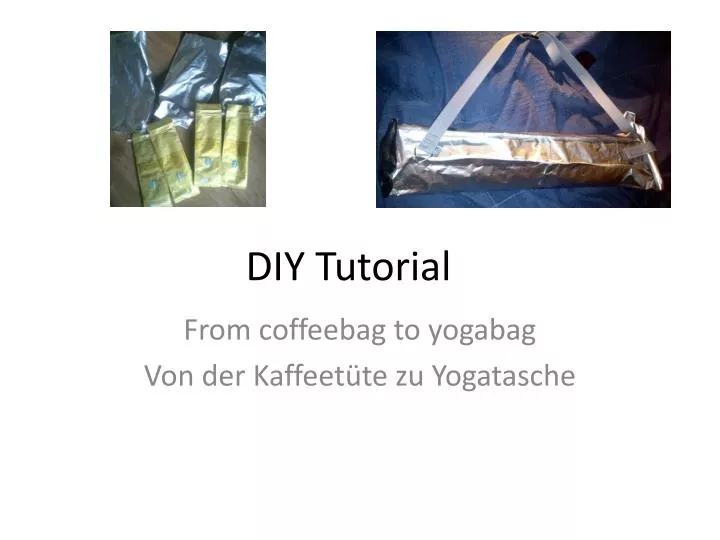
DIY Tutorial. From coffeebag to yogabag Von der Kaffeetüte zu Yogatasche. Prepare your coffeebags Bereite deine Kaffeetüten vor. collect coffeebags , cut them to have them plain and wash them to get them clean and fatfree .

E N D
DIY Tutorial Fromcoffeebagtoyogabag Von der Kaffeetüte zu Yogatasche
PrepareyourcoffeebagsBereite deine Kaffeetüten vor collectcoffeebags, cutthemtohavethemplainandwashthemtogetthem clean andfatfree. sammel Kaffeetüten, schneide sie auf, so dass sie glatt sind und spüle sie ab, so dass sie sauber und fettfrei sind.
youneed a pieceofat least 35 to 15 inchestoget a roll bigenoughforyouryogamat. du benötigst eine Fläche aus Folien von mindestens 90 mal 40 cm damit es als Rolle für deine Yogamatte reicht.
HowtofusefoilsWie werden Folien verschweißt The shinysilverinsideofthefoilis easy tofusewithheatandpressure, not the outside - theonewiththeprint. So heatyouriron. Tofusethefoilstogether, layonefoilwiththeinsideup on yourironingboard. Die silbern glänzende Innenseite verschmilzt unter Druck und Hitze mit einer anderen, aber nicht die Außenseite mit dem Aufdruck. Also heiz schon mal das Bügeleisen an. Um die Folien aneinander zu schweißen legst du eine mit der Innenseite nach oben auf das Bügelbrett.
Put a piece of baking parchment on this foil, so that you stil can see 1/2 inch of the foil for the seam. LegeeinStückBackpapier so darauf, dass du noch 1 cm sehenkannst. Das wirdderSaum.
Lay thenextfoil on top, withtheprintupside, so thatmakes a 1/2 inchseamwiththefoilbelow. Iron it, so it will fusetogetherlike a seamwithoutsewing.Lege nun die zweite Folie darauf, mit der bedruckten Außenseite nach oben, so dass sich ein Saum mit der unteren Folie ergibt. Bügele über diesen Saum, so dass er dort zusammen geschweißt wird.
Cut theseam clean, a smallseamisenoughtomakeit strong. But check theseamifitsreallyclose, sometimestheheat was not enough...thenyouneedtoiron ist again. Schneide den Saum mit einer Schere glatt ab, ein kleiner Saum (0,5 cm) genügt um die Naht stabil zu machen. Aber prüfe die Naht ruhig noch einmal, manchmal hat die Hitze nicht ausgereicht und muss nochmal übergebügelt werden.
Make an eyeletMach ne Öse You can make one or two eyelets to attach the strap at the end of the roll (one on each side). I made only one and stitched the other end of the strap on the other side of the roll. Du kannsteinoderzweiÖsen an den EndenderRolleeinfügen. Ichhabenureinegestanzt und das andereEnde des Gurtesfestgenäht.
I applied a triangular ring throughtheeyelettoaffixthestrap easy, withoutslipping. Ich habe einen dreieckigen Ring durch die Öse gezogen, damit ich den Tragegurt einfach befestigen kann, ohne dass es verrutscht.
Attachthe end ofthestrapwithcrossedseamstohavemoresustainability. Try toseamitclosetothe ring, toprovideitfromslippingtooneside (cornerofthetriangel). Nähe den Gurt mit mehreren gekreuzten Nahten an, so dass er stabil hält. Versuche möglichst nah am ring auch zu nähen, damit der Gurt nicht auf eine Seite (in eine Ecke des Dreiecks) rutscht.
Variable- Variabel I usedtwostraps, tohave a flexible lengthof it. On thestrap on theupsideofthe roll, which i seamed, is a ajustable buckle. Ich benutze zwei Gurte, damit ich die Gurtlänge einfach variieren kann. An der oberen Strippe, die ich festgenäht habe, ist eine verstellbare Schnalle angenäht.
Detail ofthelowerstrap. Just thinkofyourkindofthestrap, thereare so manywaytocarry a bag…Detail vom unteren Ende des Tragegurts. Überlege dir einfach, wie du deine Tasche tragen willst, es gibt so viele Möglichkeiten.
Readyandgo!Fertig und los! • I closedthisbagwith a singlesnap, othersarerolledandclosedlike a messengerbag. • Diese Tasche habe ich mit einem einzelnen Druckknopf geschlossen, andere habe ich gerollt und mit Klettverschluss verschlossen, wie eine Messengerbag.