Download
1 / 18
210 likes | 466 Views
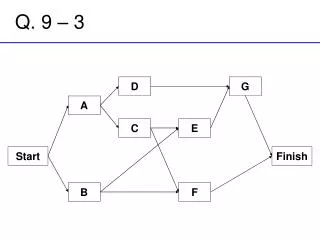
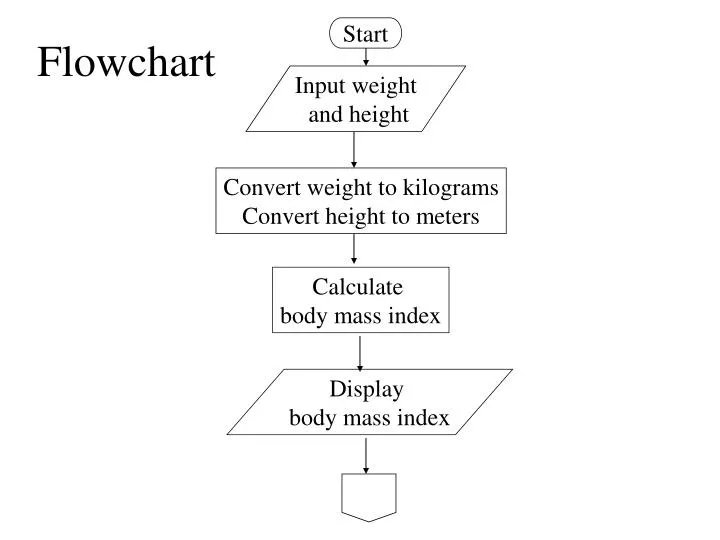
Start. Flowchart. Input weight and height. Convert weight to kilograms Convert height to meters. Calculate body mass index. Display body mass index. Is body mass > = 25?. No. Yes. Display “Normal”. Display “Overweight”. End. Hierarchy Chart. Body Mass Program.

E N D
Start Flowchart Input weight and height Convert weight to kilogramsConvert height to meters Calculate body mass index Display body mass index
Is body mass> = 25? No Yes Display “Normal” Display “Overweight” End
Hierarchy Chart Body Mass Program Input Height and Weight Calculate Body Mass Index Display Overweight or Not Overweight Convert inches to meters Convert pounds to kilograms Determine whether or not Body Mass Index >= 25
Pseudocode • Input height in inches and weight in pounds • convert height to meters • height in meters = height in inches / 39.37 • convert weight to kilograms • weight in kilograms = weight in pounds * .454 • Calculate body mass index • body mass index = weight / height2 • If body mass index >= 25 display “Overweight” Else display “Not Overweight”
Text Controls • Label control • displays text entered by the program designer • used for output or labeling components on the form • Text Box control • places text entered by the user on the form • used for input from the user • List Box control • displays a list of items • Combo Box control • combines features of list box and text box
Buttons • Command Button control • Places a button on a form that the user clicks to invoke an event • Option Button control • enables the user to make one selection from a group of choices • Check Box control • enables the user to turn an option on or off, or set values to true or false
Containers • Picture Box control • used to store a graphic image • Image control • used to place an image on the screen • the image can be clicked, like a command button, to invoke an event • Frame control • serves as a container for other controls. • used to visually separate related controls from other controls on the form
Image and Picture Boxes • Allow you to load up images from the disk and display on the screen • at design time • at run time
Loading Graphics at Design Time • Use the Picture property of • images • pictureBoxes • forms
Loading Graphics at Run Time • The LoadPicture function loads a new image into the Image or PictureBox control during run time • Example: • Image1.Picture = LoadPicture(“C:\pic\city.bmp”) • only a pointer to the file • image file name must include complete path • must remember to include graphics files with the application
PictureBox Control’s AutoSize Property • Determines whether a control is automatically resized to display it’s entire contents. • If set to True, the PictureBox dimensions adjust to the size of the contents.
Image Control’s Stretch Property • Setting the stretch property to true makes the size of the image conform to whatever size you set the Image control. • The default value, false, means the image control will take on the size of the image that is loaded into it.
Image vs. PictureBox Controls • Image controls stretch the image, picture boxes do not • Image controls use less computer resources • Image controls have fewer properties, events and methods • PictureBoxes can be used as container objects (allows other controls to be drawn inside of it) or to display output with it’s Print method. • picResults.Print “Hello World”
GUI Guidelines for Layout and Organization of the Interface • Make your design consistent with the Windows standards. • Have the information flow either vertically or horizontally, with the most important information located in the upper-left corner of the screen. • Use frames or white space to group related controls together.
GUI Guidelines for Layout and Organization of the Interface (cont.) • Limit the number of command buttons in the interface to six and put the most commonly used buttons first. • Command buttons should be either centered along the bottom of the screen or stacked in either the upper-right or lower-left corner of the screen.
GUI Guidelines for Layout and Organization of the Interface (cont.) • Identifying labels should be left-aligned and positioned either above or to the left of the control and should end with a colon. • Identifying labels, including captions, should be from one to three words only and should appear on one line.
Getting Help • Online help • MSDN Library for Visual Studio • Microsoft web site • http://msdn.Microsoft.com/vbasic/ • Additional texts • Beginning Visual Basic 6 by Peter Wright • Wrox Pres • ISBN 1-861001-05-3