Download
1 / 49
550 likes | 736 Views
Serial Communication. Presented by IEEE of Texas A&M. About This Workshop. Based on the MSP430G2553 microcontroller by Texas Instruments PowerPoint and code available at ieeetamu.org/mcc/ serialcomm Workshop Reference available at ieeetamu.org/mcc/wsref

E N D
Serial Communication Presented by IEEE of Texas A&M
About This Workshop • Based on the MSP430G2553 microcontroller by Texas Instruments • PowerPoint and code available at ieeetamu.org/mcc/serialcomm • Workshop Reference available at ieeetamu.org/mcc/wsref • Footnotes refer to User Guide (UG), Datasheet, or Workshop Reference (WSRef)
Import code projects into Code Composer • Follow instructions in the Workshop Reference or at ieeetamu.org/mcc/importing • Code: ieeetamu.org/mcc/serialcomm • Projects to import: • SPI - Serial Communications • UART - Serial Communications • PuTTY will be needed for the UART exercise. • You can download it for free at http://www.putty.org/
Extremely Useful Documents • User's Guide – MSP430x2xx Family • ieeetamu.org/msp430ug • All general MSP430 information • Ex: MSP430 Architecture, Instruction Set, Registers, clocks, timers, module types and functionality • This document is extremely useful for this workshop • MSP430G2x53 Datasheet • ieeetamu.org/msp430ds • Information specific to individual set of chips • Ex: List of included modules, pin-outs, memory size
Topics Covered • Parallel vs. Serial Communication • Serial Communication on MSP430 • Serial Peripheral Interface • Universal Asynchronous Receiver/Transmitter
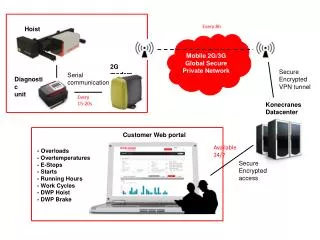
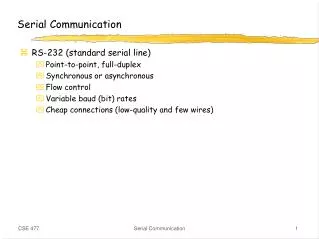
How do Digital Devices Communicate? • Parallel Schemes • Use of many transmission lines to send data bits simultaneously • Ex: SCSI, P-ATA, PCI, IEEE 1284 (Parallel Printers) • Serial Schemes • Use of a single transmission line to send data bits one at a time in series • Ex: Ethernet, S-ATA, USB, RS-232 Both methods use additional lines for non-data signals, depending on protocol
Serial vs. Parallel • Serial communication is used most often today due to lower cost, time-wise and space-wise • Parallel methods are still used when transmission speed or reduced complexity is a factor
Today’s Topic: Using a Serial Link on the MSP430 • The MSP430 chip is capable of multiple serial protocols • SPI: Serial Peripheral Interface • UART: Universal Asynchronous Receiver/Transmitter • I2C: Inter-Integrated Circuit • We will be focusing on the SPI and UART protocols in this workshop • We are using the Universal Serial Communication Interface (USCI) Module A0
Serial Peripheral Interface Open “spi_communication.c” in the project “SPI - Serial Communications”
Serial Peripheral Interface Pros of SPI: • Synchronous • Full Duplex • Capable of higher throughput than I2C • Low hardware cost for interfacing than parallel methods Cons: • No flow control or acknowledgment • No error checking • Relatively short links • More pins required than I2C • No hot plugging
Serial Peripheral Interface • Operates using a Master/Slave relationship with other devices • The Master sets the clock and determines when the transmission is started • Able to transmit to multiple slaves, but only able to listen from one at a time • The MSP430G2253 can act as either role • 4-Wire or 3-Wire bus • 4-Wire is used when there are multiple slaves • 3-Wire is used when there is no need for slave select signal
SPI Set-up For 3-Wire Mode: • CLK - Master SPI Clock • SIMO - Slave Input/Master Output • Transmits the register value from the Master to the Slave • SOMI - Slave Output/Master Input • Transmits the register value from the Slave to the Master This transfer happens simultaneously, one bit at a time.
SPI: How the data is sent between devices • Each time the Master pulses the clock, 1 bit is shifted from Master to Slave, and from Slave to Master. • This continues until all bits are swapped • This can be done either MSB first or LSB first
SPI Modes • The MSP430 has four SPI Modes • CKPL controls the polarity, or idle state. • CKPL = 0, the line idles low • CKPH controls the phase for reads and writes • CKPH = 1, write then read • This gives the four modes.
Exercise: Launchpad to Launchpad • We will be sending a byte from one MSP430 to another to instruct the LEDs to turn on or off. • Choose partners; one will have the master device and the other will be the slave device Connect the below pins between the Master and Slave
Exercise: Launchpad to Launchpad • Run the code! • Remember to change masterMode to 0 for the slave device • Each button press will send the next byte to the slave device and change the LED pattern on the slave
Setting up the State Machine Master Device Registers P1SEL = BIT1 + BIT2 + BIT4; P1SEL2 = BIT1 + BIT2 + BIT4; UCA0CTL1 = UCSWRST; UCA0CTL0 |= UCCKPL + UCMSB + UCMST + UCSYNC; UCA0CTL1 |= UCSSEL_2; UCA0BR0 |= 0x02; UCA0BR1 = 0; UCA0MCTL = 0; UCA0CTL1 &= ~UCSWRST; • UCA0CTL0 controls the polarity, phase, endianess, and master/slave select • UCA0CTL1 sets the clock source • UCA0MCTL must be set to 0 for SPI, it is unused.
Setting up the State Machine • UCCKPH – Phase Select • 0: Read then Write • 1: Write then Read • UCCKPL- Polarity Select • 0: Idle low • 1: Idle high • UCMSB: Endianess (direction of shifts) • 0: LSB • 1: MSB • UCMST: Master Mode Select • 0: Slave mode • 1: Master mode • UCSSEL_x: Clock Source Select (Used in CTL1) • 1: ACLK • 2: SMCLK • 3: SMCLK
Determining Clock Speed • UCA0BR0 and UCABR1 together make up the 16 bit prescaler value, BR1 is the upper byte and BR0 is the lower byte. • This prescaler divides the base clock speed to slow down the communication speed
Setting up the State Machine Slave Device Registers P1SEL = BIT1 + BIT2 + BIT4; P1SEL2 = BIT1 + BIT2 + BIT4; UCA0CTL1 = UCSWRST; UCA0CTL0 |= UCCKPL + UCMSB + UCSYNC; UCA0CTL1 &= ~UCSWRST; The Slave uses much of the same set up as Master except UCMST is 0 for Slave mode, and the clock is not configured.
Other Configuration • Enables the Receive Buffer Interrupt vector • Enables Pull-Up Resistor for P1.3, connected to the left-hand pushbutton. • -Remember this is used to tie the “floating” input pin when the button is not pressed • Enables the Port 1 Interrupt vector and clears the interrupt flag IE2 |= UCA0RXIE; P1REN |= BIT3; P1OUT |= BIT3; P1IE |= BIT3; P1IES |= BIT3; P1IFG &= ~BIT3;
Interrupt Vectors #pragma vector=PORT1_VECTOR __interruptvoid Port_1(void) { while (!(IFG2 & UCA0TXIFG)) {}; UCA0TXBUF = masterData; masterData++; if(masterData > 0x03) masterData = 0x00; __delay_cycles(100000); P1IFG &= ~BIT3; }
Interrupt Vectors #pragma vector=USCIAB0RX_VECTOR __interruptvoid USCI0RX_ISR (void) { char data = UCA0RXBUF; switch (data % 4) { // Switch statement for displaying bits // on the Red and Green LED based on // received data } }
Exercises to Try: • Return data to the Master device from the Slave • Implement and use blinkLEDs(char data) • Replace showLEDs(chardata) in the interrupt vector • Make LEDs blink/toggle faster or slower based on data
Return data to the Master Device #pragma vector=USCIAB0RX_VECTOR __interruptvoid USCI0RX_ISR (void) { chardata = UCA0RXBUF; showLEDs(data); if(masterMode == 0){ while (!(IFG2 & UCA0TXIFG)) {}; UCA0TXBUF = masterData; } __delay_cycles(100000); }
Implement and use blinkLEDs(char data) voidblinkLEDs(char data){ P1OUT ^= BIT0 + BIT6; switch (data % 4) { case 0: _delay_cycles(250000); break; case 1: _delay_cycles(200000); break; case 2: _delay_cycles(150000); break; case 3: _delay_cycles(100000); break; default: _delay_cycles(500000); break; } }
Implement and use blinkLEDs(char data) • #pragma vector=USCIAB0RX_VECTOR • __interruptvoid USCI0RX_ISR (void) • { • char data = UCA0RXBUF; • blinkLEDs(data); • if(masterMode == 0){ • masterData = data; • } • __delay_cycles(100000); • }
Universal Asynchronous Receiver/Transmitter Open “uart_communications.c” in the project “UART - Serial Communications”
Universal Asynch Receiver/Transmitter • Asynchronous • Non-shared Clock • Can be simplex, full duplex, or half duplex • Either UART can control when a frame is sent • No master/slave relationship • Can interface a parallel bus into a serial link without additional hardware
UART • The few transmission lines between UARTs allow for longer link distances
UART For asynchronous communication, each partner must agree on the following: • Duplex mode - simplex, half, or full duplex? • Bits per character - 5, 6, 7, or 8 data bits? • Endianess - MSB or LSB first? • Baud rate - # of characters per second • Parity used - None, odd, or even parity • Number of Stop Bits
UART Error Checking • Overrun Error: • Occurs when the newly received bit overwrote the previous one before it was read • Framing Error: • Occurs when the start or stop bits are invalid. Usually when the stop bit is missing or corrupted • Parity Error: • Occurs when the parity bit does not match the received data.
UART: How the data is sent between devices • Sends character in a frame • A start bit, data bits, optional parity bit, and one or more stop bits • The Start bit signals a change from line idle, generally high to low. • The Stop bits signal the return to idle after the data bits are sent, generally high.
Exercise: Launchpad to PC • The MSP430 communicates with your PC through the COM port when connected via USB. • PuTTY can be used to send a character to the microcontroller and show the response.
Configure the Launchpad • The jumpers for the TX and RX pins (top right bank) need to be rotated 90 degrees to set up the hardware UART connection through USB
Configuring PuTTY • Configuration of PuTTY: • The exact COM port is found on the Windows Device Manager
Exercise: Launchpad to PC • Run the code! • Run PuTTY and connect to the correct COM port • As you type into the terminal, the next character will be returned and displayed.
Setting up the State Machine P1SEL = BIT1 + BIT2; P1SEL2 = BIT1 + BIT2; BCSCTL1 = CALBC1_1MHZ; DCOCTL = CALDCO_1MHZ; UCA0CTL1 |= UCSSEL_2; UCA0BR0 = 104; UCA0BR1 = 0; UCA0MCTL = UCBRS0; UCA0CTL1 &= ~UCSWRST; IE2 |= UCA0RXIE;
Setting up the State Machine • BCSCTL1 and DCOCTL set the clock speed to 1MHz • UCA0CTL0 controls parity settings, endianess, character length, stop bit settings • UCA0CTL1 controls clock source • UCA0MCTL controls the modulation of the input signal • This helps to compensate for differences in baud rates
Setting up the State Machine • UCPEN – Parity Enable • 0: Parity disabled • 1: Parity enabled • UCPAR: Parity Select • 0: Odd Parity • 1: Even Parity • UCMSB: Endianess (direction of shifts) • 0: LSB • 1: MSB • UC7BIT: Character Length • 0: 8 Data bits • 1: 7 Data bits • UCSPB: Stop Bit Select • 0: One Stop Bit • 1: Two Stop Bits • UCSSEL_x: Clock Source Select (Used in CTL1) • 1: ACLK • 2: SMCLK • 3: SMCLK
Determining UART Clock Speed • The prescaler value is determined much like for SPI, but it is easier to calculate based on the required baud rate (clock speed) • If the value is a non-integer, round to the nearest integer and use UCA0MCTL modulation if necessary
Interrupt Vector #pragma vector=USCIAB0RX_VECTOR __interruptvoid USCI0RX_ISR(void) { while (!(IFG2 & UCA0TXIFG)) {}; P1OUT^=BIT0; UCA0TXBUF = UCA0RXBUF + 1; }
Examples to Try: • Change what characters are sent by the microcontroller • Send the previous ASCII character (a sent back for b) • Send the capital version of a lowercase letter (Asent back for a) • Set specific keys to turn on/off the LEDs • A/S turns Red LED on/off • D/F turns Green LED on/off
Send the Previous ASCII Character (a sent back for b) #pragma vector=USCIAB0RX_VECTOR __interruptvoid USCI0RX_ISR(void) { while(!(IFG2 & UCA0TXIFG)) {}; P1OUT^=BIT0; UCA0TXBUF = UCA0RXBUF - 1; }
Send the Capital Version of a Lowercase Letter(A sent back for a) #pragma vector=USCIAB0RX_VECTOR __interruptvoid USCI0RX_ISR(void) { while(!(IFG2 & UCA0TXIFG)) {}; P1OUT^=BIT0; UCA0TXBUF = UCA0RXBUF - 32; }
Set Specific Keys to Turn On/Off the LEDs case'd': P1OUT |= BIT6; UCA0TXBUF = data; break; case'f': P1OUT &= ~BIT6; UCA0TXBUF = data; break; default: UCA0TXBUF = '\7'; break; } } #pragma vector=USCIAB0RX_VECTOR __interruptvoid USCI0RX_ISR(void) { while (!(IFG2 & UCA0TXIFG)) {}; char data = UCA0RXBUF; switch(data){ case'a': P1OUT |= BIT0; UCA0TXBUF = data; break; case's': P1OUT &= ~BIT0; UCA0TXBUF = data; break;