Download

1 / 37
370 likes | 785 Views
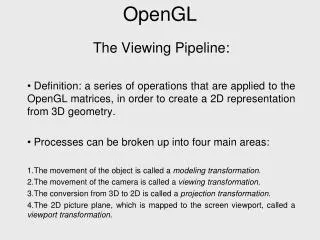
OpenGL. “a software interface to graphics hardware” a library for 3d graphics and modeling portable and fast intended for use with computer hardware that is designed and optimized for 3d graphics NT ships with a generic software based version. What can it do ?. Display primitives

E N D
OpenGL • “a software interface to graphics hardware” • a library for 3d graphics and modeling • portable and fast • intended for use with computer hardware that is designed and optimized for 3d graphics • NT ships with a generic software based version
What can it do ? • Display primitives • Coordinate transformations (transformation matrix manipulation) • Lighting calculations • Antialiasing • Pixel Update Operations • Display-List Mode
OpenGL Naming Conventions • Function names in the basic OpenGL library begin with the letters gl, • Each component word within a name has its first letter capitalized. • The following examples illustrate this naming convention: • glClear (), • glCopyPixels () and • glPolygonMode ().
OpenGL Types • Basic numeric types • GLdouble = double • GLfloat = float • GLint = int • GLshort = short • Mostly you’ll use GLdouble and GLfloat • Constants begin with the letters GL, component words in the constant are written in capital letters, and _ is used as a separator between the words. • A few examples constants available in OpenGL are: • GL_CCW, • GL_RGB
OpenGL Conventions • C library • All function names start with gl • OpenGL is a retained mode graphics system • It has a state • glBegin(GL_POLYGON) puts us into a polygon rendering state.
Function suffixes • Many functions have alternatives • Alternatives are specified by the suffix • glVertex2d • 2 double parameters • void glVertex2d(GLdouble x, GLdouble y); • glVertex3f • 3 float parameters • void glVertex3f(GLfloat x, GLfloat y, GLfloat z); • glVertex3fv • void glVertex3fv(const GLfloat *v);
OpenGL® Primitives • All geometric objects in OpenGL are created from a set of basic primitives. • Certain primitives are provided to allow optimization of geometry for improved rendering speed.
OUTPUT PRIMITIVES: POINT PLOTTING • The function glVertex () specifies the coordinates for a point position. • We define world-coordinate positions with glVertex functions placed between a glBegin/glEnd pair using the primitive type constant: GL_POINTS. • In the following example, three points are plotted along a two-dimensional straight-line path with a slope of 2. Coordinates are given as integers. • glBegin (GL_POINTS); • glVertex2i (50, 100); • glVertex2i (75, 150); • glVertex2i (100, 200); • glEnd (); GL_POINTS
OUTPUT PRIMITIVES: POINT PLOTTING • glBegin (GL_POINTS); • glVertex2i (50, 100); • glVertex2i (75, 150); • glVertex2i (100, 200); • glEnd (); • Alternatively, we could have used an array of points for the coordinate positions the statements between the glBegin/glEnd glVertex2iv (endpointCoords1); where parameter endpointCoords1 is a pointer to an array of coordinate values. GL_POINTS
OUTPUT PRIMITIVES: Line based primitives 1 • GL_LINES generates a series of unconnected line segments between each successive pair of specified endpoints. • If the number of specified endpoints is odd, the last endpoint position is ignored.
OUTPUT PRIMITIVES: Line based primitives 2 • GL_LINE_STRIP generates a "polyline" of connected line segments between the first endpoint and the last endpoint.
OUTPUT PRIMITIVES: Line based primitives 3 • GL_LINE_LOOP generates a series of connected line segments the same as GL_LINE_STRIP, but then adds a final line segment from the last point back to the first point specified.
Example Line based primitives • Depending on the line mode used, the following example generates line, polyline, or polygon • glBegin (lineMode); glVertex2i (50,150); glVertex2i (150, 150); glVertex2i (150, 50); glVertex2i (50, 50); • glEnd (); • If parameter lineMode in this example is set to the value GL_LINES, we obtain two line segments. With GL_LINE_STRIP, we have a connected polyline with three line segments. And with GL_LINE_LOOP, we draw the four connected edges.
v3 v5 v2 v6 v1 v7 v8 OUTPUT PRIMITIVES: TRIANGLES 1 • GL_TRIANGLESGenerates a set of unconnected triangle fill areas. • The first triangle is formed with the first three vertices specified, the next triangle is formed from the next three vertices, and so on. • If the number of vertices specified is not a multiple of 3, the final one or two vertex positions are not used. • Same is GL_QUADS (4 edges)
OUTPUT PRIMITIVES: TRIANGLES 2 • GL_TRIANGLE_STRIP Generates a set of connected triangles. • Each successive triangle shares an edge with the previously specified triangle. • Thus, the ordering of the vertex list must be set up to ensure a consistent display. • For N specified number of vertex positions, we obtain N-2 triangles in the strip. If N is odd, vertices n, n+1, and n+2 are used to form triangle n. If n is even, vertices n+1, n, and n+2 are used to form triangle n, where n = 1, 2, ... , N-2. • This is required so that the triangles can form a consistent set of facets for a single surface. • The vertex list should contain at least three coordinate positions. • Same GL_QUAD_STRIP v3 v2 v5 v1 v4 v6
OUTPUT PRIMITIVES: TRIANGLES 3 • GL_TRIANGLE_FAN generates a set of connected triangles that all share a common vertex. • For N specified vertices, we obtain N-2 triangles in the fan. The first vertex along with vertices n+1 and n+2 are used to form triangle n, where n = 1, 2, ... , N-2. • Thus, the first triangle is specified with three vertices, and each additional vertex defines the next connecting triangle. v4 v3 v5 v2 v1
v3 v5 v2 v6 v1 v7 v8 OUTPUT PRIMITIVES: Polygon • GL_POLYGON generates a single polygon fill area from a list of vertex coordinate positions. • The fill area is inside the boundary formed by the straight-line edge segments that connect vertex positions. • The specified vertex list must contain three or more positions for anything to be displayed, the vertices must form a convex polygon, and there must be no crossing edges.
Begin/End Blocks • Drawing a collection of primitives to form an object such as a line or polygon is performed using the glBegin and glEnd function calls. The functions are defined as follows: • GLvoid glBegin( GLenum mode) - Marks the gebinining of a vertex-data list that describes a geometric primitive. • The type of primitive is indicated by mode, which can be any of the values shown below. • GLvoid glEnd( GLvoid)- Marks the end of a vertex-data list
Begin/End Blocks • The parameter mode defines the type of primitive that is to be rendered. Within the Begin End block, vertices are specified using the glVertex*() function call. The various primitives that can be rendered and specified through glBegin() are as follows: • GL_POINTS individual points • GL_LINES pairs of vertices interpreted as individual line segments • GL_LINE_STRIP series of connected line segments • GL_LINE_LOOP same as above, with a segment added between last and first vertices • GL_TRIANGLES triples of vertices interpreted as triangles • GL_TRIANGLE_STRIP linked strip of triangles • GL_TRIANGLE_FAN linked fan of triangles • GL_QUADS quadruples of vertices interpreted as four-sided polygons • GL_QUAD_STRIP linked strip of quadrilaterals • GL_POLYGON boundary of a simple, convex polygon
Restrictions on using glBegin()/glEnd() • The most important information about vertices is their coordinates. You can also supply additional vertex-specific data for each vertex - a color, a normal vector, texture coordinates, or any combination of these. The following table list a complete set of commands that may be specified within a Begin/End block: • glVertex*() set vertex coordinates • glColor*() set current color • glIndex*() set current color index • glNormal*() set normal vector coordinates • glTexCoord*() set texture coordinates • glEdgeFlag*() control drawing edges • glMaterial*() set material properties • glArrayElement() extract vertex array data • glEvalCoord*(),glEvalPoint*() generate coordinates • glCallList(),glCallLists() execute display Lists(s)
COMPILING/INSTALLATION OpenGL • Microsoft Developer Studio 6 workspace and project files have been included in the source code distribution. • To build the glut dll: • First, open Microsoft Developer Studio. • Then, select File -> Open Workspace and find the glut.dsw file in the file dialog and double-click on it. • Finally, select Build -> Build glut32.dll. • When the build is finished, it will copy: • glut32.dll to %WinDir%\System, • glut32.lib to $(MSDevDir)\..\..\VC98\lib, and • glut.h to $(MSDevDir)\..\..\VC98\include\GL.
Microsoft Windows Specifics • GLUT source code and binary downloads are available on the same page. • Installing OpenGl by: • Copy the files as follows: • copy the dll libraries to the Windows/System directory (i.e., glut32.dll, glu32.dll, opengl32.dll) • copy the .lib files to your $(MSDEVDIR)\..\..\VC98\lib directory • copy the .h header files to your $(MSDEVDIR)\..\..\VC98\include\GL OR
Microsoft Windows Specifics 2. Build the glut dll as folllows: • First, open Microsoft Developer Studio. • Then, select File -> Open Workspace and find the glut.dsw file in the file dialog and double-click on it. • Finally, select Build -> Build glut32.dll. • When the build is finished, it will copy: • glut32.dll to %WinDir%\System, • glut32.lib to $(MSDevDir)\..\..\VC98\lib, and • glut.h to $(MSDevDir)\..\..\VC98\include\GL.
Included libraries • The following include pre-compiler directives should be included in your applications: #include <stdio.h> #ifdef __FLAT__ #include <windows.h> #endif #include <gl/glut.h>
Creating an OpenGL Application in Microsoft Visual C++ • From the main Visual C++ menu pull down, select file and the sub menu option New.
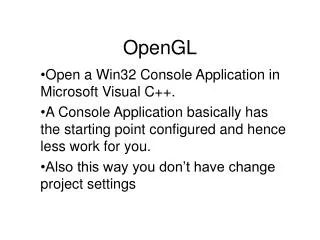
Creating an OpenGL Application in Microsoft Visual C++ • From the new Dialogue Select Win32 Console Application and specify a Project name for the new project.
Creating an OpenGL Application in Microsoft Visual C++ • Select an empty project from the "Win32 Console Application - Step 1 of 1" dialogue window and press the Finish button. Note the New Project Information dialogue will appear specifying that the project will be a Win32 Console Application with no files created or added to the project. After verifying the information, press the OK button.
Creating an OpenGL Application in Microsoft Visual C++ • At this point, the sample project has been created and Visual C++ presents its standard classes view of the program. Select the "FileView" tab in the center left pane and open the sample project files directory. We must now add a main line file to the project. This is accomplished by selecting the Project menu option and the "Add to Project" sub menu option. Specify a "C++ Source File" and "main" as the new file name in the "New" dialogue window as show below. Hit the OK button.
Creating an OpenGL Application in Microsoft Visual C++ • Now we need to type in your source code for the main program. Once the program is completed, it must be compiled and then run from within the Visual C++ IDE.
Creating an OpenGL Application in Microsoft Visual C++ • Compiling and running the program consists of first selecting the compile icon , verifying successful compilation as shown below and then running the program by selecting the run icon . Run Compile Compilation and Link Results
Removing the Console Window • By default, a console application in MS Visual C++ creates a console window from which the application will be started.To remove this window, use the procedure below. If you are not using the console window for debugging or print messages, remove it as follows: • Select Projects > Setting See next
Removing the Console Window • 2. Click on the Link tab.
Removing the Console Window • 3. Edit the Project Options on the bottom. scroll down in the field and replace /subsystem:console with /subsystem:windows /entry:mainCRTStartup • 4. Select the OK button and recompile, link and run your application. The console window should no longer appear when running your application.
Associated Files, Libraries and Linking Instructions • OpenGL Library: Header file - #include <GL/gl.h> Under X Window Systems link with -lGL Under MS Windows link with opengl32.lib • GLU : #include <GL/glu.h> X Window –lGLU , MS Windows glu32.lib • GLX : #include <GL/GLx.h> Part of X11 library (/usr/lib/libX11.so), Link with -lX11 • WGL: Automatically when you #include <GL/gl.h> and with the opengl32.lib library • GLUT: #include <GL/glut.h> (also includes gl.h, glx.h) link with -lglut and –lXmu, under Xglut32.lib under Windows
Library Linking Order • Library link order under X: -lglut -lGLU -lGL -lXmu -lX11 -lm • Under Windows opengl32.lib glu32.lib glut32.lib
OpenGL Naming Conventions • Library Defined Constants Function Prefix • OpenGL GL_ gl • OpenGL Utility Library GLU_ glu • OpenGL Utility Toolkit GLUT_ glut • GLX( X only) GLX_ glx • WGL (Windows only) WGL_ wgl