Download
1 / 52
530 likes | 724 Views
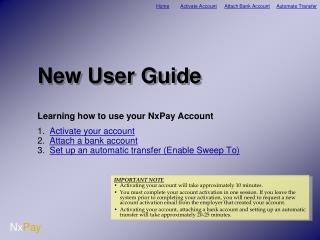
User Guide. Table of Contents. Logging In Ascend SMS Screen Layout Admin Home Tab 4. Initial School Setup. Logging In From an internet browser, go to your school’s Ascend SMS website https :// yourschool .ascendsms.com /

E N D
User Guide Ascend SMS User Guide
Table of Contents Logging In Ascend SMS Screen Layout Admin Home Tab 4. Initial School Setup Ascend SMS User Guide
Logging In • From an internet browser, go to your school’s Ascend SMS website • https://yourschool.ascendsms.com/ • Log In using the credentials given to you by your school’s Ascend SMS Administrator Ascend SMS User Guide
Ascend SMS Screen Layout On All Screens • Across the top displays your school logo – which is hyperlinked to your school website – together with your school name and address. • Clicking on the ASCEND SMS logo always brings you back to this “Home” screen . Ascend SMS User Guide
Ascend SMS Screen Layout On All Screens • This tabbed menu bar varies based upon user-id type and available content. • Some users will have more and/or different tabs than other users. • Each tab may have sub menus. Ascend SMS User Guide
Ascend SMS Screen Layout On All Screens • The left hand side displays the SECURE AREA , which describes the current date, term, and user login information • User can also select to change their password or to logout on any screen. Ascend SMS User Guide
Admin Home Tab • The admin’s home tab is used to manage: • Users • Batch • Term • Effort Card • Grading Scale Subjects • Classes • Grade Indication • Assignment Category • Promotion • Shift Student • Assign • Honor Grade • Headroom Search • Vitality • Mailing Address Report • ACR Time sheet • Social Media Links Ascend SMS User Guide
Initial School Setup Change batch name. Set Terms – Trimester / Quarters Define Effort Review Grading Scale Set Subjects Add Classes Import Students Import Teachers Assign Classes to Teachers Set Default Assignment Categories E-Classrooms Parent Account Letter Ascend SMS User Guide
Select Batch from the home tab. Click the edit icon. Rename the Batch to the current school year. Set the start date to 08/01 of the school year and the end date to 06/24 of the ending year. Ascend SMS User Guide
The revised batch should look similar to the image above. The batch name will be transferred to the report card. The start and end dates define your school year. The check batch indicates the school year that is being used system wide. Ascend SMS User Guide
Select Term from the home tab. Verify the term type is correct for your school. Click on the term name to define dates within your schools grading periods. Ascend SMS User Guide
Edit each term detail to set the correct dates. Update after revising the start and end dates. Repeat until all terms have been set. Ascend SMS User Guide
Sample of the defined terms after revision. Please note that the terms do not have any dates undefined within the school year. After a term ends, the next term begins the following day. Ascend SMS User Guide
Select Effort Card from the home tab. Review each description of the effort card by selecting the defined name. Ascend SMS User Guide
Effort Card Defaults Ascend SMS User Guide
To change the Letter/Number of the description, click edit. Update after changes. Ascend SMS User Guide
If additional effort marks are needed within an effort card, click on add effort letter. Enter new information and save. Ascend SMS User Guide
Select Grading Scale from the home tab. Review each description of the grading scale by selecting the defined name. Ascend SMS User Guide
Grading Scales Ascend SMS User Guide
To change the range of a letter grade, click into the minimum value cell and change it to your desired value. Click save. Ascend SMS User Guide
Additional Grading Scales may be created to suit the needs of your school. Select Add Grading Scale to customize a new scale. Name the new scale and save. Ascend SMS User Guide
Subjects appear on the report card and receive a grade. Select Subjects from the home tab. Review the default subjects and subheadings. Click edit to view the subheadings. Ascend SMS User Guide
If a default subject does not apply to you school, simply delete the subject. Ascend SMS User Guide
Triple confirmation of deletion Ascend SMS User Guide
Add New Subject Click Add Subject Add new subject and save. Ascend SMS User Guide
After saving, click edit to enter the subheadings of the new subject. Ascend SMS User Guide
From this screen, add all of your school classes by homeroom. Click Add Class. Ascend SMS User Guide
Name of homeroom class Class code, if any Select term. Select Grading Scale Select Effort Card Uncheck any subjects that will not appear on the report card. The selected subject will appear on all of the students’ report card. Ascend SMS User Guide
Repeat the process until all homerooms have been added. Ascend SMS User Guide
Import Students From the Classes screen, click the Import icon. Ascend SMS User Guide
Prepare the class list where A = StudentID, B = Last Name, and C = First Name. If your school does not have a student id for each child, use the following format. First 2 digits = graduation year + 4 digits Ascend SMS User Guide
Browse to the location of your class list by clicking, “Browse.” Click “Import” to upload the class list. By adding students through the import tool, a parent account is automatically created. Confirmation message will appear after importing successfully. Ascend SMS User Guide
Users will now appear when selecting home. Select “Classes” from the Home tab and repeat the process until all students have been assigned to their homerooms. Ascend SMS User Guide
Keep your class list to update your student profiles. Import/Update will be developed to meet your school’s data requirements. Ascend SMS User Guide
From the main menu bar, select import teachers from the Teachers tab. Ascend SMS User Guide
Prepare your teacher list where A=Title, B=First Name, C=Last Name, and D= email address. This document needs to be saved in a csv format. Select “Browse” and find your teacher document. Ascend SMS User Guide
Click “import” to complete the process. Select the Teachers tab to verify the import. Ascend SMS User Guide
Hover over to view the teacher’s password. Click on LoginID to access the teacher’s portal. Ascend SMS User Guide
Click the number under the column, Classes, to view the teacher’s assigned classes. Select “Assign Class” to assign a class to a teacher. Ascend SMS User Guide
Choose all subjects within the Class that are assigned to the selected teacher. Choose “Home room teacher” if the selected teacher is the homeroom teacher of the selected class. Ascend SMS User Guide
Using your teacher matrix as a guide, continue assigning classes until all subjects at every grade level have been assigned. Ascend SMS User Guide
Upon completion, all subjects within a class will be assigned to a teacher. Personal Development and Work / Study will not be assigned to any teacher. The subheadings of these areas are made available to teachers through the subject report. Ascend SMS User Guide
Select “Assignment Category” from the Home tab. Click “Add Assignment Category.” Assignment Categories added by the admin will push out to the entire school. Teachers may create their own categories that will be limited to their account. I recommended creating the categories of Test, Quiz, and Homework. Ascend SMS User Guide
After clicking “Add assignment category,” type the new category in the assignment category field. Repeat until all school wide assignment categories are entered. Ascend SMS User Guide
Step 1: Go to St. Martin of Tours webpage Because Ascend SMS resides on the internet, you can access it from anywhere, anytime if you have access to the internet. Type yourschool.ascendsms.com into your web browser’s address bar. https://yourschool.ascendsms.com • Step 2: • Log In to Ascend SMS: • Login Id = your first initial, last name • Password = your last name • For Example: • Teacher Name: Craig Phillips • Login Id = cphillips • Password = phillips
Step 3: Edit Your Profile Information: After logging into the system, select edit my profile from the left hand navigation panel.
Step 4: Complete all fields and then select update when finished. . . . • Personal information such as your address will NOT be posted to the web
Step 5: Setting Up E-Classroom: Select a Class In the top left corner, select the E-Classroom button.
Step 6: Updating E-ClassRoomthe Home Tab. Pictures can be uploaded from the picture icon (200KB max). When finished, select “Update Page Content” to save your changes.
Step 7: Updating E-ClassRoomthe Links and Contacts Tab. Click to create webpage links in the Related Links section. Click to add contacts in the Related Contacts section. Note: http:// is required!