Download
1 / 9
90 likes | 261 Views
Hard Drive Replacement Procedure WJ-HD300A Series DVR. PAL. S 3 Service Support Contact Details. 0870 - 90 70 357 Option 1: Pre-Sales Support Option 2: Technical Support Option 3: Service Centre Email cctv.sales@panasonic.co.uk cctv.technical@panasonic.co.uk Panasonic CCVE Homepage

E N D
Hard Drive Replacement Procedure WJ-HD300A Series DVR
S3 Service Support Contact Details • 0870 - 90 70 357 • Option 1: Pre-Sales Support • Option 2: Technical Support • Option 3: Service Centre • Email • cctv.sales@panasonic.co.uk • cctv.technical@panasonic.co.uk • Panasonic CCVE Homepage • www.panasonic.co.uk/cctv Training Course on the WJ-HD300A Series DVR
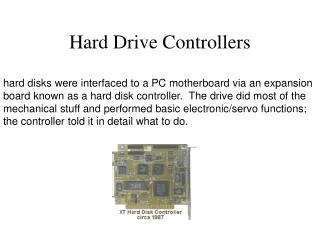
A B WJ-HD300A Series Hard Drive Installation • Remove the screw under the end panel (A) • Slide front panel across to remove it (B)
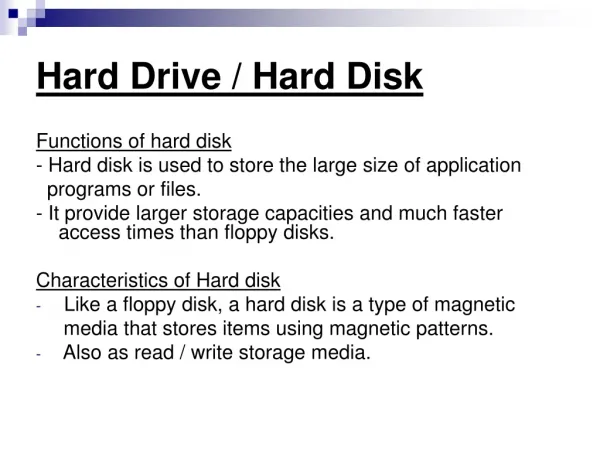
A B WJ-HD300A Series Hard Drive Installation • The front panel will fall forward (A) • Carefully remove connector (B)
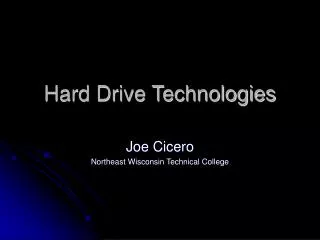
A B WJ-HD300A Series Hard Drive Installation • Remove the 4 draw screws (A) • Pull draw out towards the front (B)
The draw will separate from the main unit completely Connect the Hard Drive to the power connector and SATA cable. WJ-HD300A Series Hard Drive Installation
WJ-HD300A Series Hard Drive Installation • Screw the Hard Drive into place using the holes shown • This MUST be done to ensure correct operation • The screws come supplied with the main unit
WJ-HD300A Series Hard Drive Installation - Format • After replacing or adding an additional hard drive, • the WJ-HD300A will need to format the hard drive in order to record to it. • Upon boot up, providing the hard drive was installed correctly, the WJ-HD300A • will force you into the format screen. • The password for formatting is the same as the ADMIN user password. • This by default is “12345” • If the WJ-HD300A does not see the hard drive it may be down to: • The drive not set to “Master” • The connectors not seated correctly • The wrong type of drive has been used, or • A faulty hard drive