Download
1 / 27
280 likes | 429 Views
Tomcat Configuration. A Very, Very, Very Brief Overview. Topics. Tomcat Creating a new server. Adding servlets to the web.xml file. Initiating requests both with and without the translations inside the web.xml file. Added initialization parameters to the web.xml file.

E N D
Tomcat Configuration A Very, Very, Very Brief Overview
Topics • Tomcat • Creating a new server. • Adding servlets to the web.xml file. • Initiating requests both with and without the translations inside the web.xml file. • Added initialization parameters to the web.xml file. • Starting and stopping Tomcat.
Servlet Engines • In order to execute a servlet, you must be running a servlet engine. • This is software that accepts and processes requests for servlets. • A servlet engine is usually a key component in an application server. • The application server, and hence the servlet engine, generally exists independently of the web server. • Application servers are tied to web servers via connectors.
Web Connectors • When a web server receives a request for static content such as an HTML document, it can handle the request itself. • When a request for dynamic content, such as a servlet, is received, the web server must hand that request off to the application server for processing. • The software that coordinates this effort is called a web connector.
Jakarta - Tomcat • Tomcat is the servlet and JavaServer Pages engine from the Apache group. • http://jakarta.apache.org/tomcat • It’s small, installs quickly, and free. • For the purposes of this class, Tomcat is acting as both a web and application server.
Tomcat Root • The directory where you installed Tomcat is called the Tomcat Root. For instance: • c:\program files\apache group\tomcat-3.1 • We’ll use the Tomcat Root as our point-of-reference for all Tomcat configuration stuff. • One installation of Tomcat can host multiple web applications. This is discussed on the next slide.
Document Root • Change to the webapps directory under the Tomcat Root. For example: • c:\program files\apache group\tomcat-3.1\webapps • Create a new subdirectory called the document root. For example: • SE491 • A separate document root is created for each application we wish to host.
Directory Structure • Within your document root, create the following directory structure: • WEB-INF • WEB-INF/classes/ • WEB-INF/lib/ • WEB-INF is where Tomcat looks for elements relating to your application. • /classes is used for all of your servlets. • /lib is used for third-party APIs and classes.
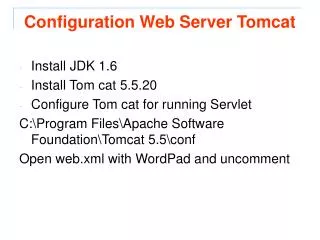
Server Configuration • Once you have chosen a document root, it’s a good idea to make Tomcat aware of it. • In theory Tomcat can locate your new document root implicitly, but you’re always better off controlling the configuration explicitly. • If any part of your Tomcat configuration is incorrect, Tomcat will fail to start and will record the problem in the <tomcat-root>/logs subdirectory. For instance: • c:\program files\apache group\tomcat-3.1\logs
Server Configuration • Find and edit the following file: <tomcat root>/conf/server.xml • Add a new entry at the bottom of the file: <Context path="/se491" docBase="webapps/se491" debug="0" reloadable="true"> </Context>
Server Configuration (cont.) • The context path should be the document root directory you just created. This is the place that Tomcat will use to derive all other locations. • The docBase is where Tomcat looks for non-dynamic elements such as HTML. • The debug suggests that you aren’t debugging the servlet request. Change this value to “1” to get more information in the Tomcat logs.
Server Configuration (cont.) • The reloadable entry suggests that if Tomcat notices that a class file has changed, it should reload that class the next time it is requested. • This feature of application servers allows us to have 7 x 24 availability; we don’t need to shut down the server to deploy enhancements and fixes to the application.
Server Configuration (cont.) • You should add a new entry to server.xml for each document root you create. • We typically create a single document root for each application being hosted by the application server. • In a development environment we might host multiple application environments. For instance we might have document roots for development, string testing, system testing, acceptance testing, and performance testing. • We can use a similar approach if we’re doing both enhancements and regular maintenance concurrently.
Servlet Installation • Before we can execute the servlet, we need to install it on the application server. • Each application server has its own method for performing this installation. • The following instructions apply to Tomcat only.
Class File Location • Compile the servlet like any other Java program. • Copy the servlet’s.class file to the WEB-INF/classes subdirectory. • If you are using packages, make certain that you use the same directory structure under WEB-INF/classes that you did when developing your source code. • This ensures that the class loader is able to find all of the required resources.
web.xml • As with the Tomcat server configuration, when we add a new servlet to our application we should make Tomcat aware of it. • This is accomplished through the web.xml file. • Every application has its own web.xml file. • This file contains important configuration information that Tomcat uses to translate a browser request into a servlet execution.
web.xml (cont.) <?xml version="1.0" encoding="ISO-8859-1"?> <!DOCTYPE web-app PUBLIC "-//Sun Microsystems, Inc.//DTD Web Application 2.2//EN" "http://java.sun.com/j2ee/dtds/web-app_2.2.dtd"> <web-app> <servlet> <servlet-name> howdy </servlet-name> <servlet-class> HelloWorldExample </servlet-class> </servlet> <servlet-mapping> <servlet-name> howdy </servlet-name> <url-pattern> /howdy </url-pattern> </servlet-mapping> </web-app>
web.xml (cont.) • The first part of this file provides a translation from the “pretty” name that users see in the browser to the servlet’s class name: <servlet> <servlet-name> howdy </servlet-name> <servlet-class> HelloWorldExample </servlet-class> </servlet>
web.xml (cont.) • The second part of this file provides a translation from groups of names to the servlet name identified in the first part of the file: <servlet-mapping> <servlet-name> howdy </servlet-name> <url-pattern> /greetings </url-pattern> </servlet-mapping>
Bouncing the Server • Whenever you make configuration changes to Tomcat you should “bounce” the server. • “Bouncing” is a euphemism for shutting the server down and then immediately restarting it. • To bounce Tomcat, follow these steps: • Change to the <tomcat root>/bin directory • At the command line enter tomcat stop to stop the Tomcat server. • At the command line enter tomcat start to start the Tomcat server.
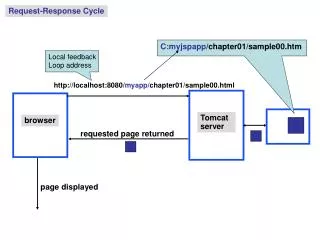
Running a Servlet • To execute a servlet you need to issue a request to Tomcat using your browser. • By default Tomcat listens for requests on port 8080. This can be configured, but for this class this value is fine.
Running a Servlet (cont.) • To execute the HelloWorldExample servlet, use the following URI: • http://localhost:8080/se491/greetings • Because we have a servlet mapping from /greetings to howdy, and howdy has been associated with the HelloWorldExample servlet in our web.xml file, Tomcat can translate this request into a servlet call.
Running a Servlet (cont.) • All of these URIs invoke the same servlet: • http://localhost:8080/se491/greetings • http://localhost:8080/se491/servlet/howdy • http://localhost:8080/se491/servlet/HelloWorldExample • This works because of the translations we defined in the web.xml file.
Servlet Lifecycle Reprise • You issue a request to the application server (Tomcat) using the client of your choice. • Tomcat looks at your request and attempts to locate the servlet within the URI. • Tomcat then looks at the servlet mappings that were defined in the web.xml file to determine the class name of the servlet that was requested.
Initialization Parameters • Sometimes we want to initialize a servlet when it’s first loaded by the servlet engine. • For instance, we may wish to load some configuration settings before allowing the servlet to process requests. • This can be useful for testing when you don’t want to configure a web page to initiate the test.
Tomcat Initialization Parameters • Tomcat allows you to place the initialization parameters within the web.xml file. • It requires a slight modification from the original format: <servlet> <servlet-name> message </servlet-name> <servlet-class> MessageServlet </servlet-class> <init-param> <param-name>msg</param-name> <param-value>this is a message....</param-value> </init-param> </servlet>
Changing Initialization Parameters • If you change the initialization parameters for a servlet, you should bounce the servlet engine to ensure that those changes are accepted. • Recycling the server forces it to reload the server.xml and web.xml files.