Download

1 / 27
270 likes | 460 Views
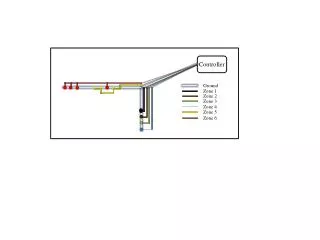
Controller Diagnostics. Topics Covered:. Diagnostics that allows you to check basic controller and reader functionality through the address display on the controller and the optional LCD-1 display Controller status LEDs (on-board indicators). Controller Diagnostics.

E N D
Topics Covered: • Diagnostics that allows you to check basic controller and reader functionality through the address display on the controller and the optional LCD-1 display • Controller status LEDs (on-board indicators)
Controller Diagnostics • All diagnostic routines are built into the controller’s firmware and hardware • Detailed information on using the diagnostic routines can be found in the Troubleshooting and Diagnostics Reference Document • This document can be found on the Keri CD or on the Keri Systems web site (www.kerisys.com)
LCD-1 • Firmware diagnostic routines require a Liquid Crystal Display module (LCD-1) • Diagnostic tests are accessed and results displayed through the LCD-1
Sharing the LCD-1 • One LCD-1 can be shared by multiple controllers • LCD-1s are “hot pluggable” • After inserting an LCD-1 on a “hot” controller, double-click S1 to reset the display
Available Diagnostic Tests • A/B Receiver Signal Quality (only for Keri PXL-500P/510P proximity controllers) • PXL-500/510 Controller Inputs • The SB-593 Satellite Board Inputs test is not yet implemented
Accessing Diagnostics • Click S1 on the controller until the “TEST” label appears • Double-click S1 to enter the diagnostics section
Accessing a Specific Test • Click S1 to step through the individual diagnostic tests • When the desired test is displayed, double-click S1 to enter that test
Receiver Signal Quality Test • This test measures the strength and the amount of interference in the reader signal received by the controller NOTE: This diagnostic routine puts the reader into a test mode that disables it for access use until the test is exited – presented cards affect the quality of this test
Performing the Test • As the routine runs, the LCD-1 displays a milli-volt (mv) reading • This reading reflects the quality of the reader signal received by the controller • Monitor the value displayed over 10 seconds - the reading will fluctuate, but you can note an average value
Analyzing the Results • The average MV reading value should be less than 500 mV • A significantly higher reading indicates the reader is receiving electro-magnetic interference • Affecting the reader’s read range and reliability • A significantly lower reading indicates the controller is receiving a weak signal from the reader • The weaker the signal, the lower the reader’s read range will be
PXL-500 Controller Inputs Test • Verifies that the controller can sense the change-of-state (open – closed) for the three inputs • AUX – Auxiliary • RTE – Request to Exit • DR1 – Door
Performing the Test • The inputs test shows on the LCD-1 an indicator for each input that is closed • Indicators for inputs that are open are not displayed • In a typical application the Door input is normally-closed and the AUX and RTE inputs are normally-open
Performing the Test • Toggle the inputs to see the change-of-state • Open door • Closed AUX and RTE
Analyzing the Results • Usually, if an indicator for an input does not toggle on and off as that input is opened and closed: • The input switch is not working • The input wiring is misrouted
Exiting Diagnostics • Click S1 and step through the tests until “EXIT” appears • Double-click S1 to exit diagnostics
Controller LEDs • Power Fuse • Power Status • With Over/Under voltage display • Communication • RS-485 controller network • RS-232 master controller to PC • Relay Status • Door Lock and Alarm • Wiegand Reader Voltage • PXL-500W/510W controllers ONLY
Power Fuse LED • When FUSE LED 1 is on, a problem exists with the physical power wiring connection to the controller • OFF = no problem • RED = power and ground lines are reversed • GREEN = an excessive current draw condition exists (i.e. a power line short)
Power Status – Over/Under Voltage • When POWER LED 8 is red, a power over/under voltage condition exists • An approximate voltage reading is given on the address display • When LED 8 is green, power is at an acceptable voltage level
RS-232 Communication Status • TXD/RXD LEDs 2 and 3 flicker red/green as data is transferred • These LEDs are for the primary RS-232 serial communication line (on all PXL-5xx controllers) • Between the PC and the master controller
RS-232 Communication Status • TXD/RXD LEDs 4 and 5 flicker red/green as data is transferred • These LEDs are for the optional RS-232 serial communication line (on PXL-510 controllers) • Between an alarm panel and the master controller
RS-485 Communication Status • COMM LED 9 flickers red/green as data is transferred • This LED is for the RS-485 controller network communication line • On the master controller, it flashes every time it polls a slave controller • On a slave controller, it flashes every time it is polled by the master
Lock and Alarm Relay Status • LOCK LED 6 is green when the lock relay is activated (unlocking the door) • ALARM LED 7 is green when the alarm relay is activated (an alarm condition such as a door forced open) • These LEDs are off when the relay is inactive
RS-485 Wiring Test • Uses JP9, LED11, and LED12 to determine RS-483 wiring integrity • Wire up the network and power up all controllers
RS-485 (-) Wiring • Jumper pins 1-2 of JP9 • If LED11 is solid RED and LED12 is off or flashing, the wiring is OK • If LED12 is solid GREEN, then +/- lines are reversed somewhere • If LED11 is OFF, there is an open in the RS-485 line • If both LEDs are solid ON there is either a short in the RS-485 line or there is a PXL-250 controller in the network with R45 installed
RS-485 (+) Wiring • Jumper pins 2-3 of JP9 • If LED12 is solid GREEN and LED11 is off or flashing, the wiring is OK • If LED11 is solid RED, then +/- lines are reversed somewhere • If LED12 is OFF, there is an open in the RS-485 line • If both LEDs are solid ON there is either a short in the RS-485 line or there is a PXL-250 controller in the network with R45 installed
Wiegand Reader Voltage • LED 10 is red if JP5 is set to provide 12 VDC power to a Wiegand reader • JP5 set to the right, provides 5 VDC power (factory default setting) • JP5 set to the left, provides 12 VDC power which can damage 5 VDC readers