Download
1 / 21
210 likes | 668 Views
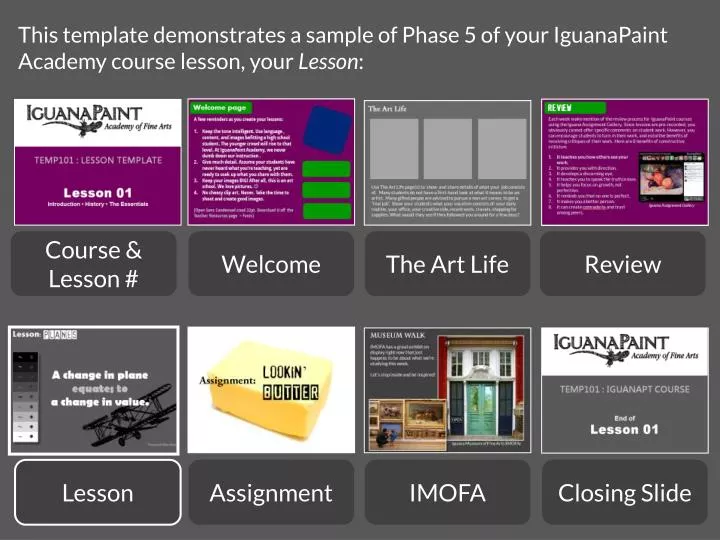
This template demonstrates a sample of Phase 5 of your IguanaPaint Academy course lesson, your Lesson :. Course & Lesson #. Welcome. The Art Life. Review. Lesson. Assignment. IMOFA. Closing Slide.

E N D
This template demonstrates a sample of Phase 5 of your IguanaPaint Academy course lesson, your Lesson: Course & Lesson # Welcome The Art Life Review Lesson Assignment IMOFA Closing Slide
You’ll find a few sample layouts for each section in this sample presentation. You can move and resize the shapes and text boxes around as you like with your mouse cursor. For effective lessons, please use transition screenssuch as these to the right to introduce each new stage. > We have sprinkled tips throughout the template. For many more tips, visit the Teacher Resource pages at www.iguanapaint.com. Be as creative as you can while maintaining a professional appearance in your slides. If you have questions, please don’t hesitate to contact us at admin@iguanapaint.com.
Before you view the sample lesson, here a few essentials that should be evident in all your lessons: • ALWAYS do a demonstration of the lesson assignment. A picture is worth a thousand words (i.e. it’ll save you a ton of emails full ofquestions from students). Think of your lesson as a ‘how-to” of the assignment. • Explain the setup and itemize supplies. • Teach principles as well as practical how-to tips. • If in doubt, include it. Better too much info that not enough. Be exhaustive. • Use large, clear graphics. Take GREAT step-by-step photos of you doing the assignments. • ALWAYS include an Assignment slide. • See more tips on the Teacher Resource pages.
Lesson: PLANES This is an example of a transition slide, consisting of mostly background, few words, and large title. It should be obvious to students that they are entering the next stage of your lesson.
Lesson: PLANES NEVER FORGET THAT… A change in plane equates to achange in value. * *most of the time
planes Teachers: include photos to illustrate principles, as shown here. Planes are the sides of an object. Sometimes they’re flat, sometimes not. For our purpose, we’ll focus on the planes of blocks.
planes Wood blocks can really help you learn to draw. We’ll be making good use of them this semester. We’ll start by identifying the top planes.
planes Almost always, a change in plane means a change in value, sometimes in very subtle ways. Notice the difference in value between the top and front planes.
planes See how the different planes give the sense of form to our objects?
planes Cast shadows are planes as well. Alrighty then- let’s put this into practice. Our ‘block’ will be a stick of butter. I’ll walk you through this week’s assignment…
Review of values This is an art school. That means use plenty of large graphics to illustrate principles. I often will pull slides from previous lessons to reinforce what I have taught. shadow mass light mass cast shadow mass
SETUP For your assignment), you’ll need the following items: sketchbook… Teachers: always be clear about what supplies are needed for each assignment.
SETUP First thing I do is get my still-life and workspace set up. I’ve set up the butter in front of me, and there’s a window to my right casting a nice side light… Teachers: spell everything out for your students, including setup! No, you don’t need to draw the text on the wrapper.
Lay-in Teachers: I usually use 20-40 slides to demonstrate an assignment. I like to include the previous step in an inset photo, plus other helpful photos.
Lay-in I keep drawing the different edges of the butter. Now I’m putting in the horizontal… Teachers: be detailed in your texts! It helps your narration, too! Photo of previous slide
Lay-in Once I am happy with the drawing, I use my kneaded eraser and by PRESSING it on the paper (not rubbing it!), I ‘pick up’ the darker lines and lighten my drawing before shading. Teachers: Photo of previous slide Teachers: Photo of “special tip” Press, don’t rub!
block-in You can see close-up the patient build up of many fine lines of pencil. Holding the pencil opposite the pointed end helps keep my strokes consistent and light, even with the 6B pencil.
finish Keep a sharp point on your pencil to draw fine lines, such as around the edges.
Teachers: show close-up details of procedure. I check the lights. The wrapper has crinkles in it, and I need to show those to make the wrapper look like waxed paper. The crinkles are crisply defined. finish
finish Before I finish, I compare the values of the different planes, to see if they’re in the right relationship to one another. Once they are, I check the edges (crisp vs. soft). After that? I sign my drawing and I’m done!
A few drawing tips: • Teachers: Include a few tips at the end of a lesson to summarize key points. • Mention tips on using tools • If you think of something that books and teachers often forget, share it! • “Secrets” of the trade? John Singer Sargent- Mrs. Richard D Sears, 1916