Download
1 / 26
280 likes | 458 Views
INTRO TO PHOTOSHOP. By francheska aristy & kayla fuit. About photoshop. - Photoshop is used for raster images Meaning they can be scaled down but when scaled up it will be pixelly. Best used for photo editing or creating images for web output that will not need to be resized.

E N D
INTRO TO PHOTOSHOP By francheskaaristy & kaylafuit
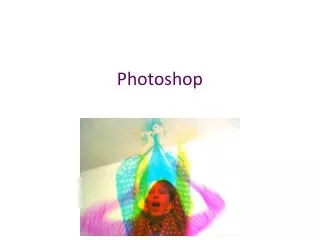
About photoshop • - Photoshop is used for raster images • Meaning they can be scaled down but when scaled up it will be pixelly. • Best used for photo editing or creating images for web output that will not need to be resized. • - Photoshop is used not only for design purposes, but also to manipulate pictures. Here is an example: Photoshop in the Media
Creating a Document • File>New Document> 8 1/2 x 11 is standard paper • Resolution 300
Opening a document File>Open
Main toolbar - File New- standard paper is 8.5x11 inches. Use resolution of 300 Open- allows you to open previous documents or photos/documents for your project Save- Saves your project. Once saved if you save again it saves it in same name/format Save As- Can save your document under another name/format without changing original file Always save jpeg and psd format
Main toolbar - Edit Undo- Go back a step Step forward-jump forward. Takes back the undo Step Backward- like undo but goes back farther than one step copy-duplicates selected item Paste- Puts copied item in project
Main toolbar - image mode-Grayscale (black and white) RGB color-for web CMYK-printing adjustments -levels-adjust lighting -Desaturate-black and white with allowing color to remain (colorpop) Image size-change size of image you are working on Image rotation- 90 degrees clockwise/counterclockwise 180 degrees
layers • Separates your images for easier editing • You can only edit the images/text on the layer you are currently on • The order of the layers changes the way your final product looks.
Main toolbar - layer New- Creates a new layer, so you can edit without messing up other layers Duplicate layer- copies the layer you are on exactly. Good for if you need multiple shapes in the same size. The new layer will appear on top of the old layer. Delete-deletes the layer rename layer- allows you to name your layer so when you are editing you know which layer has what on it.
Helps you select layers, deselect, or inverse your selection. MAIN TOOLBAR - SELECT Select all-selects everything on the current layer inverse- Selects everything outside of your selection on the layer you are currently on. All layers-Selects all layers. Allows you to move everything on your document without changing spacing or orientation. Deselect layers-takes you out of the layer and can not be edited until you select the layer again
Main toolbar - filter Filters change the appearance of your photos. They change the lighting, smoothness, colors and more
Main toolbar - view zoom in- makes the images on your document appear larger because you are focusing on only a certain part of the document zoom out- if you are zoomed in this will bring you back to seeing the document as a whole. rulers-brings rulers on the sides of the document so you know where center is or 1/3 of the page, etc.. Guides- drag from the ruler down and can place a line to know exactly where you want to place your files. Helps to put a line in center of document to know where center is. Also, helps in making sure items are lined up. Clear guides-clears current guides on your project
Main toolbar - window This lets you add more toolbars/panels to your workspace and rearrange things
Main toolbar - help Not sure where something is? Go to the "help" tab and type in what you are looking for!
LAYERS Blending mode/opacity/fill options Layer visibility and rename option Background layer The layers are the cores of your document. How they are edited and organized affect the whole display of the final document. New layer Blending options Delete layer
LAYER GROUPS Layer groups will help keep you more organized especially in a document with 50+ layers. You can rename them as well. To create a group, select the layers want while holding Ctrl and click the Folder icon on the bottom of the Layer group .
SIDE pANEL • - Will go in depth via presentation • - Tools you will use the most: • Type • Brush • Marquee & Lasso tools • Paint Bucket • Eraser • Magic Wand tool • Shapes tool
MAKING A FLYER - BACKGROUND - Background layer means nothing. - Create a new layer and use the Paint Bucket tool to fill background with a color, gradient, or pattern.
MAKING A FLYER - TEXT Font websites: Dafont.com, fontsquirrel.com, creativebloq.com, 1001fonts.com Add drop shadow, stroke, etc. Change font style Change font position Change font Change font size Change font shape - Add text using the Type tool. - Text will appear as its own layer.
MAKING A FLYER – PLACING IMAGES You can put images in three ways. - Copy and paste the image from online into the document. - Open the document and drag it in. - Place it in the document. Placing an image is the best way. You can use File -> Place to put an image in the document, this will place the image as a Smart Object and you will be able to resize it without losing quality.
MAKING A FLYER – WHEN, WHERE, WHAT • - Make sure to have the correct date, time, location, and any other specifics.
MAKING A FLYER - SHAPES Use these shapes to your advantage. Hold down the Shift tool to create a proportional shape. Custom shapes will spice up your flyer. You can download more from online such as all-free-download.com
MAKING A FLYER - BRUSHES Adjust opacity & blending mode Brushes will add even more spice to your flyer. You can download more of them online in sites like brusheezy.com Adjust brush shape, size, & hardness.
COMMON PROBLEMS • - Object won't move. • Make sure the "Move" tool is selected. • - Picture is on top of text. • Make sure the layers are in the correct order. • - Custom shapes are just one layer. • Make sure you click out of the shape before you make a new one. • - Can't edit Smart Objects. • They are not supposed to be directly edited. But if you need to, you must first "Rasterize" the layer.