Download
1 / 9
90 likes | 333 Views
Create 15 MSN-accounts (including passwords) and install restricted contact lists ... 15 simulatneous video conferences, each in realtime with 1:1 ...

E N D
Slide 1:This Virtual Classroom Tour template has been provided so you can develop your own Virtual Classroom Tours. Use the template to record a special learning project that you have found particularly successful in your classroom. Then share the project with other teachers in your school, district or beyond. Here�s how: Follow the prompts on each slide and in the embedded Word documents, in this PowerPoint document, to insert your project information. When you have finished inputting all of the project information that is requested, delete the prompts. Select each one and press the Delete key. Note: To enter the title of your Virtual Classroom Tour you must select View, Master, Slide Master, and enter it on the slide master. Then click Close Slide Master. This will cause the title to appear on each of the slides. From the File menu choose Save As� and save the document as a PowerPoint Show. (Use the File type: drop-down list to choose PowerPoint Show). You can then distribute the Virtual Classroom Tour. This Virtual Classroom Tour template has been provided so you can develop your own Virtual Classroom Tours. Use the template to record a special learning project that you have found particularly successful in your classroom. Then share the project with other teachers in your school, district or beyond. Here�s how: Follow the prompts on each slide and in the embedded Word documents, in this PowerPoint document, to insert your project information. When you have finished inputting all of the project information that is requested, delete the prompts. Select each one and press the Delete key. Note: To enter the title of your Virtual Classroom Tour you must select View, Master, Slide Master, and enter it on the slide master. Then click Close Slide Master. This will cause the title to appear on each of the slides. From the File menu choose Save As� and save the document as a PowerPoint Show. (Use the File type: drop-down list to choose PowerPoint Show). You can then distribute the Virtual Classroom Tour.
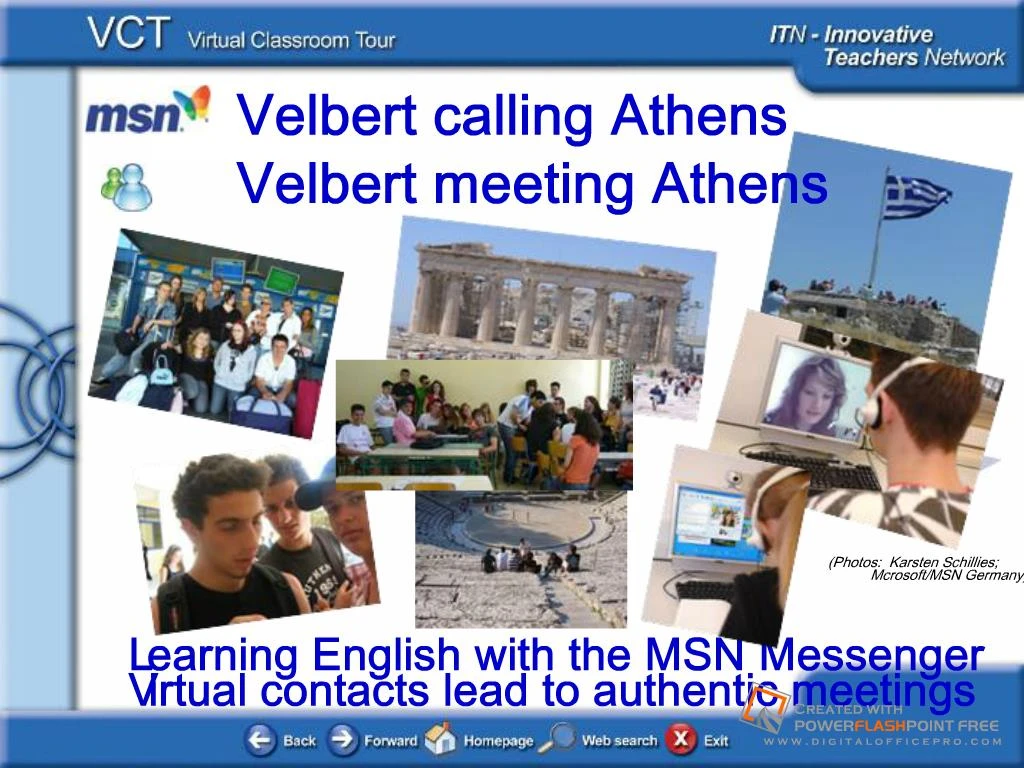
Hard-/Software Description Authentic context for communication were provoked with the help of voice- and videoconferences with students of a partner school in Athens which lead to an improvement of foreign language skills. Windows 2003 Server, Windows XP prof. clients, client HD protection with �Kaiser Karten�, IQ:on Network, MSN messenger, Microsoft Word, 2.3 Mbit S-DSL line, webcams, headsetsSlide 2:This Virtual Classroom Tour template has been provided so you can develop your own Virtual Classroom Tours. Use the template to record a special learning project that you have found particularly successful in your classroom. Then share the project with other teachers in your school, district or beyond. Here�s how: Follow the prompts on each slide and in the embedded Word documents, in this PowerPoint document, to insert your project information. When you have finished inputting all of the project information that is requested, delete the prompts. Select each one and press the Delete key. Note: To enter the title of your Virtual Classroom Tour you must select View, Master, Slide Master, and enter it on the slide master. Then click Close Slide Master. This will cause the title to appear on each of the slides. From the File menu choose Save As� and save the document as a PowerPoint Show. (Use the File type: drop-down list to choose PowerPoint Show). You can then distribute the Virtual Classroom Tour. This Virtual Classroom Tour template has been provided so you can develop your own Virtual Classroom Tours. Use the template to record a special learning project that you have found particularly successful in your classroom. Then share the project with other teachers in your school, district or beyond. Here�s how: Follow the prompts on each slide and in the embedded Word documents, in this PowerPoint document, to insert your project information. When you have finished inputting all of the project information that is requested, delete the prompts. Select each one and press the Delete key. Note: To enter the title of your Virtual Classroom Tour you must select View, Master, Slide Master, and enter it on the slide master. Then click Close Slide Master. This will cause the title to appear on each of the slides. From the File menu choose Save As� and save the document as a PowerPoint Show. (Use the File type: drop-down list to choose PowerPoint Show). You can then distribute the Virtual Classroom Tour.
Reference of the project to the English Curriculum (What does this project have to do with teaching English?) Aims and objectives of teaching English as a second language: Strengthening of the meaningfull oriented language acquisition in authentic situations, Strengthening of speaking skills, Focus to an increased cultural awareness to improve intercultural competence. MSJK, (Hrsg.); Kernlehrplan f�r die Hauptschule In Nordrhein-Westfalen, Englisch; Rittersbach Verlag, 2004; S.11 ff.Slide 3:This Virtual Classroom Tour template has been provided so you can develop your own Virtual Classroom Tours. Use the template to record a special learning project that you have found particularly successful in your classroom. Then share the project with other teachers in your school, district or beyond. Here�s how: Follow the prompts on each slide and in the embedded Word documents, in this PowerPoint document, to insert your project information. When you have finished inputting all of the project information that is requested, delete the prompts. Select each one and press the Delete key. Note: To enter the title of your Virtual Classroom Tour you must select View, Master, Slide Master, and enter it on the slide master. Then click Close Slide Master. This will cause the title to appear on each of the slides. From the File menu choose Save As� and save the document as a PowerPoint Show. (Use the File type: drop-down list to choose PowerPoint Show). You can then distribute the Virtual Classroom Tour. This Virtual Classroom Tour template has been provided so you can develop your own Virtual Classroom Tours. Use the template to record a special learning project that you have found particularly successful in your classroom. Then share the project with other teachers in your school, district or beyond. Here�s how: Follow the prompts on each slide and in the embedded Word documents, in this PowerPoint document, to insert your project information. When you have finished inputting all of the project information that is requested, delete the prompts. Select each one and press the Delete key. Note: To enter the title of your Virtual Classroom Tour you must select View, Master, Slide Master, and enter it on the slide master. Then click Close Slide Master. This will cause the title to appear on each of the slides. From the File menu choose Save As� and save the document as a PowerPoint Show. (Use the File type: drop-down list to choose PowerPoint Show). You can then distribute the Virtual Classroom Tour.
Planning and management Technical preparations (autumn 2005 to spring 2006): Integration of IQ:on Network (e.g. acitvating/deactivating MSN messenger) Installation of 2,3 Mbit S-DSL line Equipping the medialab with webcams, headsets Create 15 MSN-accounts (including passwords) and install restricted contact lists Activate HD protection �Kaiser-Karte� (MSN-accounts may only be used during lessons) Realisation in lessons (spring 2006 to spring 2007): �virtual meetings� Regular video conferences between the classes Prepared digital work sheets to current topics (e.g. Tom Cruise/Scientology, FIFA World Cup Finals, U2) Visit to Athens (May 2007) �real authentic meeting� Visit to the partner school in Athens (Avgoulea School) Scheduled field trips and leisure time MSN project video (Video: Microsoft/MSN Germany; Hardenbergschule; film-i-motion) (Photos: Microsoft Germany/MSN) (Click the picture above!)Slide 4:Open the Word documents at the bottom of each slide by double clicking the icons. Follow the prompts [in the yellow boxes] for inserting information about your learning project. Open the Word documents at the bottom of each slide by double clicking the icons. Follow the prompts [in the yellow boxes] for inserting information about your learning project.
IQ:on Network Activates od deactivates application Digital worksheets Technical implementation of the virtual contacts into lessons 15 simulatneous video conferences, each in realtime with 1:1 networking by S-DSL line at both schools (Only two of 15 connections are shown here)Slide 5:On this slide, embed the student handouts and the resources created for this project. Some examples are a student project overview, Internet and other resources, directions for art projects, or instructions to students for peer editing of projects. To embed the resources, follow these steps: Have the resource document available. From the Insert menu choose Object. Select Create from File� and click Browse�. Find the file you want to include and click OK. Select Display as icon and click Change Icon� and add a suitable caption. Click OK to add the caption and click OK to embed the file. Position the document icon at the bottom of the slide. You can go to View, Grid and Guides, and click Display Grid on Screen for a grid on which to line up your icons. On this slide, embed the student handouts and the resources created for this project. Some examples are a student project overview, Internet and other resources, directions for art projects, or instructions to students for peer editing of projects. To embed the resources, follow these steps: Have the resource document available. From the Insert menu choose Object. Select Create from File� and click Browse�. Find the file you want to include and click OK. Select Display as icon and click Change Icon� and add a suitable caption. Click OK to add the caption and click OK to embed the file. Position the document icon at the bottom of the slide. You can go to View, Grid and Guides, and click Display Grid on Screen for a grid on which to line up your icons.
http://www.u2.com A teaching example The students of HBS and AS were told to work on the digital worksheet about U2 as a team activity. Technically this was feasable because of the 1:1 networking and the possibility of a video conference via webcam.Slide 6:On this slide, embed the student handouts and the resources created for this project. Some examples are a student project overview, Internet and other resources, directions for art projects, or instructions to students for peer editing of projects. To embed the resources, follow these steps: Have the resource document available. From the Insert menu choose Object. Select Create from File� and click Browse�. Find the file you want to include and click OK. Select Display as icon and click Change Icon� and add a suitable caption. Click OK to add the caption and click OK to embed the file. Position the document icon at the bottom of the slide. You can go to View, Grid and Guides, and click Display Grid on Screen for a grid on which to line up your icons. On this slide, embed the student handouts and the resources created for this project. Some examples are a student project overview, Internet and other resources, directions for art projects, or instructions to students for peer editing of projects. To embed the resources, follow these steps: Have the resource document available. From the Insert menu choose Object. Select Create from File� and click Browse�. Find the file you want to include and click OK. Select Display as icon and click Change Icon� and add a suitable caption. Click OK to add the caption and click OK to embed the file. Position the document icon at the bottom of the slide. You can go to View, Grid and Guides, and click Display Grid on Screen for a grid on which to line up your icons.
�We' ll keep in contact � there is always MSN.� (Quotation of a student) Aylin thanks (click in the picture) (Video: Hardenbergschule; film-i-motion) �When my father picked me up at the airport, I wanted to answer in English.� (Quotation of a student) Velbert meeting Athens (click in the picture) (Video: Hardenbergschule; film-i-motion) Authentic meeting /conclusion �Virtual contacts lead to authentic meetings� � this idea was the trigger to contact local school authorities and firms that in the end sponsored our project. We were guests in Athens in May 2007. Not only did we visit our partner school but we also had an interesting cultural programme � and communicated in English as a matter of course. MSN project video (click in the picture) (Video: Microsoft/MSN Germany; Hardenbergschule; film-i-motion)Slide 7:On this slide, embed the student handouts and the resources created for this project. Some examples are a student project overview, Internet and other resources, directions for art projects, or instructions to students for peer editing of projects. To embed the resources, follow these steps: Have the resource document available. From the Insert menu choose Object. Select Create from File� and click Browse�. Find the file you want to include and click OK. Select Display as icon and click Change Icon� and add a suitable caption. Click OK to add the caption and click OK to embed the file. Position the document icon at the bottom of the slide. You can go to View, Grid and Guides, and click Display Grid on Screen for a grid on which to line up your icons. On this slide, embed the student handouts and the resources created for this project. Some examples are a student project overview, Internet and other resources, directions for art projects, or instructions to students for peer editing of projects. To embed the resources, follow these steps: Have the resource document available. From the Insert menu choose Object. Select Create from File� and click Browse�. Find the file you want to include and click OK. Select Display as icon and click Change Icon� and add a suitable caption. Click OK to add the caption and click OK to embed the file. Position the document icon at the bottom of the slide. You can go to View, Grid and Guides, and click Display Grid on Screen for a grid on which to line up your icons.
Do you have some more questions about the project? Just �google� Hardenbergschule Athen � or ask me at the congress in Hongkong!Slide 8:On this slide, embed the student handouts and the resources created for this project. Some examples are a student project overview, Internet and other resources, directions for art projects, or instructions to students for peer editing of projects. To embed the resources, follow these steps: Have the resource document available. From the Insert menu choose Object. Select Create from File� and click Browse�. Find the file you want to include and click OK. Select Display as icon and click Change Icon� and add a suitable caption. Click OK to add the caption and click OK to embed the file. Position the document icon at the bottom of the slide. You can go to View, Grid and Guides, and click Display Grid on Screen for a grid on which to line up your icons. On this slide, embed the student handouts and the resources created for this project. Some examples are a student project overview, Internet and other resources, directions for art projects, or instructions to students for peer editing of projects. To embed the resources, follow these steps: Have the resource document available. From the Insert menu choose Object. Select Create from File� and click Browse�. Find the file you want to include and click OK. Select Display as icon and click Change Icon� and add a suitable caption. Click OK to add the caption and click OK to embed the file. Position the document icon at the bottom of the slide. You can go to View, Grid and Guides, and click Display Grid on Screen for a grid on which to line up your icons.
GHS Hardenbergschule Waldschl��chen 37 42553 Velbert-Neviges Tel.: 02053-923 270 Homepage: www.hardenbergschule.de Mail: info@hardenbergschule.de �The friendly school in the country� Gisela Geurtz, Karsten Schillies (Kompetenzteam NRW D�sseldorf/Mettmann) Participating teachers Hardenbergschule: (All videos are streamed from the website www.medienzentrum-rheinland,de -> Medienbrief)Slide 9:On this slide, embed the student handouts and the resources created for this project. Some examples are a student project overview, Internet and other resources, directions for art projects, or instructions to students for peer editing of projects. To embed the resources, follow these steps: Have the resource document available. From the Insert menu choose Object. Select Create from File� and click Browse�. Find the file you want to include and click OK. Select Display as icon and click Change Icon� and add a suitable caption. Click OK to add the caption and click OK to embed the file. Position the document icon at the bottom of the slide. You can go to View, Grid and Guides, and click Display Grid on Screen for a grid on which to line up your icons. On this slide, embed the student handouts and the resources created for this project. Some examples are a student project overview, Internet and other resources, directions for art projects, or instructions to students for peer editing of projects. To embed the resources, follow these steps: Have the resource document available. From the Insert menu choose Object. Select Create from File� and click Browse�. Find the file you want to include and click OK. Select Display as icon and click Change Icon� and add a suitable caption. Click OK to add the caption and click OK to embed the file. Position the document icon at the bottom of the slide. You can go to View, Grid and Guides, and click Display Grid on Screen for a grid on which to line up your icons.
