Download
1 / 67
670 likes | 970 Views
Welcome to CORS Installation 101. Our Goals in this session:Identify the components that make up a CORS SYSTEMRelate a professional procedure for installing a reliable high performance CORSDemonstrate this procedure in use during a recent CORS installationWe want to prevent you from making mist

E N D
1. Installing a Continuously Operating Reference Station Tom Mackie
Americas� GPS Infrastructure Sales Manager
Carl Thompson
GPS Infrastructure Applications Engineer
2. Welcome to CORS Installation 101 Our Goals in this session:
Identify the components that make up a CORS SYSTEM
Relate a professional procedure for installing a reliable high performance CORS
Demonstrate this procedure in use during a recent CORS installation
We want to prevent you from making mistakes that will impact your system�s performance
CORS = Continuously Operating 24/7
Reference Station Data you can depend upon
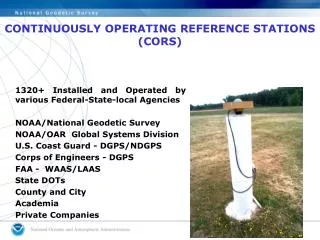
3. What are the components of a CORS installation? Planning and Preparation
Hardware
Monumentation
Software
Communications
Toolkit
Knowledge
System Installation
Installation Report
4. CORS Hardware Electronics Component
GPS Receiver
Network Router
Device Server
Uninterruptible Power Supply (UPS)
Electrical Surge protection
Equipment Location
Enclosure
Shelf
Computer?
Internet power switch
GPS Antenna Component
GPS Antenna
Location
Monumentation - Mounting
GPS Antenna Cable Component
Routing
Lightning protection
Grounding
Radio Component (optional)
5. Which components don�t come from Trimble? Electronics:
UPS - Uninterruptible Power Supply � Size for load and duration
Source: Any Computer Store
Brands: APC, Belkin, Tripp Lite, �
Router � Interface between GPS receiver and computer network
Source: Any Computer Store
Brands: Linksys, D-Link, Belkin, Netgear, Cisco, �
Device Server � Converts from serial communications to Internet Protocol network comms.
Source: Online Computer Stores (CDW.com, Amazon.com)
Brands: Lantronix, Comtrol, Moxa, �
Electrical Surge Protection � AC Power, Ethernet, Serial
Source: Online Computer or Comms Stores (CDW.com, Tessco.com)
Brands: APC, Tripp Lite, Polyphaser�
6. Which components don�t come from Trimble? Electronics:
Grounding System � Ground rod and wire to fully engineered system
Source: Communications Retailers, Grounding Specialty Shops (Tessco.com)
Brands: Polyphasor, Harger, Wireless Solutions
Custom Coaxial Cables � Very long or very short lengths
Source: Communications Retailers (Tessco.com, DavisRF)
Brands: Times Microwave, Amphenol, RFS Cablewave, Belden, Andrew
Lightning Protection � Surge suppressors to engineered systems
Source: Communications Retailers, Lightning Protection Specialty Shops (Tessco.com)
Brands: Polyphaser, Harger, Huber+Suhner
Mechanical Components � Hardware, Brackets, Metal Parts, Consumables
Source: McMaster-Carr (mcmaster.com), Grainger (grainger.com), Allied Electronics(allied.com), Newark Elec., Corner Hardware Store, Fabrication Shop
Brands: Various
7. -Monumentation General Requirements
Clear sky view
100 meters (328�) unobstructed view to the horizon 360 degrees
No nearby Signal reflectors
1.5 meters (5�) above horizontal surfaces
No nearby signal transmitters
300 meters (984�)
Stability
Thermal Expansion
Wind Loading
Soil Expansion/Contraction
Conditions must not change with time
8. -Monumentation Pillar Mount
Concrete
Metal
9. -Monumentation Drilled-Braced Monument
Extremely Stable
10. -Monumentation Building Mount
Rooftop attachment
Wall side attachment
11. -Which components don�t come from Trimble? GPS Antenna Monumentation:
Building Mount � Custom fabrication or standard parts
Source: McMaster-Carr (mcmaster.com), Grainger (grainger.com), Corner Hardware Store, Fabrication Shop
Brands: Various
Ground Pillar � Custom fabrication and/or concrete
Source: McMaster-Carr (mcmaster.com), Grainger (grainger.com), Corner Hardware Store, Fabrication Shop, Local Concrete Contractor
Brands: Various
Drilled-Braced Monument � See SCIGN site (www.scign.org)
Web Search: SCIGN Drilled-Braced Monument
12. -Planning � �The 5 P�s� Assemble your toolkit
Inspect the proposed reference station site
Plan the installation
Electronics Mounting
GPS Antenna Mounting
Electrical Power
Network Connection
Site Access
Site Security
Lightning Protection
Order the parts
13. Reconnoiter the Site How do we get access?
Arrangements for keys before arrival
Access to roofing
Security passes issued
Building tenants notified
Scheduling constraints
Consider this in your long-term service plan
14. -Reconnoiter the Site What are the major considerations?
Determine the GPS electronics location
Determine GPS antenna location
Determine the GPS antenna cable route
Is the site a suitable location for a CORS?
15. Recon the Site � GPS Antenna Installation Make notes! Take Pictures!
Dimensions
How will you mount the Antenna?
Bracket fabrication
Stability
Clear sky view
Installation practicality
Safety, long-term maintenance
Attachment
Fasteners, Welding
Offsite fabrication required?
Tradesmen � welder, mason, carpenter, roofer
Building penetration for mechanical bracket
Concrete forms?
Tools required?
Lift truck
Tall ladder
16. -Recon the Site � Electronic Components Installation Make notes! Take pictures!
How could the electronic parts be installed?
Enclosure or table top?
How to mount the equipment box?
Wall, studs, fasteners, cable runs,access
Structural modifications required?
Offsite fabrication required? Shelves, brackets
Network and power outlets
Is there commercial power at the site?
Do I need a new network connection?
Personnel � Will we need utility representatives on site during the installation?
17. Recon the Site � GPS Antenna Cable Route Make notes! Take pictures!
Lengths
Actually measure along the proposed route
Holes needed through interior walls?
Building penetration for the antenna cable to get to the GPS
Where? Wall? Roof? Existing penetration?
Leaks are bad
30m of cable is supplied � Times Microwave LMR400
Is this enough? Consider bends, turns, bulkheads, need for securing
Need longer cable?
Goal � no preamps
Commercial cables are available that will enable up to 300� lengths
Times Microwave LMR600
Sources: Tessco, DavisRF
18. -Plan the Installation The pieces of the puzzle have to fit
Revise your plan while on site
Revise your plan off site after reviewing pictures and sketches
Revise you plan based on available components
Go back and measure again with new plan
Check List:
Antenna can connect to the GPS receiver
GPS receiver can connect to power and a network
GPS antenna will be stable
Installation will be pleasing to the landlord and safe for you
19. -Plan the Installation Order the parts
Have parts fabricated
Arrange the contractors
Arrange site access
Get Permits
Spend the majority of the installation time planning and preparing. The actual installation should take 24 man hours or less on site.
20. Planning - Build The Basic Toolkit Notebook computer with serial port
Pad and pencil
Digital camera
Basic hand tools � Screwdriver set, wire strippers, crimp tool, pliers, cutters, sharp knife, ratchet set, bubble level, tape measure (100� and carpenters 25�), allen keys, wire strippers, multimeter, files, Hammer, compass, hacksaw, PVC conduit cutter
Drill � 3/8 inch for driving screws or drilling small holes, 1/2inch for drilling larger holes � especially through steel or masonry
Consumables � Electrical tape, Rubber Self Sealing Tape (3M2223), Tie wraps, Duct tape, Screws (stainless when outside), Drywall screws, Cable clamps, velcro cable ties, silicone sealant, paint, spray lube (WD40), 5/8-11 nuts (stainless), shop rags and cleaner (windex), hand cleaner, deodorant
Tool belt or tool bag � to keep hands free
Electrical Supplies - Coaxial cable adaptors, ethernet cables, power strip, grounding wire (#6 solid), wire terminals
Rope � with carabiners (or learn to tie knots)
Extension cord
Ladder
5-gal plastic bucket
Trash bag
Soldering Kit
Heat Gun
Adhesive labels � possibly your company contact information
21. -CORS Installation Install the CORS
Take components to the site
Install the components according to your plan
22. Safety Moment Studies have shown that you can perform hundreds of CORS installations in a lifetime. In order to make this possible, do not kill or seriously injure yourself during any one installation.
Hydrate or die
Heat related health problems are bad
Wear the proper clothing
Footwear matters
Cold will slow you down too
Use personal protective equipment
Safety Glasses
Ear Plugs
Work Gloves
It is always better to use these items and not need them than to find out the hard way that you should have used them.
Work in teams
Especially important when lifting and climbing
23. -Site Reports Installation reports (site reports) are not optional. They are a part of your deliverable to the customer.
Installation reports will be used for troubleshooting when necessary.
Document all serial numbers.
Include photos and diagrams of the site.
Document site contacts.
24. -Put Theory Into Practice: A Real CORS Installation
25. A Real CORS Installation A survey company wants to install a CORS at their building in Norfolk, Virginia
This CORS will stream data to RTKNet software
26. Site Recon Determine the GPS electronics location
Shared space designated �Electrical Room�
Excellent security
Good environmentals � temperature controlled
Easy physical access
Reliable electrical power
Large plywood mounting plates on wall
Located close to the roof
Room�s unfinished ceiling is roof decking
30m Antenna cable is sufficient
Network connection already within the room
Ground bar located in the room
27. -Site Recon Electrical Room
Lots of �stuff� in the way
28. -Site Recon Determine the GPS Antenna Location
Rooftop mount was the general plan
Building is 2.5 stories with a steel frame and brick siding
Easy access via internal ladder
Secure location
29. -Site Recon Determine the GPS Antenna Location
360 degree clear sky view
No nearby signal reflectors
No nearby transmitters
30. -Site Recon Determine the GPS Antenna Location
Vertical structural steel available for attaching mount
Very stable
Can be drilled
Minimal multipath
Mount 3m above HVAC air handlers
Roof can be penetrated
Rubber membrane
4� thick foam board
Corrugated steel decking
31. -Site Recon Determine the GPS antenna cable route
Cable can be attached to superstructure on rooftop
Can run through conduit over walkway
Cable can follow other cables in the electrical room
Roof will need a penetration
Easy inside access for drilling
Grounding point is available!
A 30m cable will work well
32. Preparation for Installation Plan the installation based on site inspection
Order all required components
Design any custom parts
Have custom parts fabricated
Schedule contractors
Schedule with property owner
33. Preparation for Installation Site was inspected and found to be good for a CORS
The antenna must have minimal visual impact
The installation was planned
A NetRS with Zephyr Geodetic antenna was ordered
A custom GPS antenna mount was fabricated
Various components and supplies were ordered
Permission was granted to work on the site and to access the roof
A temporary electronic access card and key were acquired
Contractors were scheduled
Tools were gathered
34. -CORS Installation You have a good idea where everything will go�.now start humping it inside!
Tip: add luggage wheels to your tool kit
Tip: get an intern to help
35. -Installation Procedure We chose to install in this order
Electronics cabinet
GPS antenna cable
GPS antenna
���.We did it this way so that we could be on the roof during the hottest part of the day.
36. Installation Procedure We chose to install in this order
Equipment cabinet
Antenna cable
Antenna
Really?
No. We did it in this order because we needed the roofing contractor to seal building penetration and we needed to visit a welder to modify our antenna mount
We were able to get the most done within the hours available
37. -Install the Equipment cabinet This cabinet came from Tessco
Large size allows for additional equipment
Clear hinged front � troubleshooting by the untrained
Lockable � no meddling by the untrained
19� rack � don�t forget to buy shelves
Landlord friendly - neat
Easy to order
38. -Install the Equipment cabinet Start mounting � based upon your Recon
Pick suitable fasteners � we used butterfly mollys
Drill using the supplied template
Be sure to level the template
39. -Install the Equipment cabinet Drill as needed
40. -Install the Equipment cabinet Mount the enclosure
2-man lift!
41. -Review Completed so far:
Site recon and installation planning
Transportation of equipment to the CORS site
Installation of the equipment cabinet
Still needed:
Install the GPS antenna cable and accessories
Which means a building penetration
Install the electronic components in the cabinet
Install the antenna mount and GPS antenna
42. A Word About Cutting Holes in Buildings Always check with the landlord
When waterproofing systems are in place such as a rubber roof, hire a contractor
If you don�t know how to make a hole through the material, hire a contractor
Time the drilling so that you are not doing the job on a bad day or there is potential of rain if you need to leave a hole. Always temporarily patch the holes if you must leave the site.
Check to see �what�s on the other side� � BEFORE DRILLING
TIP � Leaks are Bad
43. Let�s Drill Through the Roof Contact a roofing specialist � you can�t buy this stuff at Home Depot.
Measure twice or more � drill once
44. Roof Penetration �Claudio the roofing guy�
45. Roof Penetration The hole was drilled and the Antenna Cable has been roughed into place.
TIP - Protect the factory �N� or �TNC� connector with tape or a dummy plug to prevent damage. We used a dummy plug (add to your toolbox)
46. Roof Penetration Claudio works his magic�
Prep the area
Seal the cable
Use an off-the-shelf seal or make one � we made one
Use the correct glue
Seal edges with the correct sealer
47. Roof Penetration Claudio works his magic�
Caution: Flammable
48. Roof Penetration TIP- Secure the cable while curing
49. -While The Roof Seal Is Curing � Move Inside Prep the cable ends � we recommend you buy patch cables and avoid terminating cables in the field.
Connect the cables with the lightning arrestor In-Line
50. -Cabling the GPS Antenna � Lightning protector Lightning protector must be grounded
DO NOT mount the unit to the back of the NetRS
Check www.polyphaser.com for tips
51. -Secure the Cabling Landlord wants it neat
Use clips to secure all wiring
This room may be used by unknowing maintenance people. Secure your installation out of their way. Otherwise it is guaranteed to be damaged.
52. -Populate the Equipment Cabinet Planning ahead means you have shelves for all gear
We improvised shelves from HomeDepot
NetRS
Router
UPS
53. -Populate the Equipment Cabinet Orderly wiring
Tie Wraps
Hook and Loop ties
54. -Populate the cabinet TIP � Leave the NetRS serial cable in the cabinet for service
55. -Review So far we have finished:
Site recon and installation planning
Transportation of equipment to the CORS site
Installation of the equipment cabinet
Routing the GPS antenna cable
Installing the electronic components
We still need to:
Install the antenna mount and GPS antenna
56. GPS Antenna Mount Installation The mount was fabricated before CORS installation
Welded Steel
Problem � We realized the mount was too short which would lead to multipath. We contacted a speed shop for pipe and welding services (after hours). (The 1.5 meter rule)
After modifications, the mount was professionally painted
57. -GPS Antenna Mount Installation Holes were marked and drilled using �� drill
Have sharp bits
Use cutting oil
58. GPS Antenna Mount Installation We used self-tapping screws to fasten the mount to the structure
59. -GPS Antenna Mount Installation Attach the Mount
60. GPS Antenna Mount Installation Finally, Install the antenna and secure the cable
Tip � tape the cable to protect from UV
61. -GPS Antenna Mount Installation A Beautiful Moment
62. -GPS Antenna Mount Installation The landlord did not want the antenna to attract attention.
63. Completion of Installation Electronic components had to be configured
NetRS
Router
65. Thank you
66. Resources � Supplies and Information www.tessco.com
www.davisrf.com
www.mcmaster.com
www.alliedelec.com
www.newark.com
www.ngs.noaa.gov/CORS/Articles/Cors_guidelines.pdf
www.polyphaser.com
www.harger.com
67. Remember the 5 Ps