Download
1 / 16
160 likes | 531 Views
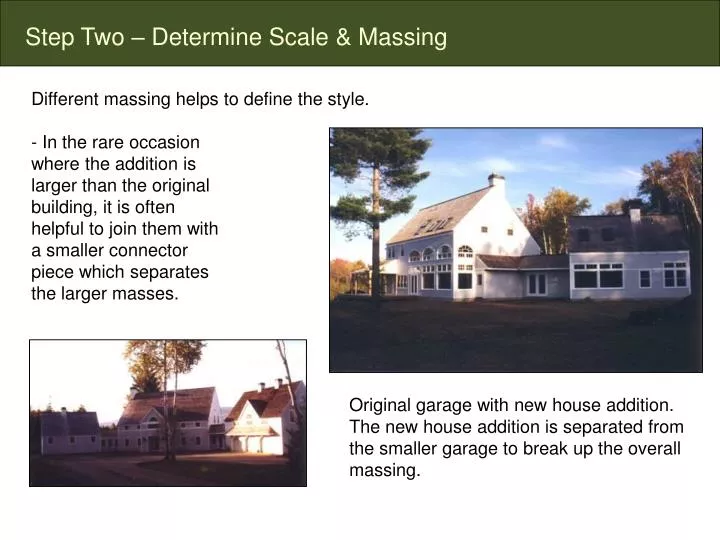
Step Two – Determine Scale & Massing. Different massing helps to define the style. - In the rare occasion where the addition is larger than the original building, it is often helpful to join them with a smaller connector piece which separates the larger masses.

E N D
Step Two – Determine Scale & Massing Different massing helps to define the style. • - In the rare occasion where the addition is larger than the original building, it is often helpful to join them with a smaller connector piece which separates the larger masses. Original garage with new house addition. The new house addition is separated from the smaller garage to break up the overall massing.
Step Two – Determine Scale & Massing Façade elements should have similar scales. Wrong Correct - The larger scale picture windows shown on the left are not in keeping with the scale of the original building. To keep the scale down, separate the windows from each other and use windows of similar size. Also, the double-hung windows with 6 over 6 muntins division help to further define the residential scale.
Step Two – Determine Scale & Massing Façade elements should have similar scales. • The scale of materials also has an effect on the appearance of the building. • Here, the clapboard siding of the new addition does not match the siding on the original house. • Even if a different material is used, it is best to use them in a way which the scale is consistent. • Note the inappropriate use of shutters on the new windows.
Step Three – Roof Design Try to keep consistent proportions of façade elements. • Gable and eave overhangs on the new addition should generally try to match those on the original design when possible. • - Overhangs on smaller roof areas, such as dormers, typically do not have to be as large as the main roof. However, their roof lopes should be consistent. Roof dormers add an additional scale reduction to the overall design, especially to large roof areas. They should be used instead of skylights whenever possible. If skylights are desired, they may be more appropriate on the back of the house.
Step Four – Proportions Different treatments for same openings…...a missed opportunity. Example A: Five narrow casement windows that do not match the rest of the windows in the house. These owners would rather have double hung windows that match the others. Example B: The same opening could have been used for three double hung windows like the rest of the house (Pictured above). Instead, they installed five narrow windows because they thought they had to be the same width as the older casement windows.
Step Four – Proportions Try to keep consistent proportions of façade elements. • - Façade elements such as windows or decorative items should be kept in similar proportions between the old and new construction. It might not always be possible, for example, to find an exact match to an old window, but it is usually possible to match the proportions. Old Window: 3’-0” x 6’-0” (Twice as tall as it is wide) New Window: 2’-8” x 5’-4” (Twice as tall as it is wide)
Step Five – Fenestration Try to keep a consistent percentage of fenestration (openings in a façade). 38% Open 18% Open The fenestration percentage is a quick way to determine if the size and spacing of your windows and doors is compatible with the original design. Typically speaking, if the percentage is more than twice the original amount, your windows are too big, too close together, or both. In this example, the opening percentage is more than double, and is beginning to look out of character.
Step Six – Façade Composition Determine an organizational theme for the façade. • Example of Symmetry. • Both the original building and the new addition each have symmetrical façades. • This is generally the simplest design and most easily recognizable.
Step Six – Façade Composition Determine an organizational theme for the facade. • Example of Rhythm. • Both the original building and the new addition each use similar rhythm spacing to define their window placements which helps to tie them together. • This is a more complex composition to experiment with, but can lead to very interesting designs. A B A B A
Step Six – Façade Composition General points to remember: • Try to take design cues from the original structure whenever possible. • - Generally speaking, an easily recognizable pattern (such as symmetry) is the most successful façade design. You can also experiment with more complex designs that create rhythms and patterns by themselves and with the original façade at the same time. • Try to avoid large amounts of blank wall on the front facade. • - Avoid placing windows or doors too close to an adjoining wall or exterior corner. • The front façade is usually the most important part of the exterior design, and should try to reflect the overall character of the original. If necessary, the side and rear façades can have more flexibility.
Step Seven – Material Selection General points to remember: • Any transition from one material to another should be accompanied by a “hard edge” where one material abuts a right angle turn that stops it and begins the start of the new material. • Whenever possible, try to match the same materials used on the original building. • Smaller scale, natural materials such as wood clapboard or brick are generally preferred. • Try to keep the detailing consistent. If the trim around the existing windows is 4” wide, do the same on the new windows. • - Cheaper materials don’t always mean a cost savings.
Porch Design & Restoration • Typically the front steps should align with the main entry for formal design. • End of porch should stop short of corner. • - Width of porch should be divided equally into a regular pattern of columns. This does not always have to align with the spacing of the windows, and often times does not. However, if possible, it strengthens the façade composition and provides a more formal design. A well designed front porch makes a house more inviting and provides a relaxing atmosphere.
Porch Design & Restoration • Provide at least 8” of space below the second floor windows to reduce rain water splash-back and for proper flashing. • Porch roof materials should ideally match those on the main roof. • Provide a diversion for rainwater and snow over the porch stairs. This has the added benefit marking the entry point and adding a scale reduction element.
Porch Design & Restoration • The overhang and slope of the porch roof does not need to match the main roof, and typically is much less. • Provide a return post or pilaster up against the house. • - For best results, the porch should be deep enough to accommodate some chairs and a small table for gathering.
Porch Design & Restoration Typical Column Design: Capital The use of the optional pedestal feature provides an area to accept the railings and creates an area above for a more intricate design if desired. Shaft The proportion of a column or post is very important. Columns should not appear too thin or spindly to carry the weight above them. At the same time, they should not appear too thick. Typically, this means about 10-20 times as tall as it is wide. Pedestal (optional) Base
Restoration • Restoration work: • Only remove as much of the existing materials as you have to. • - Do work in small batches, using hand tools when possible. • - The final appearance of the work is the priority in historical restoration. The actual materials or methods used are secondary. • - Avoid the temptation to replace finish wood with pressure treated wood unless it is properly weathered or a hidden structural element. Pressure treated wood