Download

1 / 18
251 likes | 770 Views
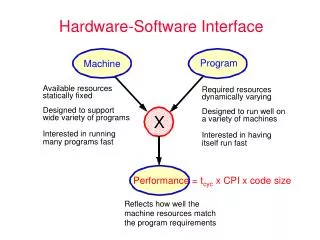
The Hardware Interface. The Hardware Interface. The 68000 Hardware Interface Chip Pins – group pins into classes Specifics of the classes – look at each class of pins in turn Some basic interfacing to those pins. Chip Interfaces. Chip interface for a microprocessor

E N D
The Hardware Interface Lecture 3 - Instruction Set - Al
The Hardware Interface • The 68000 Hardware Interface • Chip Pins – group pins into classes • Specifics of the classes – look at each class of pins in turn • Some basic interfacing to those pins Lecture 3 - Instruction Set - Al
Chip Interfaces • Chip interface for a microprocessor • Microprocessor chip is not stand alone • To make it work must add • Memory • I/O interfaces • Timing • Other support pin connections that are processor specific • Support pins like RESET Lecture 3 - Instruction Set - Al
Microprocessors and microcontrollers • What is the difference in a microprocessor and a microcontroller? • Microprocessor – needs memory, I/O, and other support to operate. • Microcontroller – almost stand alone • Many have internal clock – can add an external crystal if desired but usually not required • RAM and ROM on the chip (although limited in size) • I/O on chip – often dual use for I/O and address/data to/from memory • Minimal external support needed Lecture 3 - Instruction Set - Al
The 68000 pinout • 64 pin chip • Pins can be placed into 3 categories • System support • Special purpose • Usually device specific • Memory and peripheral interface Lecture 3 - Instruction Set - Al
System support pins • Most are common to all microprocessor and microcontroller chips • Power Supply • 68000 has 2 each Vcc and GND pins (4 total) • Why? • Better on chip power distribution and thus, a more reliable chip. • Less voltage drop to many points on the chip Lecture 3 - Instruction Set - Al
System support pins - 2 • Clock • Single phase TTL-compatible signal • All internal timing derived for this signal • 68000 uses dynamic storage technique internally • What is dynamic storage technique? • VLSI technique that reduces the logic required and thus results in power savings • Relies on the capacitive nature of CMOS VLSI Lecture 3 - Instruction Set - Al
System support pins - 3 • 2 Phase Clock operation • Non overlapping • Only 1 high at any time • When asserted • Input value applied • Value is then held by the capacitive charge on the output, signal line, and gate input Lecture 3 - Instruction Set - Al
System support pins - 4 • RESET* (* means active low) • Common to all microprocessors and microcontrollers • Forces processor into a known state • Reset action on the 68000 • Load the supervisor stack pointer from memory location $00 0000 and loads the PC from address $00 0004 • RESET* and HALT* asserted for at least 100ms for correct reset action to be initiated when they are no longer asserted. Lecture 3 - Instruction Set - Al
System support pins - 5 • RESET* also acts as an output to allow reset of other system devices • HALT* (also a bidirectional pin) • Active low • When asserted by external device, causes 68000 to stop processing at end of current bus cycle and tristate data and address busses Lecture 3 - Instruction Set - Al
System support pins - 6 • HALT* • Enables the 68000 to execute a single bus cycle each time asserted • Thus allows the processor to be stepped through the program cycle by cycle. • USEFUL FOR DEBUGGING • Cycle by cycle is not common but instruction by instruction is present in most microprocessors and microcontrollers • Halt can also be an output to indicate error conditions Lecture 3 - Instruction Set - Al
Special Function Pins • BERR* • Bus error input (active low) • Informs the processor that something has gone wrong with the current bus cycle • Allows for “graceful” recovery if possible • Action taken is complex and also dependent on HALT* Lecture 3 - Instruction Set - Al
Special Function Pins -2 • Bus Arbitration Control – 68000 support direct memory access (DMA) • DMA – where the processor grants another device control of the bus • 3 pins dedicated to “bus arbitration”, .i.e., arbitrating who controls the bus See next slide For signals on figure Lecture 3 - Instruction Set - Al
Special Function Pins - 3 • Bus arbitration pins • BR* - Bus Request – when asserted informs the CPU that another device wishes to take control of the system bus. • BG* - Bus Grant – an output from the 68000. When asserted tell the device that asserted BR* that it is being granted control of the bus. When this device is done with the bus it must deassert its BR signal • BGACK* - Bus Grant Acknowledge – and input that tells the 68000 that the device wishing control and granted control, acknowledges that it now the bus master. Lecture 3 - Instruction Set - Al
Special Function Pins - 4 • Function Code Outputs • Provides information about the nature of the bytes of memory currently being addressed in the current bus cycle. • Has 3 such pins – FC0, FC1, FC2 Lecture 3 - Instruction Set - Al
Function codes • As an instruction goes through its cycles to execute, the function code outputs change. • Possible to have separate regions of memory addressable only for program and data Lecture 3 - Instruction Set - Al
Special Function Pins - 5 • Interrupt control Interfaces • 3 interrupt control inputs • IPL0*, IPL1*, IPL2* • 3 input pins allow 8 level for setting priority on devices requesting interrupt in hardware. • Allows servicing the more important request when multiple requests arrive during the same cycle. • Level 7 – all pins asserted – always serviced Lecture 3 - Instruction Set - Al
Special Function Pins - 6 • Interrupts can be masked off • Bits 8,9, & 10 of the status word indicate the level of interrupt that will be serviced • Priority of interrupt must be equal to or greater than this level to be serviced • So level 7 is highest (IPL0*, IPL1*, IPL2* all asserted). Level 6 next where (IPL0*, IPL1*, IPL2). Lecture 3 - Instruction Set - Al