Download

1 / 54
620 likes | 991 Views
Chapter 7 Dimensioning. Contents. Introduction. Dimensioning components & their recommended practices. Dimensioning the object’ s features. Placement of dimensions. Problem solving steps. Introduction. Definition.

E N D
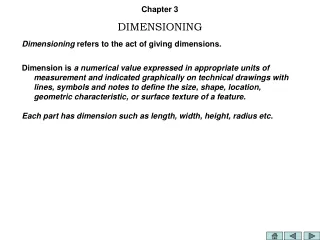
Chapter 7 Dimensioning
Contents Introduction Dimensioning components &their recommended practices Dimensioning the object’ s features Placement of dimensions. Problem solving steps
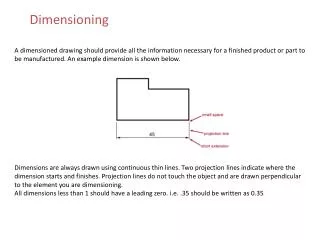
Definition Dimensioning is the process of specifying part’ sinformation by using of lines, number, symbolsandnotes. Notes 1. Lines to be used are alwaysthincontinuous line. 2. Symbol or abbreviation commonly found in a drawing are - “diameter” is represented by a symbol “f”. - “radius” is represented by a letter “R”.
Process Level Types of an information A basicinformation (this course)1. Sizes and location of the object’s features. (this chapter) 2. Type of material 3. Number of piece required to assemble into a single unit of a product (or machine). Example : Roughness condition A higher-levelinformation 1. Tolerances : Size and geometric2. Surface roughness 3. Manufacturing or assemble process descriptions.
Dimensioning components : General topics
Dimensioning components Extension lines Example - indicate the location on the object’s features that are dimensioned. 20 f10 Dimension lines(with arrowheads) R16 - indicate the direction and extent of a dimension, and inscribe dimension numbers. Dimension numbers (or dimension figures) 13 123o Leader lines - indicate details of the feature with a localnote. Notes - local or general note
Applying the dimensioning components Mostly done by using Extension line, dimensionline and dimension number Leader line and note Example Example f10 27 45o Notes The appropriate method depends on the object’s features. Detail of a local note depends on the object’s features.
Dimensioning components : Recommended practice
Poor practice 3 2 2 1 4 Extension line Always leave a visible gap(≈ 1 mm) from a view or center lines before start drawing a line. Extend the lines beyond the (last) dimension line 2-3 mm. Good practice
Extension line Do not break the extension lines as they cross any line types, e.g. visible line, hidden line or center line, i.e. extension line always a continuous line. Poor practice Good practice 1 3 2
Dimension line Dimension lines should be appropriately spaced apart from each other and the view. Poor practice Good practice Too close 34 30 25 34 30 25 Too far At least 2 times of a font size 34 30 25 At least 1 time of a font size
Dimension number : General Lettered with 2H or HBpencil. The height of numbers is suggested to be 2.5~3 mm. Place the numbers at about 1 mm above and at a middle of adimension line. Poor practice Good practice 34 30 30 25 25 34
Dimension number : Number system 1. Metric system (This course) (ISO and JIS standards etc.) Examples 32, 32.5, 32.55, 0.5 (not .5) etc. 2. Decimal-inch system(ANSI standard) Examples 0.25 (not .25), 5.375 etc. 3. Fractional-inch system , Examples etc.
Dimension number : Unit Lengthdimension is expressed in millimeters without a necessity tospecify a unit symbol “mm”. Angulardimension is expressed in degree with a symbol “o” places behind the number (and if necessary minutes and seconds may be used together). Poor practice Good practice 60 60o 25 25 mm
Dimension number : Narrow space situation If there is not enough space for number or arrows, put it outside either of the extension lines. Good practice Poor practice 16.25 1 1 1 16.25 16.25 or Not enough space for number Not enough space for arrows
2nd choice 1st choice Dimension number : Orientation 1. Aligned method (This course) The dimension figures are placed so that they are readable from the bottom or right sideof the drawing. 2. Unidirectional method The dimension figures are placed so that they can be read from the bottom of the drawing. Do not apply both systems on the same drawing or on the same series of drawing (JIS Z8317).
EXAMPLE :Orientation of a length dimension 1. Aligned method (This course) 2. Unidirectional method 30 30 30 30 30 30 30 30 30 30 30 30 30 30 30 30
EXAMPLE :Orientation of an angular dimension 1. Aligned method (This course) 2. Unidirectional method 45o 45o 45o 45o 45o 45o 45o 45o 45o 45o 45o 45o 45o 45o 45o 45o
Local notes Lettered with 2H or HBpencil and the height of 2.5~3 mm. Must be used in a combination with a leader line. Place near to the feature which they apply but should be placed outside the view. Placed above the bent portion of a leader line. (This course) Always be lettered horizontally. Poor practice Good practice 12 Drill 12 Drill 12 Drill 12 Drill Too far ≈ 10mm
Dimensioning the object’s features
Length Dimensioning components Information to be dimensioned - Length of an edge Extension and dimension lines, and dimension number - Distance between features 60 Example 30 7 15 10 40
Angle Dimensioning components Information to be dimensioned Extension and circular dimension lines, and dimension number - Angle between edges. A circular dimension line must have its center at the vertex of the angle. Example Poor practice
Arc 60o 60o 30o 30o Dimensioning components Information to be dimensioned - Radius Leader line and local note Extension and dimension lines, and dimension number - Location of its center The letter “R” is written in front of a number to emphasize that the number represents radius of an arc. Leader line must be aligned with a radial line and hasan inclined angle between 30 ~ 60 degs to the horizontal.
Arc Sufficient space for both. Sufficient space for arrowhead only Insufficient space for both R62.5 R200 R200 R6.5 R62.5 Place a note outside Place a note and an arrow outside The note and the arrowhead should be placed in a concave side of an arc, whenever there is a sufficient space. Example : Radius of an arc
Arc : Common mistakes R62.5 R62.5 R62.5 R62.5 R62.5 62.5 R62.5
Arc Method 1 Method 2 A drawing sheet If the arc has its center lies outside the sheet or interfere with other views, use the foreshortened radial dimension line. Example
Curve (A combination of arcs) Dimensioning components Information to be dimensioned - Radius Leader line and local note Extension and dimension lines, and dimension number - Location of its center Example : Radius of the arcs Poor practice R20 R40
Fillets and Rounds 2. Most of fillets and rounds have an equal radius except for some places 1. All fillets and rounds have an equal radius R12 NOTE: All fillets and round are R6.5 unless otherwise specified. NOTE: All fillets and round are R6.5 Dimensioning components Information to be dimensioned 1. Leader line and local note 2. General note 3. Combination of both - Radius Example
Cylinder Measurement of object’s diameter 150 70 Dimensioning components Information to be dimensioned - Diameter Extension and dimension lines, and dimension number - Length Diameter should be given in a longitudinal view with the symbol “ ” placed in front of a number. Example
External chamfer S S q q Case of 45 degrees Case of 45 degrees CS CS S S S S S q Dimensioning components Information to be dimensioned 1. Leader line and local note or - Linear distance - Angle 2. Extension and dimension lines, and dimension number
Hole Dimensioning components Information to be dimensioned - Diameter Leader line and local note - Depth Extension and dimension lines, and dimension number - Location of its center - Number of holes having an identical specification Local note Diameter and depth of the hole should be given in a circular view. Location of a hole should be given in circular view.
Small hole : Specifying a diameter and a depth f 10, 12 Deep f10 1) Through hole 2) Blinded hole Hole’s depth (or10 Drill) (or10 Drill, 12 Deep)
Small hole : Specifying a location 40 Drilling a hole Distance from center to center Play
Large hole Use leader line and note Use diametral dimension line Use extension and dimension lines f 50 f 50 f 50 Three possible methods are:-
Hole : Common mistakes f xx f xx f xx f xx f xx Rxx
Straight slot Dimensioning components Information to be dimensioned - Length Extension and dimension lines, and dimension number - Width - Location pad pad
Straight slot 15 15 50 40 Machining process Distance from center to center Tool cutting distance Dimen- sioning Play Play
Keyseat Dimensioned according to the standard sizes of a key or to facilitate a manufacturing process. Key (standard part) Less preferable method Shaft with keyseat 25 20
Placement of dimensions
Recommended practice 1 Extension lines, leader lines shouldnotcross dimension lines. Example Poor practice Place longer dimensions outside shorter ones.
Recommended practice 2 Extension lines should bedrawn from the nearest points to be dimensioned. Example Poor practice
Recommended practice 3 Extension lines of an internal feature cancross a visible line without leaving a gap at the intersection point. Example Wrong
Recommended practice 4 Do not use visible, center, and dimension lines as an extension lines. Example Poor practice
Recommended practice 5 Avoid dimensioning hidden lines. Example Poor practice
Recommended practice 6 Place dimensions outside the view, unless placing them inside improve the clarity. Example 1 2
Recommended practice 7 Apply the dimension to the view that clearly represents the contour or shape of a feature. Example Poor practice
Recommended practice 8 Dimension lines should be lined up and grouped together as much as possible. Example Poor practice
Recommended practice 9 Avoid repeat a dimension (superfluous dimensions). Example Poor practice
Problem solving steps