Download
1 / 18
180 likes | 308 Views
Resolution. Digital Cameras Digital cameras measure the image size not in pixels per inch but instead, its measured in megapixels. A megapixel is simply 1 million pixels.

E N D
Digital Cameras Digital cameras measure the image size not in pixels per inch but instead, its measured in megapixels. A megapixel is simply 1 million pixels. To find out how many megapixels you need to create a particular image size, in Photoshop’s image size dialog box you set the resolution you want and the image size you want. Multiply the number of pixels together. In the example to the left you would need a camera that had 6.5 megapixels - (2179 x 3000 = 6,537,000)
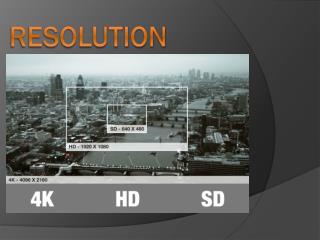
Print Resolution 300 pixels per inch (ppi) Resolution simply means how large a pixel is when you print it , and it usually is measured in pixels per inch. More pixels per inch means higher resolution. 1 inch 100 pixels per inch (ppi) 1 inch 30 pixels per inch (ppi) 1 inch 1 inch
How high of a resolution do you need? That will depend on what medium your image is viewed in such as monitors, printers, scanners, digital cameras. Unfortunately, there can be confusion because the terminology for different devices can vary (ppi, dpi, lpi, megapixels, and so on.) Sometimes we use lines per inch because “dots” aren’t used to make up the image such as in “half tones” used in newspaper work. Some Common lpi Settings: 85 lpi Newspaper Advertisements 100 lpi Newspaper Editorial section 133 lpi Magazines and brochures 150 lpi High-end magazines and high quality brochures 175 lpi Annual reports and high end brochures 53 lpi 300 dpi Laser printers 106 lpi 600 dpi Laser printers 212 lpi 1200 dpi Laser printers
You’ll get very high quality results on most injet printers if you use images with resolution settings between 240 and 360 ppi. Anything over 360 is just overkill. You probably won’t even notice the difference between 360 ppi and one with a higher resolution even if you use a magnifying glass to compare them. If you work with textured papers you might want to use closer to 240 ppi and if you use a glossy paper you might want to use 360 ppi. My general recommendation is to to split the difference and use 300 ppi if you are unsure.
Resampling Resampling will change how large the pixels are that make up the image. Any changes you make to the resolution setting when the resample box is checked will make the pixels larger or smaller, but the image will stay the same overall size. This might be useful if you have a high resolution image going to a low resolution medium. By making that change the file size would become less and that can be very useful in many different ways. Lowering file sizes for the purposes of the web will allow images to “load” faster in a browser and in printing it will lessen the time it takes to print. Caution is advised however as once the image is resampled to a lower resolution you will not be able to resize it back to a larger size since you “threw away” pixels to get the image smaller. Trying to make it bigger will result in a pixelated image.
Notice in this example that is not resampled. By changing the Resolution you change the size of the image but the number of pixels stays the same. Digital cameras frequently give a default setting of 72 ppi but the image is quite large. If you change the resolution to around 300 ppi the image size will be quite a bit smaller (typically 4 x6 inches.)
Sharpening the Image The last thing you’ll do before sending your image to its final destination may be to “sharpen” the image. Many but not all images need sharpening. However, its important to understand what that means. You will go to the “Filter” section under the menu bar to find the “Sharpen” commands. You do not use “Sharpen”...you will use “Unsharp Mask”. Oddly named, its is a remnant from techniques used in the printing industry in the past. Unsharp mask puts a “halo” around each pixel to make it appear sharper. If it is done in the correct proportion it will improve the appearance of the image. If it is overdone it will be apparent and lessen image quality. Different mediums will require different levels of sharpening. There are 3 settings in the Unsharp Mask dialog box. Amount, Radius and Threshold. The Amount is measured in percent and you can go above 100% without harm to the image. Radius refers to the how much space will be used for the contrast boost between pixels and the setting should probably should not exceed 1.5 pixels. Threshold determines how different two colors have to be for “sharpening” to kick in. Threshold set at 0 will sharpen everything. You should view your image at 100% size while sharpening.
The big problem with color is trying to get everyone to agree what color a color actually is....Buy three Red felt tip markers from three different manufacturers and see if they all look the same. Walk into a store to look at different televisions from different manufacturers and see if the pictures all look the same. In order to get accurate color throughout the process, all of the devices used must be “profiled” so that they know how one another interprets color. All of the monitors in this lab have been profiled using a sophisticated calibration device & software. You should calibrate your monitors at home if you intend to work there and expect half way accurate color here. All of the printers used here have had all of the papers commonly used here “profiled” with the same sophisticated device and software used on the monitors. Doing these things is only the beginning.....
How do you make a print that looks the same as it does on the monitor? Through color management.
Make sure your image is “tagged”. The photo lab’s computers should be set up to embed a profile of Adobe RGB 1998 automatically. In Photoshop you can set that up under Edit > Color Settings
You’ll need to make sure that several dialog boxes all are in agreement about what kind of file you are using, what kind of paper you are printing on and even what printer you are printing on. Whenever you are printing you will want to start the process by clicking on the “Print” button under File in the menu bar.
After you push the “Print” button you’ll see this dialogue box. Click on the “Print Settings” button. Check to make sure that your printer is selected, the right size paper is selected and that the image is properly oriented on the paper.
When you push the “Print” button on the main print dialog page you’ll be given yet another dialog box where you must check a couple of other things. The first is to check the “Print Settings”
The “Print Settings” dialog box looks like this. You should make sure that the “Media Type” agrees with the paper you are using, that the Print Mode is set to “color” if you are making a color print. Color Mode should be set to OFF (No Color Management). Output Resolution is set at “SuperPhoto 1440”.
Clicking on the “Printer Profile” tab brings up a large number of choices. You need to select the one that matches the specific paper your are using. If you don’t...your picture will not be color correct. The paper & Ink types are listed using a code...Enhanced Matte Paper = EMP Premium Luster Photo Paper = PLPP, Photo Black ink = PK, Mate Black ink = MK etc.
If you have followed all of the steps mentioned previously you should end up with a print that looks very close to what you see on screen. If your print looks vastly different than what you see on screen... chances are very good that you’ve neglected to make all of the proper settings agree with one another. You should double check to make sure that you have selected all of the proper settings.