Download

1 / 14
160 likes | 618 Views
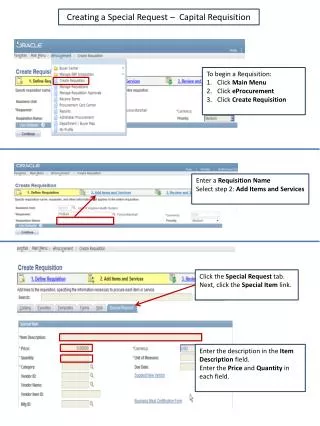
PowerPoint tutorial MENU (click to choose menu item) What is PowerPoint? Starting a new presentation General formatting Managing your slides Adding text, pictures, graphs, and links Other useful things Design ideas How to set up your presentation show

E N D
PowerPoint tutorial MENU (click to choose menu item) • What is PowerPoint? • Starting a new presentation • General formatting • Managing your slides • Adding text, pictures, graphs, and links • Other useful things • Design ideas • How to set up your presentation show Press <escape> to close this tutorial
What is PowerPoint? • PowerPoint a software application. • Is is an easy way of making pages (slides) for presentations. • The presentations are slide shows controlled by clicks of the mouse or automatically timed. • Each slide can have text, pictures, graphs, animation effects and links. • NOTE: This tutorial is made using PowerPoint. BACK TO MENU
Starting a new presentation When you open PowerPoint for the first time you will see the window on the right: Click on one of the option buttons (for your presentation click ‘Blank presentations’). Then click OK. You will see the choices of auto-layouts in the New Slide window Move the cursor to the layout you want. Then click OK. NOTE: At any time you can change the layout of a slide from the top menu (’Format’ and then ‘Slide Layout’) or by clicking ‘Slide Layout’ on the Common Tasks window (right) BACK TO MENU
Background colour. From the menu at the top of the screen, click ‘‘Format’, then ‘Background’ to get the Background window. Click on the arrow next to the colour box. • Choose a colour or pattern (these can be textures, patterns or even pictures) and click OK. Then ‘Apply to all’. Note: If you click the ‘Apply’ button instead,the changes are only to the background of the slide you are working with. Title & general text To keep the size and style of titles and text the same for every slide in your presentation, click ‘View,’ then ‘Master’ and finally ‘Slide Master’. Highlight the title or text and either, right click your mouse or choose ‘Format’ , and then ‘Font’ from the top menu. From the ‘Font window you can then choose the font, style, size and effects you want to use. You an also use the bottom left toolbar buttons (below) for formatting. General formatting BACK TO MENU
Click on the arrow on the bottom box to open the colour drop down menu (below). Choose a colour or effect (textures, patterns or even pictures) and click ‘Apply to all’. Note: The ‘Apply’ button only changes the background of the slide you are working with. BACK
If you choose the top left box when you click OK you will see the editor page below If you want to add text boxes, graphs, pictures and charts yourself, choose from the bottom right (a tile only page or a blank (empty) page. The other pages automatically add title, text, chart and picture boxes for you.. This page layout was used for this tutorials menu page. BACK
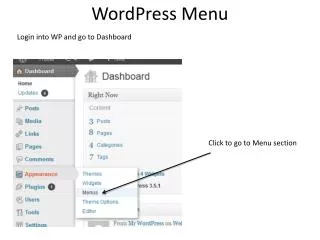
Managing your slides Useful buttons At the bottom of your slide window you can see the following: Slide View | Outline View | Slide Sorter | Notes View | Slide Show Slide View- Shows the selected slide in the PowerPoint editor. Outline View- Shows all slides in outline (text only) format. Slide Sorter- Shows all slides together and allows you to re-order, copy, or delete slides. Notes View - Shows the selected slide on top and a text box for presentation or handout notes (For example see a menu page in notes view. Slide Show - Begins the full-screen presentation, starting with the current selected slide. To add a new slide Click ‘Insert’ then ‘New slide’ from the top menu OR Click ‘New slide’ from the Common Tasks menu (right). NOTE: A new slide will always be added after your current selected slide. BACK TO MENU
Example: A slide in notes view. The notes box has been used to remind the user how to use the menu slide during his or her group presentation PowerPoint tutorial MENU(click to choose menu item) What is PowerPoint? Starting a new presentation Important viewing and menu options General formatting Adding and formatting text Inserting pictures, graphs, clipart etc. Animation Design tips Set up presentation show NOTE: FOR THE PRESENTATIONRemember: Each group member to start with this page and to move to their section of the talk by clicking their link.. BACK
Adding text, pictures, graphs, and links Adding to your slide layout After you choose a slide layout (as shown in the starting a new presentation page) you can still add other : text boxes charts pictures Symbols and objects (arrows, lines etc) hyperlinks (to other pages, web sites) etc. Click and choosing from ‘Insert’ from the top menu. Making Links As well as using the top menu (i.e.’Insert’ and then ‘Hyperlinks’ you can also add a link (for example BACK TO MENU )buy clicking the hyperlink button on your toolbar.You will then see the ‘Insert Hyperlink’ window for adding the link details. BACK TO MENU
The top box is for links to internet pages or files on your computer. You can search (browse) for these or simply type the URL (internet address) or a file’s path name (for example, s:/iain/picture1) of the link you want to make. This bottom box is used in the same way to make links to other PowerPoint slides. When you have added/input your link, click OK. BACK
Design ideas • Keep each slide simple. • No more than 4-5 points per slide. • No more than 4 colours. • Don’t read from the slides. • Use big text. • Font size of about 18 or more (For example, as with this page). • Use useful pictures and graphics. • Use colours carefully • Use colours which go together well for example: white on blue/ yellow on black. • Use the same colour system for all your slides. • Test your presentation BACK TO MENU
Other useful Things Transitions You can choose different effects between slides. For example are changed for example wipe left/wipe uo/dissolve/random etc. with or without sound, fast,medium or slow. Click ‘Slide show’ , then ‘Slide Transitions…’ from the top menu. Then use the Slide transition window (right) to choose your effect. Every time you choose the transition will be demonstrated to you in the picture box. When you are sure of the transition you want, click ‘Apply to all’. The ‘Apply’ button only makes an effect for the slide you are working with. NOTE: This tutorial uses random transitions with no sound. Animation For fun, you can make titles text etc appear one at a time using different animation effects. Click the animation effect button on the toolbar to get the’ Animation Effects’ window . Click the title or text text etc you want to appear with an effect. From the’ Animation Effects’ window choose an effect by clicking one of the effects buttons. Repeat this for other effects on a different piece of text etc or on a different slide. BACK TO MENU
How to set up your presentation show At any time You scan set up how you want your presentation to work. Click ‘ Slide show’ from the top drop down menu. Click ‘ Set up show’ to see the ‘Slide Show’ window (right). For a simple show you will need to choose ‘All’ and ‘Manual Advance’. To move from slide to slide during your presentation you simple click the mouse. You can also set up your slide changes to run automatically (Click ‘ Slide show’ from the top drop down menu then ‘Rehearse Timings’). NOTE: This however is only useful for very experienced presenters. You can see what you presentation looks like by clicking the Slide show button from the toolbar on the bottom left of your edit screen (right) After you have finished making your slide show Save your presentation as file type ‘PowerPoint Show’ (filename.pps) . PowerPoint Show files always open as a (full screen) slide show. Until this time your file has been saved each time as a ‘Presentation’ file (filename.ppt). BACK TO MENU