Download
1 / 7
70 likes | 78 Views
The transparent gold glitter background texture is the kicky cousin of elegance, no doubt stylish and tasteful, but also with a sense of humor about it. If you want to make a background for a cosmetics company, a make-up blog or even wedding invitations, we really recommend this gold glitter background PNG.

E N D
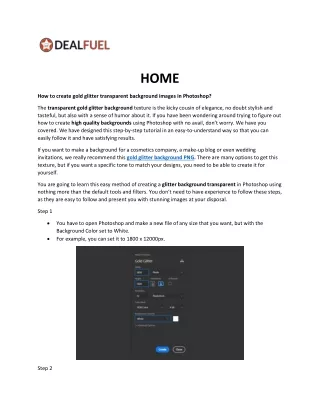
HOME How to create gold glitter transparent background images in Photoshop? The transparent gold glitter background texture is the kicky cousin of elegance, no doubt stylish and tasteful, but also with a sense of humor about it. If you have been wondering around trying to figure out how to create high quality backgrounds using Photoshopwith no avail, don’t worry. We have you covered. We have designed this step-by-step tutorial in an easy-to-understand way so that you can easily follow it and have satisfying results. If you want to make a backgroundfor a cosmetics company, a make-up blog or even wedding invitations, we really recommend this gold glitter background PNG. There are many options to get this texture, but if you want a specific tone to match your designs, you need to be able to create it for yourself. You are going to learn this easy method of creating a glitter background transparent in Photoshop using nothing more than the default tools and filters. You don’t need to have experience to follow these steps, as they are easy to follow and present you with stunning images at your disposal. Step 1 You have to open Photoshop and make a new file of any size that you want, but with the Background Color set to White. For example, you can set it to 1800 x 12000px. Step 2
Now unlock the background layer by clicking on the padlock icon in the Layers Panel. Step 3: Go on and unlock the background layer by clicking on the padlock icon in the Layers Panel. Step 4: Go to Filter > Pixelate > Crystallize and set the cell size to 6. Then click OK.
Step 5: Now press Ctrl+J on your keyboard in order to duplicate the background layer.
Step 6 Now go to Edit > Transform > Rotate 180 degrees. Step 7: Set the Blending Mode of the very duplicated layer to Multiply.
Step 8 You have to duplicate the current layer, so again press Ctrl+J on your keyboard to duplicate it. Step 9 Go to Edit > Transform > Rotate 180 degrees.
Step 10 You have to go to Layer > New Fill Layer > Solid Color. Also name this layer as "Glitter Color," then set the Mode to "Color Burn" and lastly, click OK. Step 11: In order to finish your glitter background, open the Color Picker Window and set the colour to #f3de51 and then click OK.
Step12: If you are interested in changing the glitter colour, just simply double click on the glitter colour layer thumbnail and pick any colour that you want in the colour picker window and click OK. Step 13: Now select Layer > New Layer from the menu (or you can just click on the square icon in the Layers Window). Automatically, the new layer should be transparent, and then drag this new layer below your image layer and select your content layer. Step 14: You have to make the background transparent, so using the lasso tool or the magic wand, select the area of the image that you want to be transparent. Then use a tolerance setting of 32, or you may experiment with different settings to get the result that you want. Then hit the Delete button and the selected area will be removed so that the transparent background becomes visible. If you have unconnected circles or shapes in your image, you may need to repeat the selection and deletion process on those other areas of your image. Step 15: To save the image as a transparent gold glitter PNG, click File > Save As and select PNG as the file format. Keep in mind that though a transparent background looks checkered while in Photoshop, it will definitely be transparent in the final PNG file. THANKS