Download
1 / 8
80 likes | 176 Views
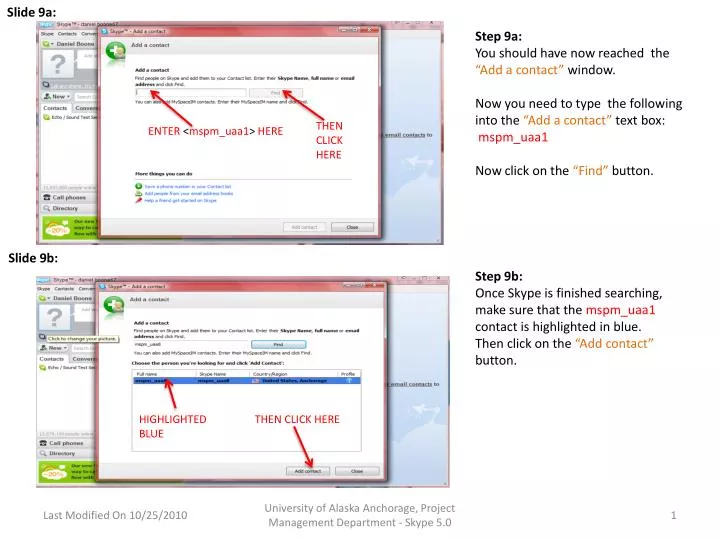
Slide 9a:. Step 9a: You should have now reached the “Add a contact” window. Now you need to type the following into the “Add a contact” text box: mspm_uaa1 Now click on the “Find” button. THEN CLICK HERE. ENTER < mspm_uaa1 > HERE. Slide 9b:. Step 9b:

E N D
Slide 9a: Step 9a: You should have now reached the “Add a contact” window. Now you need to type the following into the “Add a contact” text box: mspm_uaa1 Now click on the “Find” button. THEN CLICK HERE ENTER <mspm_uaa1>HERE Slide 9b: Step 9b: Once Skype is finished searching, make sure that the mspm_uaa1 contact is highlighted in blue. Then click on the “Add contact” button. HIGHLIGHTED BLUE THEN CLICK HERE University of Alaska Anchorage, Project Management Department - Skype 5.0
Slide 10a: Step 10a: Type whatever you would like to say to us in the chat box (where is says “Enter a message to Introduce yourself.”) Give your name, what class your taking, etc. so the tech on the other end of the call knows why you are attempting to contact the UAA PM Department. Then click on the button that says “Send”. THEN CLICK HERE TYPE YOUR MESSAGE HERE Slide 10b: Step 10b: When you see this screen you have successfully added mspm_uaa1 as a contact. Click on the button in the lower right corner that says “Close”. Step 10c: Now you will need to repeat the process for adding a new contact (shown in the last five screenshots) for the following list of UAA PM Department computers: mspm_uaa2 mspm_uaa3 mspm_uaa4 mspm_uaa5 CLICK HERE University of Alaska Anchorage, Project Management Department - Skype 5.0
Skype Operating Instructions Slide 11a: Step 11a: In order to make a call, start at the main Skype screen as seen here. Click on the contact name you would like to call from the list at the left – the name should be highlighted in blue. Then click on the green “Video call” button near the center of the window. Make sure your webcam is connected to your computer or Skype will give you an error. CHOOSE FROM CONTACT LIST THEN CLICK HERE Slide 11b: Step 11b: This is what the screen looks like when you are in a call on Skype. The video is the main part of the screen to the right and just below the video are controls to adjust your microphone volume, adjust the call volume, and Open and close the chat/text box. The full-screen control appears in the upper center of the video window when you move your mouse over the video. FULL SCREEN CONTROL OPEN & CLOSE THE CHAT/TEXT BOX MICROPHONE MUTE CALL VOLUME CONTROL CHATTING/TEXTING BOX University of Alaska Anchorage, Project Management Department - Skype 5.0
Skype Initial Setup & Troubleshooting Instructions Slide 12a: Step 12a: You will need to test your webcam and speakers before you make your first Skype call. To do this, first make sure your webcam and speakers are plugged into your computer and turned on. (If you are using a laptop, one or both of these items may be included as part of the laptop.) Also, make sure the volume is not muted on your computer. Next, you will need to open the main Skype window and click on “Tools” in the menu list near the top of the window. CLICK HERE Slide 12b: Step 12b: A drop-down menu will then appear as is shown to the left. Click on “Options” at the bottom of the drop-down menu. CLICK HERE University of Alaska Anchorage, Project Management Department - Skype 5.0
Slide 13a: Step 13a: Next, you will see the screenshot on the left. Click on the “Video Settings” option near the left of the new window. CLICK HERE Slide 13b: Step 13b: You should now have a window that shows video from your camera. Wave your hand in front of the camera to see if it is actually working. If the video does not appear, make sure your camera is plugged into your computer. If the camera still does not work, unplug it and plug it back into your computer. Ifthe camera is still not working, make sure it is securely plugged into your computer, shut down Skype and restart your computer. Then restart Skype and redo Steps 12a – 13b. University of Alaska Anchorage, Project Management Department - Skype 5.0
Slide 14a: Step 14a: Once your camera is functioning, click on the “Save” button near the lower right corner of the window. Then you can click on the “Webcam Settings” button near the center of the window to adjust your field of view. CLICK HERE ONCE YOUR WEBCAM IS WORKING THEN CLICK HERE Slide 14b: Step 14b: The “Capture Properties” window will now appear on your screen. This window allows you to adjust the field of view of your webcam. From the “Zoom/Face Tracking” button, you can zoom your camera in and out, or adjust the direction of view for your webcam. Note that some webcams are not capable of making these adjustments. You will have to physically move these webcams to change their field of view. Once you have made the necessary adjustments to your webcam, please close the “Capture Properties” window. USE THESE BUTTONS TO ADJUST THE DIRECTION OF VIEW MAKE SURE THIS BUTTON IS SELECTED USE THESE TWO BUTTONS TO ZOOM IN & OUT University of Alaska Anchorage, Project Management Department - Skype 5.0
Slide 15a: Step 15a: Once again from the “Skype Options” window, click on the “Audio Settings” option near the left side of the window. CLICK HERE Slide 15b: Step 15b: From this window you will be able to check the status of both your microphone (mic) and speakers. Note that most webcams also serve as microphones. If you have a separate mic, make sure it is plugged into your computer’s microphone jack – usually right next to your computers headphone jack. To check your mic on Skype, make noise and watch the “Microphone (top) Volume” bar in the “Skype Options” window. If the volume bar shows a green bar surging from left to right, Skype is registering sound and your mic is working. To test your speakers, click on the green play button to the right of the “Speakers” drop-down menu. If you hear sound from your computer after clicking the play button, your speakers are working correctly for Skype. MAKE NOISE – IF GREEN APPEARS HERE YOUR MIC IS WORKING CLICK HERE TO TEST SPEAKERS University of Alaska Anchorage, Project Management Department - Skype 5.0
Step 15b: (continued) • If your mic is not working, try the following – one at a time: • Unplug your webcam or microphone, and plug it back in. Check your micin the Skype “Audio Settings” again. • (Make sure you make enough noise near your microphone.) • Change the microphone type in the “Microphone” drop-down box. (There may be only one option to select.) • Check your microphone in the Skype “Audio Settings”. • Unplug your webcam or microphone, and plug it back in. Shut down Skype and restart your computer. • Check your microphone in the Skype “Audio Settings”. • Call the UAA PM Department for assistance - see contact information below. Please only contact • UAA IT Services if instructed to do so by the UAA PM Dept. • If your speakers are not working, try the following – one at a time: • Make sure the main volume on your computer is not muted and turned up. • Check your speakers by clicking the green play button in the Skype “Audio Settings”. • Change the speaker type in the “Speaker” drop-down box. (There may be only one option to select.) • Check your speakers in Skype again. • If your speakers are separate from your computer, make sure your speakers are set up correctly, i.e. • (connected to a power supply, connected to your computer, connected to each other) • and turned on with the volume turned up adequately. Check your speakers in Skype again. • If your speakers are separate, unplug them from your computer and plug them back in. Then shut down • Skype and restart your computer. For integrated speakers, just shut down Skype and restart your • computer. Then open Skype and retest your speakers in the “Audio Settings” window. • Call the UAA PM Department for assistance - see contact information below. Please only contact • UAA IT Services if instructed to do so by the UAA PM Dept. • Contact Information: • UAA PM Dept. UAA Information Technology (IT) Services • Phone: 907.786.1924 Phone: 907.786.4646 • Fax: 907.786.1935 Toll Free: 877.633.3888 • Email: pm@uaa.alaska.edu Email: callcenter@uaa.alaska.edu • www.uaa.alaska.edu/pmwww.uaa.alaska.edu/informationtechnologyservices University of Alaska Anchorage, Project Management Department - Skype 5.0