Download

1 / 18
190 likes | 508 Views
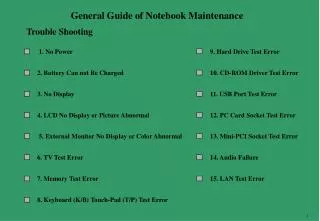
TROUBLE SHOOTING TRAINING MANUAL. This manual may not be reproduced with out the written permission of AS/R Systems . 122 BOARD. 122 Board (motor control board)

E N D
TROUBLE SHOOTING TRAINING MANUAL This manual may not be reproduced with out the written permission of AS/R Systems
122 BOARD 122 Board (motor control board) The motor control board is just what it says. It controls the motor speed at start and at ramp down. The High, and Low potentiometers on this board controls the speed to a finer degree. DO NOT TOUCH THE SLOW POD J2 from this board feeds J10 on the 124 board. Current limit (P4) and IR Comp (P3) Is controlled from this board also. TP1 to ground will give you the current limit in DCV
122 BOARD 122 Board (motor control board) The motor control board is just what it says. It controls the motor speed at start and at ramp down. The High, and Low potentiometers on this board controls the speed to a finer degree. DO NOT TOUCH THE SLOW POD J2 from this board feeds J10 on the 124 board. Current limit (P4) and IR Comp (P3) Is controlled from this board also. TP1 to ground will give you the current limit in DCV
122 BOARD • The 122 (motor control board) controls the input power to the various accessories in the 680 box i.e. SCR bridge, Field Bridge, Contactors etc. More importantly, the 124 board • Jumper’s 1 & 2 are dependent on input voltage. • 230vac jumper 2 is removed • 460vac both removed
124 BOARD The RMI 124 board (computer interface board) Is the brains of the 680 Motor Control Box. There is a series of small led lights on this board. They act as a conduit of information depending on which lights are on/off J2 &J3=Foot switch J4, J12= E Stop Jumpers J7= Reference Sensor J9= Count Direction Sensor J11= Controls left/right direction and Dynamic brake
124 BOARD • The LI (D Brake) must be on for the carousel to work. If this light is out the e stop circuit is open. Depending on the safeties, something is tripped. • L2 is the low speed light • L3 Left direction • L4 Right Direction • L5 This in conjunction with L3 or L4 • L6 This works in conjunction with L3,4, and 5 • Voltage at J6 1&4 should be240vac • If carousel is not stopping at the proper bin, and check lights L5 and 6 • They should flutter as the carousels slows to a stop using the foot switch • If they stay solid, replace C/D sensor • Transformers on top convert 230vac to 12vdc
IPC CONTROL BOARD The IPC is the termination point for all safeties, lite tree’s, Sort Bar’s, e stops, Reset button and computer cable One IPC can control 4 Carousels Each tower represents a carousel The green lights tells the operator what is on/off when something is not working. In this scenario, everything is a go
SCR BRIDGE The SCR bridge acts as a buffer between the input current from TS 12/14 on the main terminal strip (11/12 on older 680’s) A bad SCR bridge will cause the main fuse to blow immediately and, in most cases, blow the 122 board.
Contactors There are two contactors, left and right. They have a set of “points” that over time, tend to stick. A small file or emory board can be a temporary fix in an emergency. On occasions, you may hear the tell tale “click” of the contactor working but nothing happens. The carousel works in one direction but not the other. Determine which one is not working, cut power, file the points, then try again. Replace ASAP
Contact Coil The Contact Coil works in conjunction with the L/R Contactors. If you watch closely, you can see and hear the “Latch” release at the same time the contactor opens.
Field Bridge The Field Bridge is fed from TS 5 and 6 On the Power Terminal Strip. TS 5 and 6 represent the “F2 and F4” field windings in the motor.
C/D Sensor The Count Direction Sensor is represented on the 124 board by LED 5 for direction and 6 for count. If your carousel is being run by computer or a 530 box, this item controls where your carousel stops. If using a computer and your machine goes in one direction and does not stop. Chances are the count sensor is bad. If it starts and then stops after a few seconds, chances are it’s the direction sensor. Have some one rotate the carousel a few bins. Look at the bottom two led lights on the 124 board. As the carousel slows down they will begin to flicker on and off until the machine stops. If one did not flicker and remained on all the time it is bad.
Disk Blade, C/D sensor The Disk Blade or, “Chopper Blade” Is what the C/D Sensor uses to count. Each “Blade” is a pulse. Depending on the type of Carousel, pulse counts range from 245 to 315 with a 530 box or 945 to 1260 with a IPC. This is a 7 lobe 245 pulse count disk.
Reference Sensor The reference sensor starts the “Homing” process. Once the pendulum is hit by the clapper (next slide) The “C/D se nsor (slide 12) starts counting the pluses generated by the chopper blade (slide 13). The pulses are counted by the IPC/CIB and determines the bin to stop at.
Clapper The “Clapper” is mounted on top of a bin, (usually bin 1). When the clapper hits the pendulum on the reference sensor, the IPC/CIB starts counting the pulses generated by the chopper blade as it passes thru the C/D sensor. (The lack of metal on the chopper blade generates the pulse)
Carousel “Homing” • All carousels using either IPC’s or CIB’s, use the same procedure and “hardware” to find home. The only difference being the pulse count which is determined by the type of carousel. WH, the most popular, uses 980 in an IPC and 245 in a CIB. • There are Four separate pieces of hardware required for either IPC or CIB’s 1. Reference center- usually mounted on the first joint channel on the top of the carousel. The joint channel is where the first section is joined to the second section. The sensor is generally put on the right side as you face the carousel. The ref sensor has a “pendulum” that starts the “count” 2.“Clapper” The clapper is simply an “L” bracket mounted on top of a bin, usually bin 1. 3.The “Disk” or “Chopper Blade” is mounted on the side of the gear reducer. The absence of metal creates the “pulse” used by the C/D sensor 4.The last part is the C/D sensor for “count and direction”. This is mounted on the side of the gear reducer at the front of the carousel.
“Homing” • This can be on the rear reducer but very rare. • Placement is dependent on where the control boxes are placed usually to save on cabling. • When an IPC/CIB is first turned on, it’s lost. When a “go” command is given to turn to a certain bin, the carousel does not know where it is, ET must “go Home”. • The carousel will start to spin, depending on its present location, it could go 360 degrees or just a couple of bins, and it depends on where the clapper is. • Let’s say the present position is bin 45 on a 50 bin carousel. The carousel has not been “Homed” and you send it to bin 47. The carousel will rotate clockwise until the clapper (lets say it’s on bin one) hits the ref sensor, it will travel about a bin past the ref sensor, It now knows where it is. It knows where it is suppose to go, so, at this point the carousel will stop, and then go backwards to bin 47 as this is the shortest distance of travel. Once “Homed”, the carousel will always take the shortest route to it’s next location
SUMMARY • The 122 board is called the __________________________ • Which board controls the motor speed _________________ • Minimum voltage to run a carousel is __________________ • My carousel won’t stop at the proper bin. What’s Wrong ____________ • The fuse blows at power up. Probable cause _______________________ • My carousel only works in one direction. Probable cause is ____________ • each IPC controls up to ______________ carousels • The reference sensor starts the ___________ count • The current limit is found at _____________________ • Pulse count for your machine is ___________________