Download
1 / 8
100 likes | 1.05k Views
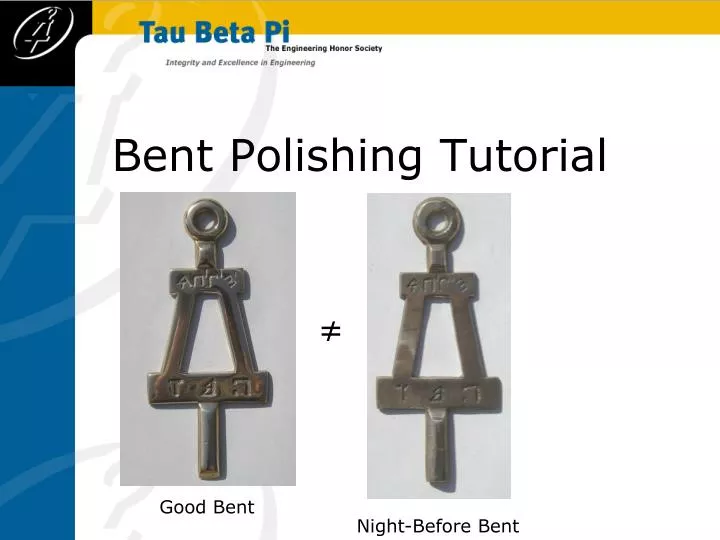
Bent Polishing Tutorial. ≠. Good Bent. Night-Before Bent. Starting Out - Supplies. Metal files Available from Home Depot, Lowes, etc.. ($5-10 for a set of several) Check out from office These are old and might not file as fast or as well Sand Paper

E N D
Bent Polishing Tutorial ≠ Good Bent Night-Before Bent
Starting Out - Supplies • Metal files • Available from Home Depot, Lowes, etc.. ($5-10 for a set of several) • Check out from office • These are old and might not file as fast or as well • Sand Paper • Range of grits from ~60 to 600 • Brasso • Available in the office • Newspaper/old rags • Steel wool
Step 1: Preparing Your Workspace • Filing metal will produce metal shavings… • Put old newspaper or something down so you don’t make a mess • Wash your hands when you’re done • You might want to wear old clothes as well
Begin filing with your largest file in a single direction Continue in that direction until all scratches are aligned in that direction DO NOT FILE TOO HARD!!!! Change directions 90° Continue filing until all scratches are now in that direction… Time to move on to step 3! Step 2: Filing
Step 3: Sandpaper • Start with low grit (~180), anything lower than that will leave scratches • Same method as for filing • Increase grit with every change of direction up to about 600 grit
Step 4: Finishing Touches • Brasso and Steel wool are the last steps in the process • Steel wool can be used before or after brasso to add shine • Come to the office, borrow the brasso, take it outside, and rub it on with an old cloth or t-shirt • Make sure to rub it in quite well • Rub off the brasso with a dry cloth or shirt
More on Step 4 • This is a very important step • Using a cloth or newspaper, keep repeating this step over and over to get rid of dullness and very small scratches • After this step, your bent should look almost as if it is made of gold and have a nice shine • Once you finish this step, find an old sock or cloth to carry your bent around in to prevent scratching
Additional Tips • Ask questions and advice • Start work early • Come by the office for feedback • If you think it is physically possible for it to improve… keep working • If you can’t see yourself in it… keep working • Some chapters suggest using windex as a final step • You can, under no circumstances, use any form of mechanical assistance such as grinders or polishers • Maintain the original shape of the bent as best you can!