Download
1 / 14
150 likes | 1.13k Views
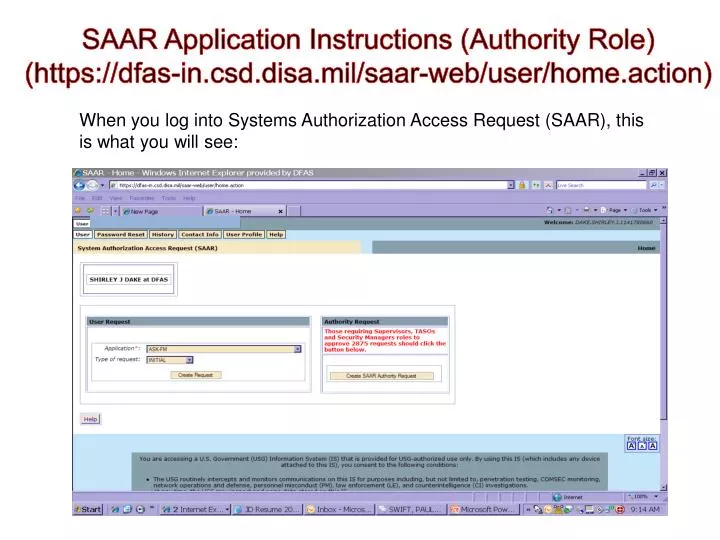
SAAR Application Instructions (Authority Role) (https:// dfas-in.csd.disa.mil/saar-web/user/home.action ). When you log into Systems Authorization Access Request (SAAR), this is what you will see:.

E N D
SAAR Application Instructions (Authority Role) (https://dfas-in.csd.disa.mil/saar-web/user/home.action) When you log into Systems Authorization Access Request (SAAR), this is what you will see:
Make sure the application selected is ASK-FM and request is INITIAL, unless you currently have access to another system through SAAR , in which case you select MODIFY. Select “Create SAAR Authority Request”.
The next screen shows your personal information. Make sure it is correct and the Information Awareness Training Date (IAT Date) is within the last year. Select “Next/Save” at the bottom of the screen to continue.
Fill in the Justification for Access: “Approve individual requests within my organization” Click on “Next/Save” to continue.
Click on the drop down and select “ASK-FM” for the authority role you are requesting. Select “Next/Save”.
This screen will ask if you want to display nonsecure items. Select “Yes”.
When you get this screen, you know your request was submitted. After approval from SAAR Operations, you will receive an email that your request has been approved.
Once you have access and log into SAAR, you will have your roles listed here. Select the approval role you want to use (i.e. Supervisor, TASO, etc.)
Once you select your role, you will see the following screen. You can either fill in the surname of the individual you want to approve or select “See all Users”. Now select “Filter”.
This screen shows all individuals available for approval. You can now (V)iew the 2875, (R)eturn the request, ( D)eny the request or (A)pprove the request.
If you select “V” for View, you will see the 2875 that was submitted. To close 2875 click on the x top right corner.
If you selected A for “Approve”, you will see the following screen. As Supervisor, you will be prompted to Select the TASO to Notify; As TASO, you will be prompted to Select the Security Manager to Notify. Use the drop down arrow to make your selection. If the individual you are looking for is not listed, they must register in SAAR for their Role. Select “Submit”.
You must now follow the screens to Digitally sign the request. You will get a screen telling you the request has been completed/forwarded to the next step.