Download
1 / 26
300 likes | 649 Views
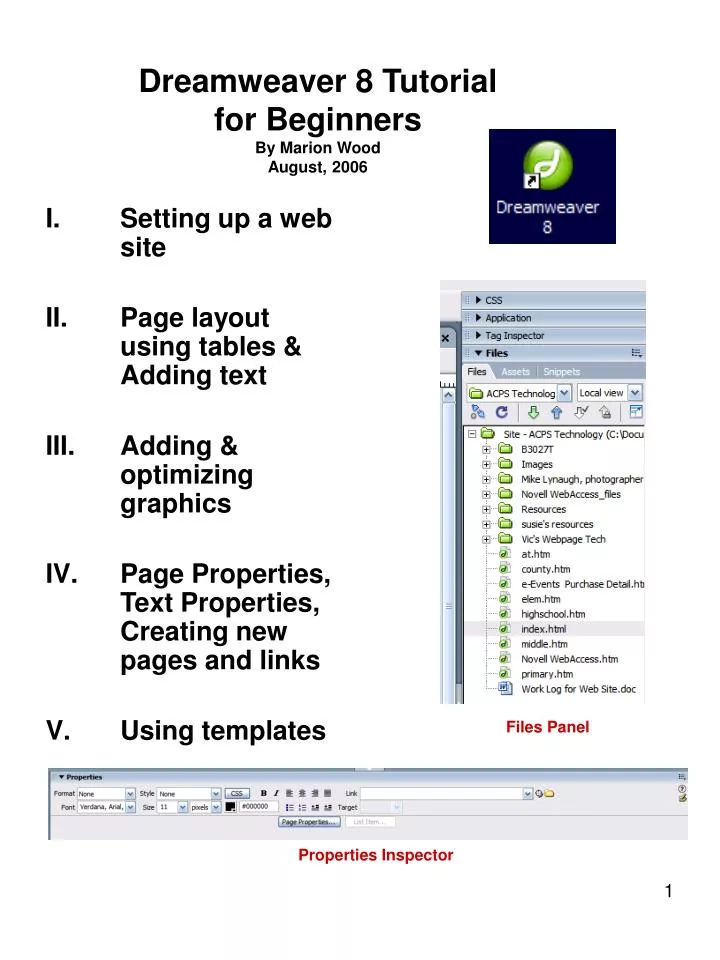
Dreamweaver 8 Tutorial for Beginners By Marion Wood August, 2006 Setting up a web site Page layout using tables & Adding text Adding & optimizing graphics Page Properties, Text Properties, Creating new pages and links Using templates Files Panel Properties Inspector

E N D
Dreamweaver 8 Tutorialfor Beginners By Marion WoodAugust, 2006 • Setting up a web site • Page layout using tables & Adding text • Adding & optimizing graphics • Page Properties, Text Properties, Creating new pages and links • Using templates Files Panel Properties Inspector
Part I Setting up a Site in Dreamweaver 8 • In order to keep all files together and relative to each other, it is necessary to create a folder for all your files in each web site. • Right-click on the desktop, click on New, click on Folder. Name the new folder “My Practice Web Site.” • Create a new folder inside the “My Practice Web Site” folder and name it Media. • Open Dreamweaver. The first time you use Dreamweaver, you choose whether you will operate in Designer View or Code View. Choose Designer. If this is not your first time to use Dreamweaver, you should automatically open in Designer View.
Open Dreamweaver, and choose Dreamweaver Site. • Make sure the Basic Tab is chosen. • Name your site “My Practice Web Site” and click on Next. • For now, choose No, I do not want to use a server technology. Choose Next.
Choose Edit local copies … and browse to select the folder you created for this site. Click on Next. • Choose None. Click on Next. We will change this later. • Your next page is the Summary Page and should look like this. Click on Done. • Your Site has been created and you should now see it in the Files Panel
Choose Create New, HTML. • Your page should look similar to the one on the right. • Choose File, Save. • Name your page index. Every web site has a home page and it is named index. Browsers look for the page entitled index.html. Important Note: Your home page must be named index.htm or index.html. • You have finished Part I and set up your site.
Part II Page Layout Using Tables & Adding Text • Tables are the most simple and direct way of creating a layout for your web site. • From the index page you created in Part I, Choose Insert, Table. Create a simple 3 row and 3 column table. Click OK. • Your page should look like this. • Select the 3 cells in the top row.
Choose Modify, Table, Merge Cells. • Type in your page title. • Note the Property Inspector at the bottom of the page. (This changes by what you have selected.) Click on the Align Center button. • Your Title is now centered in the cell. • Select the text. • Open the text box in the Property Inspector. Choose the Verdana family of fonts.
Highlight your title. In the Property Inspector, choose a larger font and click on Bold. • Select your table and notice this one is 200 pixels wide. • In the Property Inspector, change the width to 800 pixels and the height to 600 pixels. • Your table should now look similar to the one on the right. • Click inside the bottom right cell. In order to select it, click on the <td> at the bottom of the document window. This is a handy way to select different cells in a table.
Select the top cell by clicking inside it. Click on the <td> at the bottom of the document window. Type 50 in the height box and press enter. Your table should look similar to the one here. • Select the 2 bottom left cells. • Choose Modify, Table, Merge cells. We will use these merged cells to create a horizontal navigation bar. • With the merged cells selected, change the vertical and horizontal alignment within the cell to Left and Top. Notice your text cursor moves to the top left of the cell. • Sometimes it is helpful to place a table within a table. Click inside the left merged cell. Choose Insert, Table, and choose 6 Rows and 1 column.
Type page names in the table. These will be the links to the other pages in the site. • Your table might change when you insert graphics or text. Just stretch it to the desired size. You will want to make your page size approximately 800 X 600 pixels. Minimize Dreamweaver to your taskbar. • You have finished Part II. You have laid out your page using tables. 5 Basic Rules of web page design and layout Your web site should be easy to read. Your web site should be easy to navigate. Your web site should be easy to find. Your web page layout and design should be consistent throughout the site. Your web site should be quick to download. http://www.grantasticdesigns.com/5rules.htm
Part III Adding & Optimizing Graphics • Open Fireworks. You will notice that it is quite similar to Dreamweaver in that it uses the Property Inspector. • Click on Open and browse to the picture folder on your desktop (or where you are told it is). • Choose a picture to represent you. You can see a sample when you click on it. Click on Open. • Click on Modify, Canvas, Image Size. Our picture needs to fit in one of the cells in our table in Dreamweaver. So go back to Dreamweaver to see what size the cell is. • Open Dreamweaver, click on the bottom left cell. Notice the one here is 279 pixels wide. We would like our picture to fit in this cell.
Go back to Fireworks. Decide how wide you want your graphic to be in relation to the cell. 200 pixels might be good. • When you change the width to 200, notice the height changes also. It is important to have the box beside Constrain Proportions checked. Click on OK. • The picture is 47.8 kb in file size. That is not very large but needs to be even better. Also the white background needs to be made transparent. Jpg files are not able to have transparency. Png’s and gif’s can have transparency. http://darkwing.uoregon.edu/~jqj/pub-intro3/images-gif.html
The Export Wizard is a great tool. It can be used to reduce the file size and to create transparent portions of the file. Choose File, Export Wizard. • Select an export format should be checked. Press Continue. • Select Dreamweaver and press Continue. • Fireworks analyzes your file based on the information you provided and makes recommendations. Press Exit to see the recommendations. • Fireworks recommends 2 possiblities. The top choice is a gif file. The bottom choice is a jpg.
Notice how Fireworks has reduced the file size. • In order to make the background of the picture transparent, choose the gif file. • Click on the select transparent color icon. • With your eyedropper tool, click on the white background of the picture. • The checkerboard background shows that it is now transparent. • Choose Export. • When saving this file, adding “tr” to the title will help you to know that this is the picture with a transparent background. Save it where you will remember.
Click on Export. The file is now optimized. It is reduced in size while maintaining quality. It also has a transparent background. • Go back to Dreamweaver, click inside the cell where you want to place your picture. • Choose Insert, Image. • Choose your optimized file. Notice the size is now only 7kb. Click OK. • Important! The file needs to be imported into your root folder, so click Yes. • Put it in your root folder, inside your Media folder. Double-click on your Media folder to open it. It is good design practice to keep your files neatly filed. • Click on Save.
New in this version of Dreamweaver, is the opportunity to add alternate text at the time you insert the image. This makes your site more accessible to those with vision problems. Click OK. • Your picture is now in the cell of your choice. • While the image is selected, use the Property Inspector to center it within the cell. • Now, click inside the cell. • Click on the Center text button. • Your picture is now centered within the cell. • You have now optimized, created transparency, and inserted a graphic.
Part IV Page Properties, Text Properties, Creating new pages and links • It’s time to add color. Choose Modify, Page Properties. • Clck on the Background Color Box. • Pick a color. Click OK. • Notice how the transparent background on the image allows the page background color to show through. Without the transparency, your image would have a white box aound it. • Open the Page Property dialogue box again to see all the things you can do.
6.Select the text as shown. Change the font to the Verdana family. • Add text and graphics to the other cells in your table. • Change the fonts to the Verdana family. • Align the text to the top of each cell. • Your page should now look similar to the one below.
Creating New Pages –Save this page first, then • Choose File,Save as to save a copy of this page as “photos.” Always save pages in lower case, without symbols, and as short a name as possible. • Double-click on the photos page to make sure it is the one open. • For consistency of design, the left navigation cell will not be changed. Change the title as shown. • It is now time to add photos in the cells. • Go back to Fireworks. • Open the Class2 image. It is a jpg.
This picture needs to be resized and then optimized. Because it is a photograph and does not need to be transparent, it needs to be exported as a jpg. • Choose Modify, Canvas, Image Size. We want this image to replace the one already on the page. Remember, the picture needs to be 200 pixels wide. • Choose File, Export Wizard. • This time, select the jpg. Notice the size is 12.82k. This is a good file size and the picture is good in quality. Choose Export and save it with a “tr” in its name. • Do the same with the class3 image.
Go back to Dreamweaver. Select and Cut the image. With your cursor in the same cell, insert class2tr. • Click in the upper right cell and insert class3tr. Your page should like similar to the one to the right. Remember to write in your alternate text and to center the images and the text in the cells. • You can do this same technique to create all your pages. You are, in effect using the first page you created as a sort of template Naming Conventions
26. Creating Links • a. Page Links – Open the index page. (realizing that there is no navigation to Home Page, change the Student Work to Home Page.) • Highlight Home Page. Click on the Point to File icon and drag an arrow to point to the index file in the Files Panel. (Dreamweaver automatically creates the link information for you. It is like magic!) • b. External Links – Highlight http://www.Starfall.com and type its URL in the link box in the Property Inspector. • c. E-mail Links – Highlight “Contact Mrs. Wood” and type “mailto:” and the e-mail address “mailto:mrwood@appomattox.k12.va.us” in the link box in the Property Inspector.
If you were creating a real site, you would create all the links. You would also create all the pages. • A simple way to get your navigation bar to all pages, is to copy it and paste in on each page. The links will also copy. • Select the table, • copy it, • go to the next page, • select the navigation bar on the page and • choose paste. You have finished Part IV. You haveworked with Page and Text Properties. You have Created a new pages and links Preview your site and check to see if your links work. Recommended Resources A rubric for school web development and management http://www.eschoolnews.com/schoolspanwebsiterubric.pdf Free video tutorialshttp://www.video-tutes.com/index.php
If you were creating a real site, you would create all the links. You would also create all the pages. • A simple way to get your navigation bar to all pages, is to copy it and paste in on each page. The links will also copy. • Select the table, • copy it, • go to the next page, • select the navigation bar on the page and • choose paste. You have finished Part IV. You haveworked with Page and Text Properties. You have Created a new pages and links Preview your site and check to see if your links work. Recommended Resources A rubric for school web development and management http://www.eschoolnews.com/schoolspanwebsiterubric.pdf Free video tutorialshttp://www.video-tutes.com/index.php
Part V Using Templates • Do a Google Search for free Dreamweaver templates or go to http://www.dreamweaver-templates.org/free-dreamweaver-templates.html • Create a folder on your desktop and name it Template. Download one of the free templates to your desktop and into the Template folder. • Create a new folder on your desktop and name it “My Template Practice Web Site.” Remember to place a Media folder inside. • Close all the pages you have open in Dreamweaver. Choose Create New, Dreamweaver Site. • Name your new site “My Template Practice Web Site.”
Go through the setting up process again. Remember to select None for connecting to remote server. • Choose Create New html file. • Choose File, Open and browse to your template folder. Select the file in that folder that says index. • Now you can use the skills you learned earlier in this lesson to change the template and make your own site. Template Revised Template