Using WinQSB to solve Linear Programming Models
80 likes | 373 Views
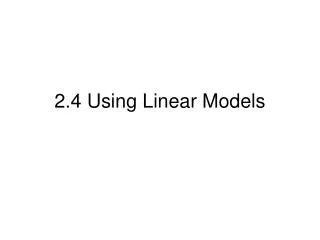
50. 1. 2. 8. 5. 35. 4. 60. 2. 4. 9. 5. 6. 25. 3. 40. From the transshipment node: 1 unit of output requires 2 units of input. Assume we wish to solve the transship problem depicted in the following network diagram . Using WinQSB to solve Linear Programming Models.

Using WinQSB to solve Linear Programming Models
E N D
Presentation Transcript
50 1 2 8 5 35 4 60 2 4 9 5 6 25 3 40 From the transshipment node: 1 unit of output requires 2 units of input Assume we wish to solve the transship problem depicted in the following network diagram Using WinQSB to solve Linear Programming Models First, formulate the model in standard LP form. All constraints must have variables on the left side and a constant on the right. Minimize Z= 2x14 + 4x24 + 5x34 + 8x45 + 9x46 Subject To: x14 <= 50 x24 <= 60 x34 <= 40 x45 = 35 x46 = 25 x14 + x24 + x34 – 2x45 – 2x46 = 0 Now you are ready to move to the software. From the WinQSB software set select “Linear and Integer Programming”
2. Complete all parameters. For the example problem, the completed parameters will appear as follows 1. Under the File drop-down menu, select “new problem” and this dialog box will appear 3. After selecting OK the Spreadsheet form will appear on the screen
2. The column headings reflect our new variable names 1. Rename the variables. Select “Variable Names” under the “Edit” pull-down menu and type the new names in the white column. 4. The lowerBound of each variable should be 0 and the UpperBound should by M (short hand for very large) 3. Enter the objective function (row 1) and the six constraints (rows C1-C6). The spreadsheet cells contain the coefficients of each decision variable in the objective function and each constraint. 5. For larger models, the spreadsheet format may be difficult to use. In these cases, switch to the normal model format in order to type the constraint set and objective function. Select “Switch to Normal Model Form” under the “Format” pull-down menu. The input screen changes to the following:
To solve the formulation select “solve the problem” under the “Solve and Analyze” pull-down. Alternatively, select the running man icon Normal Model Format
Don’t forget to save the formulation by selecting “Save Problem” from the “File” pull-down. Solution and post optimality report You will be best served to use the software on your own computer system. However, if you use the lab, note that the lab’s network may have trouble printing the solution. You may need to copy and paste a “print screen” into a package (such as Word) to print your complete solution