Download
1 / 29
290 likes | 388 Views
Introducing The IPitomy IP320, IP330 & IP410 IP Telephones Continued. 3 rd Call Key IP330. IP320, IP330* * IP330 is exactly like the IP320 but has three line keys. IP410. 2/3 Call/Line Keys. 4 Call/Line Keys. Call Logs – Dialed Numbers.

E N D
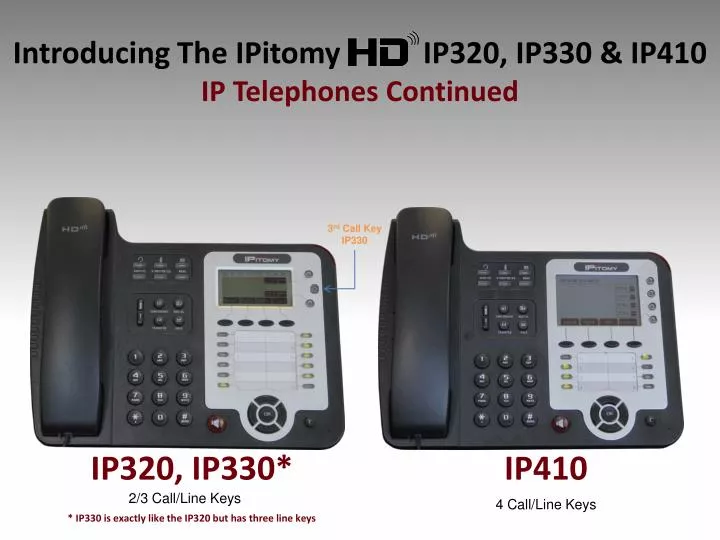
IntroducingThe IPitomy IP320, IP330 & IP410 IP Telephones Continued 3rd Call Key IP330 IP320, IP330* * IP330 is exactly like the IP320 but has three line keys IP410 2/3 Call/Line Keys 4 Call/Line Keys
Call Logs – Dialed Numbers Call Logs allow you to review calls at your telephone. From the Call Log you also have the ability to dial the call number or save the number in your Phonebook • Dialed Numbers: • press the RIGHT Navigation Key 3rd Call Key IP330
Call Logs – Missed Calls Call Logs allow you to review calls at your telephone. From the Call Log you also have the ability to dial the call number or save the number in your Phonebook • To access: • Dialed Numbers • Missed Calls • Received Calls • Use the center navigation rocker switch to select which call list to view. • Press show or right arrow navigation key to see the list. • Use the rocker switch to select the call from the list. • Press Detail to select the call. • Dial the number by pressing dial • Save to the phone book (PB) • Press Quit to exit • Dialed Numbers: • press the RIGHT Navigation Key • Missed Calls: • press the DOWN Navigation Key 3rd Call Key IP330
Call Logs – Received Call Logs allow you to review calls at your telephone. From the Call Log you also have the ability to dial the call number or save the number in your Phonebook • To access: • Dialed Numbers • Missed Calls • Received Calls • Use the center navigation rocker switch to select which call list to view. • Press show or right arrow navigation key to see the list. • Use the rocker switch to select the call from the list. • Press Detail to select the call. • Dial the number by pressing dial • Save to the phone book (PB) • Press Quit to exit • Dialed Numbers: • press the RIGHT Navigation Key • Missed Calls: • press the DOWN Navigation Key • Received Calls: • press the LEFT Navigation Key 3rd Call Key IP330
Using Call Logs Use the Navigation Keys to select the specific call within the call log being viewed. • To access: • Dialed Numbers • Missed Calls • Received Calls • Use the center navigation rocker switch to select which call list to view. • Press show or right arrow navigation key to see the list. • Use the rocker switch to select the call from the list. • Press Detail to select the call. • Dial the number by pressing dial • Save to the phone book (PB) • Press Quit to exit • In the Call Log: Dialed Numbers, Missed Calls, Received Calls…you can select a specific call using the Navigation Up/Down Keys then: • Press to dial the log number, or; • Press to see the call log details and/or to save the number in your phonebook 3rd Call Key IP330
Voice Mail IPitomy’s IP PBX is equipped with a powerful voicemail system. One simple button provides you with access to this system and notifies you when messages are waiting. Setup your voicemail: Making your voicemail greeting personal and changing your password is the first thing to do. Press the key and enter your password (factory set to your extension number) Press to enter into mailbox options…………………………………. Follow the instructions to record the various greetings Messages waiting: When voice messages are waiting in your voicemail box the Voicemail key lamp will light red. Retrieving messages: Press , you will be prompted to enter your password Input your password Follow the instructions to review those messages in your mailbox • Greetings: • Unavailable • Busy • Name • Temporary • Change Password
Programmable Keys Programmable Keys may be assigned to accommodate features frequently used. Those set at the factory are: • Park • Pickup 701 • Pickup 702 • Pickup 703 • Pause 3rd Call Key IP330 Notes: Keys assigned “None” have no function Use Smart Personal Console to program your keys.
Programmable Keys – BLF Programmable Key – BLF • BLF is Busy Lamp Field • Typical uses are: • monitoring other extensions • Answering calls ringing at monitored extensions • Monitoring Call Park Locations (701-720) A monitored extension BLF will flash when that phone is ringing …you may press that flashing BLF to answer the call ringing at that extension. Note: Use Smart Personal Console to program your keys.
Programmable Keys – Page BLF Programmable Key – Page BLF Page BLF is similar in most respects to a BLF Key… the difference being that when pressed, this key will cause the called telephone to answer automatically in hands-free (speakerphone) mode thereby allowing the called extension to reply without interaction. The extension monitored with a Page BLF Key must have this option set in programming to allow this call type. If not allowed, the call will ring as with a regular BLF. Note: Use Smart Personal Console to program your keys.
Programmable Keys – Speed Dial Programmable Key – Speed Dial Use Speed Dial to store any number you wish to dial by pressing just this key. Note: Use Smart Personal Console to program your keys.
Programmable Keys – Park Call Programmable Key – Park Call • A “Park Call” Key is used to place a call into an available Call Park Location (701-720). When doing so, the system will advise you verbally the park location into which the call has been parked. • Park Call is also possible by pressing Transfer and entering the Park Call code: 700 Note: Use Smart Personal Console to program your keys.
Programmable Keys – Call Pickup Programmable Key – Call Pickup • Calls ringing at other extensions can be answered from your telephone using the Call Pickup feature. • To pickup a ringing call press the key programmed with this feature. • Call Pickup is possible by dialing the code: 99 • Call Pickup is associated to Call Groups – To pickup a call ringing at another extension, your extension must be in the same Call Group. • An extended variation of this feature is Directed Call Pickup – which can be used to answer ringing extensions that are not in your Call Group. This is done using code: 99 + the extension number where the call is ringing. Note: Use Smart Personal Console to program your keys.
Programmable Keys – Voicemail Gateway Programmable Key – Voicemail Gateway • Voicemail Gateway is used to access the IPitomy voicemail system at the top-most level. This can be effective for transferring callers to the voicemail system where they can then traverse the system as they wish. • To transfer a caller to the Voicemail System Gateway; while connected to a call press transfer, then press the soft key Blind, then press the Voicemail Gateway key. • The Voicemail Gateway can also be accessed by dialing the code: 924 Note: Use Smart Personal Console to program your keys.
Programmable Keys – Record Programmable Key – Record • Record is used to store the audio of your conversation in a voicemail file that can be retrieved and replayed later. • To record a call; while connected to a call, press the Record Key. • This recording is stored in your voicemail under the folder: “Work” • This recording can be retrieved via SPC (Smart Personal Console) and downloaded to a computer. Note: Use Smart Personal Console to program your keys.
Programmable Keys – Forward ON Programmable Key – Forward ON • Call Forward allows you to redirect calls to your telephone to some other destination. This might be an extension, voice mail, a menu, cell phone… or other. Use the Call Forward – ON Key to activate Call Forward to the preset forward destination. • To activate Call Forward; press the Call Forward – ON key. • You can activate Call Forward using the code: *91 • Call Forward – ON also provides the opportunity to set a new destination. Note: Use Smart Personal Console to program your keys.
Programmable Keys – Forward OFF Programmable Key – Forward OFF • Use the Call Forward – OFF Key to deactivate Call Forward. • To deactivate Call Forward; press the Call Forward – OFF key. • You can deactivate Call Forward using the code: *90 Note: Use Smart Personal Console to program your keys.
Programmable Keys – Set Forward Programmable Key – Set Forward • Use Set Forward to input a new destination – bypassing the menu. • To set your extension’s Call Forward Destination; press the Set Forward key, then input the number to which calls will be forwarded • You can access Set Forward using the code: *92 Note: Use Smart Personal Console to program your keys.
Programmable Keys – Forward Gateway Programmable Key – Forward Gateway • Use the Forward Gateway to set the Call Forward status at another extension. Doing so requires that extension’s password. • To set an extension’s Call Forward status; press the Set Forward key, then input the extension number and the password and follow the prompts for the options available • You can access Set Forward using the code: *9 Note: Use Smart Personal Console to program your keys.
Programmable Keys – Pause Programmable Key – Pause • Pause is used to set Do Not Disturb at the PBX level. This is important in IP-based systems since a SIP telephone’s DND mode is local to the telephone only. • To set Pause; press the Pause key • To deactivate Pause, press the Pause Key again Pause will alert other PBX extension users of your status… when you activate Pause, your Pause Key will light and BLF Keys of your telephone at other extensions will be lit indicating that you are unavailable. Note: Use Smart Personal Console to program your keys.
Programmable Keys – Day/Night Mode Programmable Key – Day/Night Mode • Day/Night Mode is a means of altering the ringing pattern of the IPitomy IP PBX. The Day/Night Mode Key can be use to active any mode: Day/Night/Schedule • Press the Day/Night Key to enter into mode selection then follow the prompts to select the mode desired. • Requires that the extension using this feature is designated as the Operator This technique is seldom used since the Schedule feature is far more comprehensive and operates without user action. Note: Use Smart Personal Console to program your keys.
SPC – Smart Personal Console Smart Personal Console is a web-based application that allows you access to the settings of your telephone. The SPC Graphical User Interface makes setting telephone options easy. SPC allows access to: • Home Screen • Received Calls Log • Voicemail (new folder) • Account Settings • Voicemail Settings • Forward Settings • Your Phone Settings • Program Keys & Print Key Labels • Adjust volume settings • Enable/Disable Headset Mode • Setting Network connections • Set Time Server • Set Configuration Updates • Adjust Display Settings • Program Expansion Module Keys & Print Expansion Module Key Labels • Your Schedule • Call Logs (All) • Voicemail • Review all Folders • Manage Messages • Download Messages • Set/Upload Greetings IMPORTANT: Changes can be made in many ways BUT those changes performed using SPC are retained in the PBX memory where they are backed-up and restored. Often this backup/restore operation is set to operate daily. If you want your settings to stay put, use SPC to make all changes.
SPC – Access To access Smart Personal Console • Open a web browser (preferably Mozilla Firefox or Apple’s Safari). • In the Address Bar, input the IP Address of the IPitomy IP PBX installed at your location. • Obtain this address from your system administrator. • Press Enter/Return • You should see the screen pictured here • In the User Login panel in the User Name field input your extension number • In the Password field input your extension password • <Initially this is also your extension number> • Security Alert! – Make sure you change your default PIN number from your extension number to any 4 digit number. Make sure it is one you can remember. You will need it to listen to voice mail. • Click the Login button http://<yourpbxip>/ippbx your extnum your extnum
SPC – Home Screen The SPC Home Screen provides fast access to: • Received Call Log • Click on the number to place a callback to this caller… your phone will ring… when you answer the outgoing call will be in initiated • Voicemail – New Folder • Click on the number to place a callback to this caller… your phone will ring… when you answer the outgoing call will be in initiated • Click on the icon to listen to the voice message on your computer • Click on the icon to download the voice message to your computer your name
SPC – My Account SPC My Account Screen provides fast access to: • View Mailbox Name and Number • Set Password • This sets both voicemail and SPC password • Email Address – where voice message will be delivered in WAV file format • Attach to Email – Y/N • Delete After Emailing – Y/N • Turn Old After Emailing – Y/N • Say Caller ID – before playing message • Allow Review – gives caller the ability to review their message before finalizing • Allow Operator – caller can dial “0” • Play Envelope – automatically before MSG • Delete MSG’s in X days • Detect Fax • Destination for FAXes • Follow Me feature settings • Forwarding Settings (permission req) • My Phone Settings(permission req) • Volume, Features, buttons, & more • My Schedule (permission req) • Business Hours / After Hours / Lunch settings for time and ringing destinations your name
SPC – My Account – My Phone Settings SPC My Account – My Phone Settings: Phone Settings is your telephone’s programming stored in the PBX. You can program your Programmable Keys and many of your telephone’s feature settings. • Key Settings • Program Keys • Print a label for your telephone • The content of the “Label” field is used for this purpose –. • Audio Settings • Volume settings • Headset/Ringer Modes • SIP / Network Settings • Make no changes unless directed to do so by your network administrator • Display Settings • Set Backlight conditions / mode • Set idle BLF lamp to Off/Green • Expansion Settings • Program Keys for your Expansion Module (if equipped) • Print Labels for your Expansion Module Note: When printing labels just use plain paper and cut them out with scissors.
SPC – Call Log • SPC My Account – Call Log: • This is a complete call log of all call traffic to/from your telephone. • The Call Log screen: • Allows you to review calls that have occurred on your telephone • Displays conditions about each call: • Date/Time • Direction Inbound/Outbound • Source • Destination • Call Duration • Status (comments) • When numbers are displayed these numbers can be used to place a call to that number. your name
SPC – Voicemail SPC Voicemail allows access to all voice mail messages and greetings for your voice mailbox. You can: • View the current greeting in use • View the Caller information received with each message • Search for a message in any folder • Move one/multiple messages to another folder – use the your name Checkbox, Folder Pull-down and Move Selected To button • Delete multiple messages • Delete the contents of a folder • Callback callers via caller ID received • Listen to a message over your computer speakers (WAV file format) • Download a message to your computer (WAV file format) • Administer Greetings…
SPC – Voicemail – My Greetings SPC Voicemail – My Greetings allows you to administer the greetings associated to your voicemail box. You can: • View the current greeting in use • Enable/Disable the various greetings • Delete greetings (only custom greetings can be deleted) • Listen to greetings • Download a greeting to your computer • Upload a greeting from your computer your name
User Tips To end a call, hang up or press . To page another party press followed by the other party’s extension number. This will cause a speaker phone page. To page a group of people, press then the appropriate group number. All parties in the group will receive the page. To pick up a parked call, press the appropriate park pickup key. Remember that it is not necessary to put a call on hold to transfer the call. Just press Putting a call on hold; just press another line key or press the transfer button. The caller will be placed on hold automatically. When placing a call, dial first then go off hook by picking up the receiver or pressing speaker. (Pre-dial method) If you go off hook first before dialing, remember to press or


![Introducing K2 [blackpearl] BPM](https://cdn0.slideserve.com/1221291/introducing-k2-blackpearl-bpm-dt.jpg)