Download
1 / 36
360 likes | 473 Views
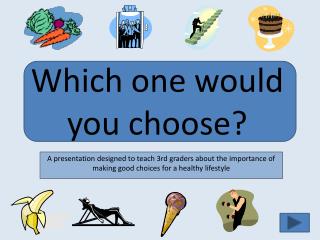
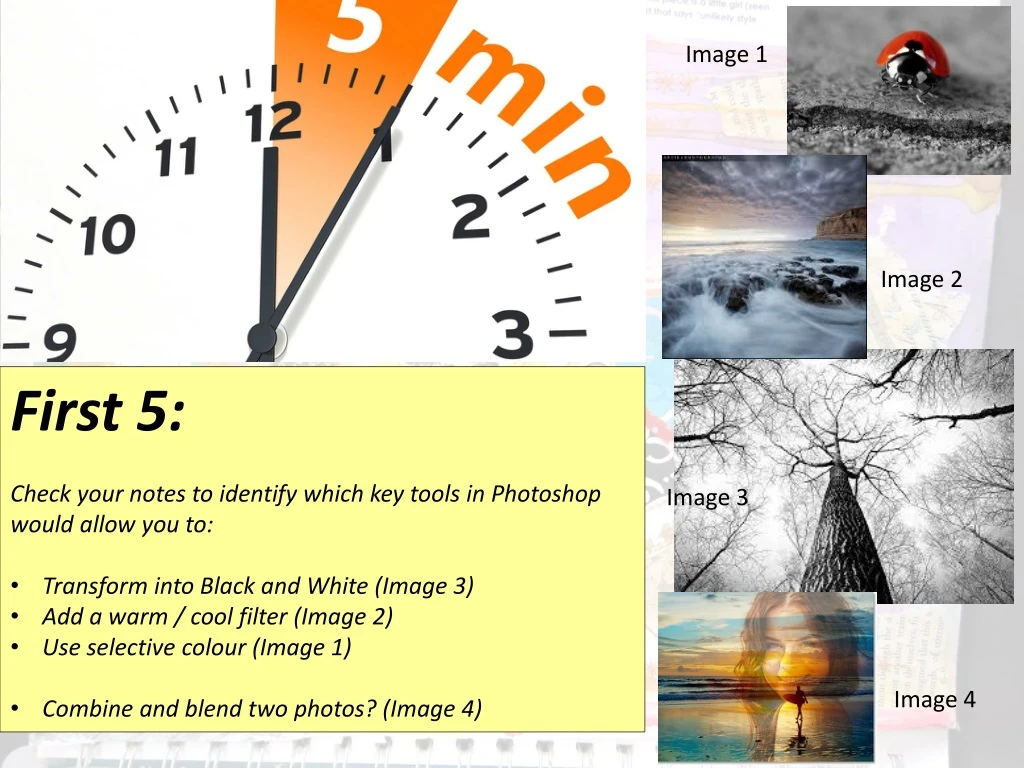
Image 1. s. Image 2. First 5: Check your notes to identify which key tools in Photoshop would allow you to: Transform into Black and White (Image 3) Add a warm / cool filter (Image 2) Use selective colour (Image 1) Combine and blend two photos? (Image 4). Image 3. Image 4.

E N D
Image 1 s Image 2 • First 5: • Check your notes to identify which key tools in Photoshop would allow you to: • Transform into Black and White (Image 3) • Add a warm / cool filter (Image 2) • Use selective colour (Image 1) • Combine and blend two photos? (Image 4) Image 3 Image 4
Black and White s Image 3 • Tools – mark / record in purple pen • Transform into Black and White (Image 3) • Create new fill or adjustment layer Black and White • Add a warm / cool filter (Image 2) • Use selective colour (Image 1) • Combine and blend two photos? (Image 4)
Photo filter s Image 2 • Tools – mark / record in purple pen • Transform into Black and White (Image 3) • Create new fill or adjustment layer Black and White • Add a warm / cool filter (Image 2) • Create new fill or adjustment layer Photo Filter • Use selective colour (Image 1) • Combine and blend two photos? (Image 4)
Selective colour s Image 1 • Tools – mark / record in purple pen • Use selective colour (Image 1) • Duplicate 2 layers – adjustment (black and white) Layer Mask Paintbrush (must use black to ‘burn through’ white)
s Image 4 • Tools – Record in the back of your book • Combine and blend two photos? (Image 4) • Move one image on top of the other Blending Modes • (Can also experiment with opacity)
Learning Objectives: • Know & Understand: • How to apply digital techniques appropriately to enhance photographs effectively • Do: • Apply and perfect techniques as appropriate to your photographs so as to have an effective example for the following skills: • Black and white • Enhanced colour (using filters) • Selective Colour or blur (using layer mask) • Blended Image • …Remember to use levels to boost the contrast on all of your photos. • You will need to print off your photos (preferably on photo paper) and present with your initial photography (unedited) – This will be homework (set tomorrow)… PCA Wed 9th Jan Photoshop: Digital Edits (using skills learned) s
s First 5: Log on and open up your images in Photoshop Read through Box 1 of your KO and select at least 1 appropriate word to describe one of your enhancements from yesterday… If time: Put this word into a coherent sentence ready to share…
Learning Objectives: • Know & Understand: • How to apply digital techniques appropriately to enhance photographs effectively • Do: • Apply and perfect techniques as appropriate to your photographs so as to have an effective example for the following skills: • Black and white • Enhanced colour (using filters) • Selective Colour or blur (using layer mask) • Blended Image • …Remember to use levels to boost the contrast on all of your photos. • Homework:Deadline - Wed 16th Jan • Presentation of photography (double page spread – initial, and digitally manipulated) with annotation (KO – Box 1 to aid vocabulary) • Optional (grade 5+) Print photos onto photo paper. PCA Thurs 10th Jan Photoshop: Digital Edits (using skills learned) s
Annotation Support (Refer to the KUNCU Website for full annotation guide) • Write 1 paragraph summarising the techniques used within your photos • Discuss impact of specific photos in more detail (i.e. how has the enhancement affected how you view the photo) • Examples: • I have edited my set of photographs using Photoshop. I have used levels to deepen the contrast within all of my photos and experimented with black and white, filters, selective colour and blending multiple images in order to enhance the images further. • I have used a filter in order to add drama to my landscape image. This image was taken in Scotland and I feel that the increased saturation of the colours captures the intensity of this wonderful place. • In the image of the ladybird, I have used selective colour to focus the viewers eye on the glossy, vivid red wings of the insect, by removing colour from the background. This and the use of a shallow depth of field when shooting has successfully achieved my intention. s
Next week: • You will need your Jan Groover images available for editing in school – save to Pictures folder now if you can… • You must do this before the lesson (email to school email (original JPEGs – do not send screenshots) or preferably save to memory stick) s Wed – Thurs in PCA
s First 5: Log on and open up your Jan Groover images in Photoshop Open your research in front of you – what effects do you want to apply to your images?What tools might help you to do this?
PCA Wed 16th Jan – Thurs 17th Jan (2 LESSONS) Photoshop experimentation • Learning Objectives: • Know & Understand: • How to apply and broaden your experience with Photoshop to enhance images appropriately. • How to respond specifically to the style of an artist: Jan Groover • Do: • Apply and perfect techniques as appropriate to your photographs… consider using the following: • Black and white • Enhanced colour (using filters) • Artistic effects (using filters from top – e.g. Noise -> Dust and scratch, Stylize -> Diffuse) • Selective Colour or blur (using layer mask) • Blending together images • …Remember to use levels to boost the contrast on all of your photos. • BOOKS OPEN ON HWK FOR LIVE FEEDBACK s
s • MAKE SURE THAT YOU ARE ORGANISED!! • Check that you have Saved everything correctly in Pictures: • Set up an Art Folder if you haven’t already • Set up a folder – ‘Jan Groover’ • Working doc - Save as: Photoshop doc (PSD) – saves so you can continue to edit • Finished images – Save as: JPEG (JPG) – printable version.
s First 5: Log on and open up your Jan Groover images in Photoshop Planners / KOs out Continue to edit independently from where you left off…
PCA Wed 16th Jan – Thurs 17th Jan (2 LESSONS) Photoshop experimentation • Homework – Deadline Wed 23rd Jan • Deadline = Photography Assessment • Present your edited Jan Groover photography opposite your research page… make sure you have: • Included a title ‘Jan Groover Responses’ • Printed your images at an appropriate size (min. 4 to an A4) – if possible, on photo paper • Annotated your photos: • A paragraph to summarise your images and the techniques used • More detailed analysis of the impact of your techniques – refer back to the artist to justify your decisions and explain what has been successful and what you would change if you were to begin again. s
PCA Wed 16th Jan – Thurs 17th Jan (2 LESSONS) Photoshop experimentation • Learning Objectives: • Know & Understand: • How to apply and broaden your experience with Photoshop to enhance images appropriately. • How to respond specifically to the style of an artist: Jan Groover • Do: • Apply and perfect techniques as appropriate to your photographs… consider using the following: • Black and white • Enhanced colour (using filters) • Artistic effects (using filters from top – e.g. Noise -> Dust and scratch, Stylize -> Diffuse) • Selective Colour or blur (using layer mask) • Blending together images • …Remember to use levels to boost the contrast on all of your photos. • BOOKS OPEN ON HWK FOR LIVE FEEDBACK s
Mixed Media: Masking fluid, watercolour and pen Kate Osborne First 5: Look at the work of Kate Osborne opposite Consider the qualities you would expect to see in student responses at the levels below… Have a go at writing out success criteria in the format below: Success Criteria: Grade 2-3- Grade 4-5 – Grade 6-8 –
Mixed Media: Masking fluid, watercolour and pen Kate Osborne Success Criteria: All- 2-3- Soundconnections made to artist through combining of media. Shape and details may be simplified or naive. Appropriatecolour and texture achieved. Most- 4-5 – Goodshape and effectivedetails achieved with great use of layered materials. Marbling of watercolours / inks links well to the chosen insect and artist. Some- 6-8 – Outstandingshape and detail captured with mixed media. Delicate and accuratepatterns and sensitivetexture to capture the fragility of the insect chosen. Link to artist is highly visible.
Mixed Media: Masking fluid, watercolour and pen Kate Osborne Process & Techniques: Remember to refer to both your own reference insect image and the work of Osborne throughout: Lightly sketch out the shape and details of your insect. Success Criteria: All- 2-3- Soundconnections made to artist through combining of media. Shape and details may be simplified or naive. Appropriatecolour and texture achieved. Most- 4-5 – Goodshape and effectivedetailsachieved with great use of layered materials. Marbling of watercolours / inks links well to the chosen insect and artist. Some- 6-8 – Outstandingshape and detailcaptured with mixed media. Delicate and accuratepatternsand sensitivetexture to capture the fragility of the insect chosen. Link to artist is highly visible.
s Carefully place drawing inside plastic wallet Hand in butterfly resources PILE YOUR SKETCHBOOKS TO BE TAKEN IN!
Mixed Media: Masking fluid, watercolour and pen Kate Osborne First 5: On your strip, create patterns with the masking fluid – these can be anything you like! Wash the masking fluid off your brush quickly once you have filled your strip…
Mixed Media: Masking fluid, watercolour and pen Kate Osborne • Know & Understand: • How to use masking fluid • The potential for this medium for creating contrast in our work and specifically in our responses to Kate Osborne Keep paint / ink strong to make the white areas bright.
Mixed Media: Masking fluid, watercolour and pen Kate Osborne • Process & Techniques: • Remember to refer to both your own reference insect image and the work of Osborne throughout: • Lightly sketch out the shape and details of your insect. • Apply masking fluid to any white detail areas • Add black pen to the body and extend slightly to add a few details • Add watercolour / ink wash appropriately to your insect – blending out the intensity of the colours and allowing colours to marble together Success Criteria: Grade 2-3- Appropriatecolour and texture achieved. Grade 4-5 – Effectivedetails achieved with great use of layered materials. Marbling of watercolours / inks links well to the chosen insect and artist. Grade 6-8 – Outstandingdetailcaptured with mixed media. Delicate and accuratepatterns and sensitivetexture to capture the fragility of the insect chosen.
s • Work away carefully • – Dry = plastic wallet • - Wet = drying wrack • Brushes to me • Water pots emptied and under window • Materials boxes neat
Mixed Media: Masking fluid, watercolour and pen Kate Osborne First 5: Take out your butterfly piece Consider what materials would be most effective for completing and refining it
Mixed Media: Masking fluid, watercolour and pen Kate Osborne • Process & Techniques - Overview: • Remember to refer to both your own reference insect image and the work of Osborne throughout: • Lightly sketch out the shape and details of your insect. • Apply masking fluid to any white detail areas • Add black pen to the body and extend slightly to add a few details • Add watercolour / ink wash appropriately to your insect – blending out the intensity of the colours and allowing colours to marble together • Dry your work • Carefully rub away your masking fluid to reveal white areas. You may at this point want to add further masking fluid and layers of ink to create a further layer • Refine details with further coloured pencil and pen – some of which you may want to bleed out or leave sharp. Success Criteria: Grade 2-3- Appropriatecolour and texture achieved. Grade 4-5 – Effectivedetails achieved with great use of layered materials. Marbling of watercolours / inks links well to the chosen insect and artist. Grade 6-8 – Outstandingdetailcaptured with mixed media. Delicate and accuratepatterns and sensitivetexture to capture the fragility of the insect chosen.
s • Work away carefully – check name on • – Dry = plastic wallet • - Wet = drying wrack • Brushes to me • Water pots emptied and under window • Materials boxes neat
Repeat Patter Inspiration Liberty Art First 5: Log on to your computer and google ‘Liberty Art repeat pattern’ Be ready to feed back at least 3 words to describe the style that you see…
Repeat Pattern Inspiration Liberty Art • Know & Understand: • The importance of visual inspiration when creating your own designs • How to bring together multiple sources of inspiration to develop artist’s further… • Do: • In pairs, collect inspiration from google / Pinterest: • Liberty repeat pattern designs (x6+) • Other images to inspire further illustrations in the style of Kate Osborne (1 each – e.g. flowers, dragonflies, birds, insects etc.) • Print = AR2077 (PCA printer)
Ensure that you have your inspiration printed… AR2077 s • Record your Homework: • Complete research / mood board from your Liberty images and information from websites: • https://www.tate.org.uk/context-comment/articles/in-the-studio-liberty • https://www.countrylife.co.uk/out-and-about/theatre-film-music/five-best-liberty-prints-151090 • Include: • Title: ‘Liberty repeat pattern inspiration’ • Images (x6 minimum) • Annotation, explaining the style and how this inspiration will influence your own designs
Mixed Media: Masking fluid, watercolour and pen Kate Osborne First 5: Take out your butterfly and new inspiration image (collected in PCA) Consider whether you need to add any refinement to your butterfly drawing… Begin sketching out your new image – be sensible with size – you have 2 lessons and half term to complete…
Mixed Media: Masking fluid, watercolour and pen Kate Osborne Process & Techniques - Overview: Remember to refer to both your own reference insect image and the work of Osborne throughout: Lightly sketch out the shape and details of your insect. Apply masking fluid to any white detail areas Add black pen to any areas you would like to bleed Success Criteria: Grade 2-3- Appropriatecolour and texture achieved. Grade 4-5 – Effectivedetails achieved with great use of layered materials. Marbling of watercolours / inks links well to the chosen insect and artist. Grade 6-8 – Outstandingdetailcaptured with mixed media. Delicate and accuratepatterns and sensitivetexture to capture the fragility of the insect chosen.
s • Work away carefully – check name on • – Dry = plastic wallet • - Wet = drying wrack • Brushes to me • Water pots emptied and under window • Materials boxes neat
Mixed Media: Masking fluid, watercolour and pen Kate Osborne First 5: Take out your new Osborne piece Open your book to reference your inspiration images & begin!
Mixed Media: Masking fluid, watercolour and pen Kate Osborne • Process & Techniques - Overview: • Remember to refer to both your own reference insect image and the work of Osborne throughout: • Add black pen to any areas you would like to bleed • Add watercolour / ink wash appropriately to your insect – blending out the intensity of the colours and allowing colours to marble together • Dry your work • Refine details with further coloured pencil and pen – some of which you may want to bleed out or leave sharp. Success Criteria: Grade 2-3- Appropriatecolour and texture achieved. Grade 4-5 – Effectivedetails achieved with great use of layered materials. Marbling of watercolours / inks links well to the chosen insect and artist. Grade 6-8 – Outstandingdetailcaptured with mixed media. Delicate and accuratepatterns and sensitivetexture to capture the fragility of the insect chosen.
s • Record Homework: • Due Wed 27th Feb • Complete your Osborne responses (both refined to best of ability) • Research new artist: • Lauren Scanlon (paper-cuts)