Download
1 / 1
40 likes | 559 Views
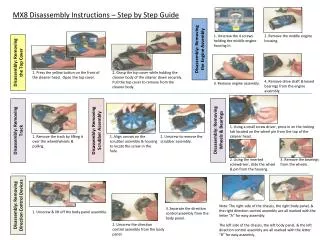
MX8 Disassembly Instructions – Step by Step Guide. 1. Unscrew the 4 screws holding the middle engine housing in. 2. Remove the middle engine housing. Disassembly: Removing the Engine Assembly. Disassembly: Removing the Top Cover.

E N D
MX8 Disassembly Instructions – Step by Step Guide 1. Unscrew the 4 screws holding the middle engine housing in. 2. Remove the middle engine housing. Disassembly: Removing the Engine Assembly Disassembly: Removing the Top Cover 1. Press the yellow button on the front of the cleaner head. Open the top cover. 2. Grasp the top cover while holding the cleaner body of the cleaner down securely. Pull the top cover to remove from the cleaner body. 4. Remove drive shaft & keyed bearings from the engine assembly. 3. Remove engine assembly. 1. Using a small screw driver, press in on the locking tab located on the wheel pin from the top of the cleaner head. Disassembly: Removing Wheels & Bearings Disassembly: Removing Scrubber Assembly Disassembly: Removing Track 1. Remove the track by lifting it over the wheel/wheels & pulling. 1. Align arrows on the scrubber assembly & housing to locate the screw in the hole. 2. Unscrew to remove the scrubber assembly. 2. Using the inserted screwdriver, slide the wheel & pin from the housing. 3. Remove the bearings from the wheels.. Disassembly: Removing Direction Control Devices Note: The right side of the chassis, the right body panel, & the right direction control assembly are all marked with the letter “A” for easy assembly. The left side of the chassis, the left body panel, & the left direction control assembly are all marked with the letter “B” for easy assembly. 3. Separate the direction control assembly from the body panel. 1. Unscrew & lift off the body panel assembly. 2. Unscrew the direction control assembly from the body panel.