Download

1 / 7
0 likes | 28 Views
Kohima-Imphal battle in 1944 was a pivotal moment in the Burma campaign of World War II. The Japanese 15th Army attempted to capture British supplies to push into India, while the British 14th Army defended fiercely, with General William Slim leading the charge. Despite initial setbacks, the British forces, aided by strategic reinforcements, managed to break the Japanese siege and turn the tide of the conflict. The dense jungle terrain, logistical challenges, and fierce combat defined this critical chapter in the Allied effort to repel the Japanese advance.

E N D
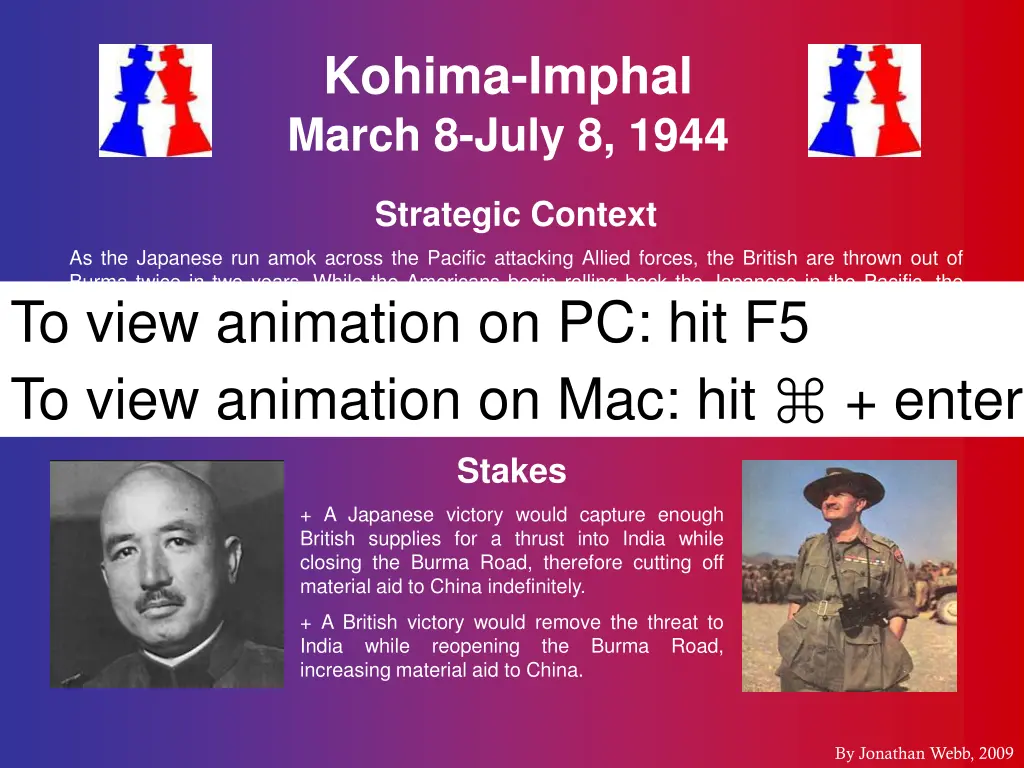
Kohima-Imphal March 8-July 8, 1944 Strategic Context As the Japanese run amok across the Pacific attacking Allied forces, the British are thrown out of Burma twice in two years. While the Americans begin rolling back the Japanese in the Pacific, the British still stand on the defensive in India. The Japanese 15. Army is much larger and advancing more quickly than the British expected. However, the self-proclaimed invincible Japanese outrun their supply lines and must now capture British supplies before pushing further into India. Joseph Stillwell defeats the Japanese 28. Army in the north at Arakan, freeing up reinforcements for William Slim’s 14. Army, which must survive until they can be brought into battle. To view animation on Mac: hit ⌘ + enter To view animation on PC: hit F5 Stakes + A Japanese victory would capture enough British supplies for a thrust into India while closing the Burma Road, therefore cutting off material aid to China indefinitely. + A British victory would remove the threat to India while reopening increasing material aid to China. the Burma Road, By Jonathan Webb, 2009
Kohima-Imphal, 1944 Strength Japanese 15. Army British 14. Army Renya Mutaguchi William Slim 100,000 155,000 Well Well By Jonathan Webb, 2009

East Asia & Pacific c. Nov 1943
The battlefield features dense, swampy jungle and constant changes in elevation. Movement is especially restricted travelling east-west as most of the major rivers and ridges run north-south, the most significant obstacle being the Chindwin River. The only open, flat areas are just east of the Chindwin River and the Imphal Plain. The most significant urban features are Kohima and Imphal, the objectives of the Japanese. The real key terrain though is Dimapur to the northwest, which sits along on the vital railroad for supply. British 14. Army (Slim) N N Pheru River Naga Hills Dimapur Kohima Imphal Yu River Imphal Plain Chindwin River Irang River Tengnoupal Ridge Manipur River Kabaw Valley Tuivai River Japanese 15. Army (Mutaguchi)

The Japanese supply situation is miserable at best and so Mutaguchi’s subordinates vainly call for a withdrawal, unimpressed by their commander’s orders to “fight with their Slim counterattacks from his strong positions against the disheartened and weakened Japanese forces. The Indian 20thand 23rdIDs strike and pursue the Japanese 15thID while the Indian 17thID strikes and pursues the Japanese 33rdID. The Indian 7thID must merely chase the Japanese Mutaguchi advances against Imphal with the 33rdID from the south and the 15thID from the east. Although Slim fails to immediately recognize the Japanese main attack as such and withdraw to the Imphal Plain, the Japanese (barely) fail to destroy the Indian 17th and 20thIDs where they stand as planned. Slim saves his two divisions by sending the Indian 23rdID to cover their withdrawal to defensive positions. Meanwhile, Slim is Slim’s fortunes rise when the entire British 2ndand Indian 5thIDs arrive by air to Dimapur and Imphal respectively. reopen the Kohima-Imphal road with two divisions and pump enough supplies into Kohima and Imphal to prepare for a counterattack. Mutaguchi deploys his three divisions behind the Chindwin River; he plans to besiege and capture Kohima with the 31stInfantry Division (ID) and Imphal with the 15thand 33rdIDs. Slim expects only a regiment-sized attack on Kohima and only places the 50thParachute Brigade (Bde) there. Slim plans to lure Mutaguchi into a battle of attrition on the Imphal Plain where British superiority in tanks, artillery and airpower can annihilate the lighter-equipped Japanese. He places the Indian 17th, 20th, 23rdIDs, and the 254thTank Bde there. Meanwhile, the Indian 5thID is being airlifted to the battle and is expected shortly. disturbed by the fact that the Japanese 31stID – a full division, not a regiment – has cut the road connecting Kohima and Imphal. Japanese are taking severe casualties from superior British tanks, artillery, and punishing strafing attacks. The Japanese 31stID completely surrounds Kohima instead of capturing the British supply junction at Dimapur, which is undefended and within striking distance. The 161stIndian Infantry Bde is quickly flown in to break the encirclement but is outnumbered and so camps outside Kohima. The Japanese 15thand 33rdIDs meanwhile block all the roads out of Imphal, which forces Slim to supply Imphal solely by air. Both sides take heavy casualties fighting on the Imphal Plain as Slim intends but the situation in both cities is desperate. Kohima. Meanwhile, a seesaw battle continues on the Imphal Plain where the Japanese make progress before being pushed back. The fighting is heavy but the 31stID back across the Chindwin River. The Japanese suffer the majority of their casualties during this rout from malnutrition and disease. The fresh British 2ndID finally breaks the siege of Kohima after more bitter fighting but the Japanese forces are literally starved of supplies such as food and ammunition. The British have plenty of all supplies and even have the air capacity and complete air superiority to transport another division, the Indian 7th ID to teeth” if no bullets are available. Yanagida and Yamauchi are sacked for their insistence to withdraw while Sato, commander of the 31stID plainly disobeys orders and begins to retreat. Mutaguchi claims Sato has lost the battle for him but the reality is clear: the Japanese have far reached the end of their supply lines. Sato’s withdrawal allows Slim to British 14. Army (Slim) Landmarks Pheru River N N Naga Hills 161st Subordinates 7th 2nd Dimapur 31st Division 31st Division 50th para Kohima Indian XXXIII Corps (Stopford) 50thIndian Parachute Brigade – Browning 31st 161stIndian Infantry Brigade – Warren British 14. Army 31st Japanese 15. Army 254thIndian Tank Brigade – Scoones 254th 33rd 2ndInfantry Division – Grover 15thDivision – Yamauchi Infantry division Infantry division 23rd 5th 7th Indian IV Corps (Scoones) Imphal Yu River 5thIndian Infantry Division – Briggs 31stDivision – Sato Infantry brigade Imphal Plain 33rdDivision – Yanagida 254th 161st Chindwin River 7thIndian Infantry Division - Messervy Tank brigade 15th 20th Irang River Tengnoupal Ridge 17thIndian Infantry Division – Cowan Manipur River 20thIndian Infantry Division – Gracey Kabaw Valley 17th 23rdIndian Infantry Division - Roberts Japanese 15. Army (Renya Mutaguchi) 100,000 Tuivai River 33rd British 14. Army (William Slim) 155,000 Symbol guide Subordinates Japanese 15. Army (Mutaguchi)

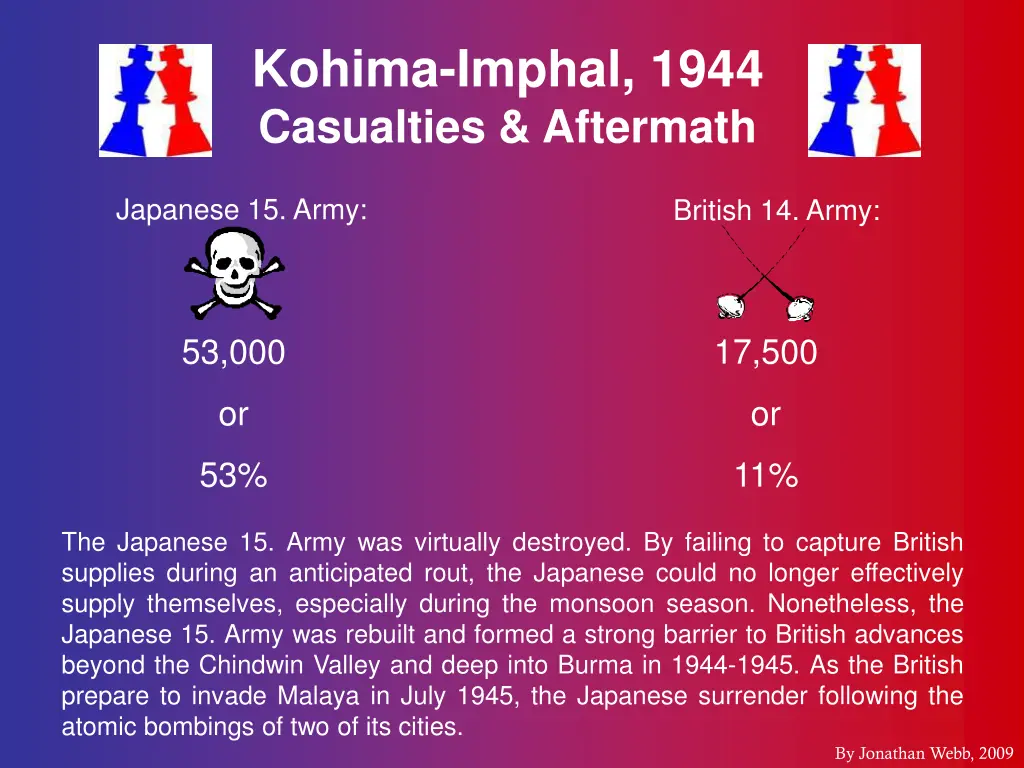
Kohima-Imphal, 1944 Casualties & Aftermath Japanese 15. Army: British 14. Army: 53,000 17,500 or or 53% 11% The Japanese 15. Army was virtually destroyed. By failing to capture British supplies during an anticipated rout, the Japanese could no longer effectively supply themselves, especially during the monsoon season. Nonetheless, the Japanese 15. Army was rebuilt and formed a strong barrier to British advances beyond the Chindwin Valley and deep into Burma in 1944-1945. As the British prepare to invade Malaya in July 1945, the Japanese surrender following the atomic bombings of two of its cities. By Jonathan Webb, 2009
The Art of Battle: Animated Battle Maps http://www.theartofbattle.com By Jonathan Webb, 2009


![[PDF] Free Download Turning Point By Danielle Steel](https://cdn4.slideserve.com/8143239/slide1-dt.jpg)
![[PDF] Free Download Flash Point By Diane Benefiel](https://cdn4.slideserve.com/8171974/slide1-dt.jpg)


![(B.O.O.K.$ The Day of Battle The War in Sicily and Italy 1943-1944 Ebook [Kindle]](https://cdn5.slideserve.com/11134834/the-day-of-battle-the-war-in-sicily-and-italy-dt.jpg)