Download
1 / 14
140 likes | 144 Views
Learn how to whiten teeth, add catchlights, remove shine and smooth skin, alter shapes, and add text using Photoshop Elements in this hands-on tutorial.

E N D
Session 3Layers Using PhotoShop Elements(or Why Didn’t Someone Tell Me About This Before?) Nancy Rosenbaum Karen Smale
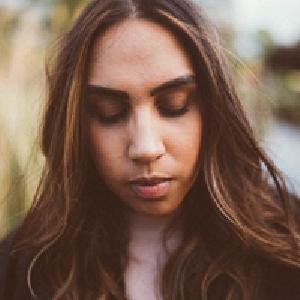
Whitening Teeth Before After
Demo: Whiten Teeth • Open file • Use a selection tool to select teeth • Save selection as layer: Layer New Layer Layer Via Copy • Desaturate teeth: Enhance Adjust Color Adjust Hue/Saturation Select Yellows Desaturate yellows Increase lightness
Adding Catchlights(and some brightness/contrast) Before After
Demo: Add Catchlights • Open file • Use a selection tool to select eyes • Save selection (to use it again later): Select Save Selection Name the selection (e.g., “eyes”) • Save selection as layer: Layer New Layer Layer Via Copy • Using the burn/dodge/sponge tool In the toolbar at the bottom, select Dodge/Range = Shadows, Exposure = 20% • Adjust brush size and “daub” eyes to create catchlights • Dial back intensity using the Opacity slider on the layer • To lighten the eye area, re-load the selection: Select Load [Selection name] • Select brightness/contrast adjustment layer and adjust • Use paintbrush (with black selected on color palette) to refine mask
Removing Shine and Smoothing Skin Before After Copy background layer Select the Clone tool Adjust opacity to 30-50% Adjust brush size accordingly Alt-click (or option-click) to select source pixels to clone Brush or daub the destination
Using Liquify to Alter Shapes Before After
Liquify Filter • Liquify Tool Bar: • Warp • Twirl Clockwise • Twirl Counterclockwise • Pucker • Bloat • Shift Pixels (drag up=left) • Reconstruct (undo distortion) • Zoom • Hand (navigate in image) Navigate to Liquify Filter: Filter Distort Liquify
Demo: Use Liquify to Shape Chin and Nose Open file Duplicate layer Open Liquify (Filter>Distort>Liquify) Use zoom tool to magnify Use warp tool to “push” pixels Use pucker tool to shrink pixels Use bloat tool to expand pixels
Adding Text • Use the Text tool (T) • Click on your document and start typing • A new layer is created • You can move/modify your text later • If you don’t see anything as you type, make sure you’re on the top layer! • Adjustment layers will affect text layers too! • You can drag and drop layers to change the order – this may have radical consequences!
Blending Modes Blending Mode Menu Blending modes change the way layers react with each other Must have at least two layers Some blending modes react differently if the opacity of the blend layer is less than 100%
Example: Multiply Before After, using Multiply blend mode
Example: Darken (Watercolor Effect) Before After, using Gaussian Blur on the blend layer and Darken blend mode Copy background layer Select Filter Blur Gaussian Blur Adjust radius to desired effect Select the Darken blend mode
Example: Overlay (Sharpening) Before After Copy background layer Select Filter Other High Pass Adjust radius so you can just see the shape outlines Select the Overlay blend mode