Download
1 / 35
350 likes | 637 Views
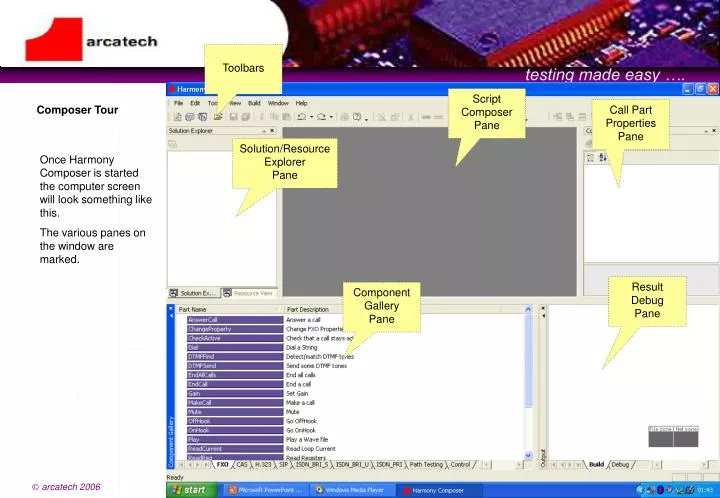
Toolbars Script Composer Pane Composer Tour Call Part Properties Pane Solution/Resource Explorer Pane Once Harmony Composer is started the computer screen will look something like this. The various panes on the window are marked. Result Debug Pane Component Gallery Pane

E N D
Toolbars Script Composer Pane Composer Tour Call Part Properties Pane Solution/Resource Explorer Pane Once Harmony Composer is started the computer screen will look something like this. The various panes on the window are marked. Result Debug Pane Component Gallery Pane
1. Click on the New Workspace button on the toolbar 2. New Workspace Pane is displayed Creating a Workspace Begin by Creating a new workspace – a workspace is a folder in which all of the projects and scripts relating to the current test are placed. 3. Enter a name for the new workspace 4. Click on OK to accept entry www.arcatech.com
1. Click on the New Project button on the toolbar 2. New Project Pane is displayed Creating a Project Next create a project which will hold all of the script tracks that will be created. 3. Enter a name for the new project 4. Click on OK to accept entry www.arcatech.com
1. Click on the + next to the project name to expand the display 3. Double click on the first entry to reveal the Virtual Harmony and Script Track panes Virtual Harmony Pane Opening a Project Before you can begin to create a script you must open up the project. Script Track Pane 2. Click on the + next to Script Design (if necessary) to expand the list of script tracks (default is one track with the same name as the project) www.arcatech.com
1. Right click on the Virtual Harmony Pane and then click on Add New Card Creating a Virtual Harmony The next stage is to create a Virtual Harmony. When you are creating scripts you do not need to know which interface ports will be available on the target Harmony – someone else may be using it as well. The Virtual Harmony represents the hardware that you will require to run the script you create – you can assign interfaces on the virtual Harmony to physical interfaces on the real Harmony when you come to upload and run the script. Interfaces on the same Virtual line card must be assigned to same physical line card on the target Harmony. 2. Click on the drop down menu to reveal a list of all the possible card types to add 3. Select the card type you need to use and click OK www.arcatech.com
2. You will then get a card will no ports highlighted. Drag the interfaces you need and drop them onto the card Creating a Virtual Harmony 1. If you do not need to use all of the interface ports on the card uncheck this box www.arcatech.com
Adding a Script Track A script is a series of operations designed to test your equipment. These operations are defined using script tracks. Each track can contain a different set of operations and each track is associated with an interface (or interfaces). When the script is uploaded and run the operations on each track are executed in parallel. 2. Click on the drop down menu to reveal a list of the possible types of tracks you can use 1. To add a script track to the Script Track Pane right click on this area and click on Add Script Design Track 3. Select the type of track you require www.arcatech.com
Adding a Script Track 4. Enter a name for the track 5. Click OK www.arcatech.com
1. Click and drag the interface port icon to the start of the script track 3. You can connect multiple interfaces to a script track Linking Tracks and Interfaces You need to associate a track with an interface (or interfaces). The operations defined on the track will be performed on the associated interfaces. The five interfaces of a LAN card are hubbed together so that they are treated as a single interface – there is no need to associate more than one LAN interface with a track. However multiple tracks can be associated with a single LAN interface. 2. Drop the icon at the start of the script track that you want to run with this interface 4. As LAN ports are hubbed internally you do not need to connect multiple LAN ports on a single card to a VoIP script track www.arcatech.com
Port Mapping You can manipulate the interfaces associated with each track by using the port mapping tool. 1. Right click on the start of the script track to see a port map 2. Right click on the port map and choose Remove Port Map to remove one interface port or Remove all Port Mappings to remove everything www.arcatech.com
2. Click on the + beside the project name to reveal the list of possible resources which can be used Stack Configuration If you are creating a script track for anything other than VoIP you will need to associate a stack configuration with the track. A stack configuration is essentially a list of default values which will be used by the stack. Either you can create a new stack configuration from scratch or you can import one from a different script. Please refer to the user manual or Harmony Help for information on the defaults for each stack. 3. Right click on Stack Configurations and choose either New Stack Config (to configure your own stack information) or Import Stack Config (to reuse a previously created configuration) 1. Click on the Resource View tab to highlight the resource view pane www.arcatech.com
Stack Configuration 4. To add a new stack configuration choose the stack type you require www.arcatech.com
Stack Configuration 5. Enter the name you want to use for the stack and click OK. The list of defaults for that stack type will be displayed for you to change. 6. Click on OK to finish www.arcatech.com
There are a list of predefined stack configurations located at \program files\emutel\emutel harmony\resources\stacks. Choose the protocol you are using (e.g. ISDN) and then the stack closest to your needs – you can still change any of the stack properties before using it. Stack Configuration 1. Click on Import Stack Config to import a previously created stack configuration www.arcatech.com
2. Double click on the name of the Stack you want to use. Pre-configured stacks are located at \program files\emutel\emutel harmony\resources\stacks\. Stack Configuration 3. Once the stack has been imported you can change any of the stack parameters in the same way you create a new stack configuration 4. Click Open the open the stack configuration www.arcatech.com
2. Select the name of the stack to be applied to this track. A stack configuration can be applied to multiple tracks. Next you must associate a stack configuration with the track you are using. As VoIP does not use stack configuration this is not necessary for VoIP tracks. Properties entered in the stack configuration are used as defaults for the track. Properties set for individual interfaces (see later) overwrite them. Properties set in Call Parts which allow you to set them will also override the stack properties. Stack Configuration 1. Click on track header to show Script Design Track Properties www.arcatech.com
The main thing to configure for each interface associated with a script track is protocol analysis. You must set Enable Analysis to TRUE if you intend to use protocol analysis on this interface. You must switch on protocol analysis for each interface associated with the script track individually. Network simulation is also set up here but this is covered in another presentation. Configure Individual Interfaces 1. Right click here to display the port map 2. Click on the Interface you wish to configure. You must repeat the process for all of the interfaces. www.arcatech.com
Configure Individual Interfaces 3. If you wish to use protocol analysis on this interface switch Enable Analysis to TRUE 4. For PRI you need to set the port type to T1 or E1 to match the stack configuration 5. Leave the other parameters as they are used only for network simulation www.arcatech.com
You set up the LAN interfaces in the same way. Because of the way the LAN interfaces are hubbed together you only need to enable protocol analysis on one of the interfaces. Configure Individual Interfaces 2. If you wish to use protocol analysis on this interface switch Enable Analysis to TRUE 4. Leave the other parameters as they are used only for network simulation 3. If you are using the Enhanced LAN card to generate RTP media then switch Enable Hardware RTP to True 1. You set up the LAN interfaces in a similar way – these are treated as a single interface so you only do it once www.arcatech.com
4. You need to complete the Component Properties for the call part – but only if they differ from the defaults 3. Drop the call part onto the track A script is built up from call parts. A call part is basically an instruction for the Harmony to do something like make a call or end a call. Call parts are dragged from the Component Gallery to the script track, and each protocol has a different collection of call parts – although many call parts are similar in each protocol. The MakeCall call part is used to initiate a call and wait for call connect. Make Call 2. Choose the call part you want to add to the script track – in this case MakeCall. Click and drag it onto the PRI Track 1. Begin to create an PRI script track by clicking on the ISDN_PRI tab www.arcatech.com
1. TIMEOUT sets the time in ms before a call part will terminate if it fails 2. If TRUE will use Enbloc dialling – if FALSE will use Overlap dialling 3. If TRUE will use Multiple Subscriber Dialling Each call part has properties. You set up the properties in the Component Properties Pane. If you do not change the properties the default properties defined for the protocol will be used. The stack will have defaults built in so you need not change them. You can also use the ChangeProperty call part to change properties for all subsequent call parts on the track. Changing Properties 5. Set to B channel you want to use – 0 for automatic selection 4. CODEC is set to either A law or U law. 6. TEL is the telephone number you want to call 7. FROMTEL is the telephone number you are calling from www.arcatech.com
2. Drop the call part onto the track 3. Only relevant Property is Cause Value The EndCall call part will initiate the termination of a call and wait for it to clear. End Call 1. EndCall call part will end the call www.arcatech.com
4. Change any of the Call Properties if defaults are not appropriate 3. Drag and drop the AnswerCall call part onto the SIP track You can add call parts to the SIP track as well. In the example the ISDN call could be to a gateway which forwards the call as a SIP call. On the SIP track we have added and AnswerCall call part – it will wait for an incoming call and connect to it. Many of the call parts (e.g. MakeCall) occur in all of the protocols – the function is the same but the properties will be different. Answer Call 2. AnswerCall call part will answer an incoming call on the LAN interface 1. To add SIP call parts to the SIP track click on the SIP tab www.arcatech.com
3. Change any of the Call Properties if defaults are not appropriate 2. Drag and drop the WaitForEnd call part onto the SIP track WaitForEnd will wait for the other end to clear the call. In our example the ISDN call is cleared by EndCall. Wait For End 1. WaitForEnd call part will wait for the call to be cleared from the other end www.arcatech.com
2. Drag and drop the Play call part onto the SIP track The Play call part will take an audio file ( a .wav file encoded in A Law or U Law format) and play out the contents as a media stream. This would typically be a voice prompt or some other test file. Play 3. Enter Call Properties as necessary. TIME will set the length of time to play the voice file (setting it to 0 will play complete file); PLAYMODE is set to Play Once or Play Continuous and WAVFILE is the name of the voice file to play. 1. Play call part will send the contents of the specified audio file as a media stream www.arcatech.com
Before you can use an audio file in a script (e.g. to play a message) you need to add it to the resources for this project. You can choose from one of the sample files supplied with the Harmony – found in \Program Files\emutel\emutel Harmony\Resources\Audio – or record your own using a utility like Windows audio recorder. Your file should be encoded in A Law or U Law format depending on the codec you are using. Adding Audio Files to Resources 2. If necessary click on + to expand the display 3. Right Click on DSP Audio and click on Import Wave File 1. Begin by clicking on the Resource View tab www.arcatech.com
4. Browse the files on the computer and select the one you want. There are sample files in \Program Files\emutel\emutel Harmony\Resources\Audio. Before you can use an audio file you need to add it to the resources for this project. You can choose from one of the sample files supplied with the Harmony – found in \Program Files\emutel\emutel Harmony\Resources\Audio – or record your own using a utility like Windows audio recorder. Your file should be encoded in A Law or U Law format depending on the codec you are using. Adding Audio Files to Resources 5. Click on Open to add this file to your resources for the project www.arcatech.com
3. You have controls to play and edit the audio file Once the audio file has been added to the resources for the project it is opened in the audio viewer. Here you can listen to the file and edit the contents. Managing Audio Files 1. Selected Audio file is now added to your resources for this project 2. Audio file is displayed www.arcatech.com
3. Drag and drop the Record call part onto the PRI track The Record call part will take an incoming media stream and convert it to an audio file (a .wav file encoded in A Law or U Law format), and save it on the Harmony. It can subsequently be used in Play call parts or downloaded from the Harmony once the test has been completed. Record 4. Enter Call Properties as necessary. TIME sets the length of time for which to record the voice file; CODEC is set to either U Law or A Law and WAVFILE is the name of the voice file you want to use for the recording. 2. Record call part will record the voice path and save the contents in a .wav file 1. To get the PRI track to record the voice file transmitted from the SIP track first click ISDN PRI www.arcatech.com
3. Drag and drop the RepeatStart call part onto the PRI track before the sequence you want to repeat 5. Drag and drop the RepeatEnd call part by clicking and dragging the symbol on the Repeat Start call part to the end of the sequence to be repeated If you want to repeat a sequence of call parts you can use the Repeat Start and Repeat End call parts. You can repeat a number of times or for a time interval. In our example the ISDN script will make a call and wait for it to connect, record an audio file, finish the call and wait for it to clear, repeat this sequence a number of times. Repeat Start/End 4. Enter Call Properties as necessary. DUR is the length of time (in ms) to repeat the sequence of call parts, CNT if the number of times to repeat it. 2. RepeatStart call part is used to repeat a sequence of call parts a number of times 1. To repeat the test sequence a number of times click on the Control tab www.arcatech.com
1. To make and clear a call many times put a repeat loop around the MakeCall-EndCall call parts By putting a RepeatStart and RepeatEnd around each call part we change to behavior of the script. The first repeat loop will make a call and wait for it to connect, then make the next call and so on until all of the calls are established. The second repeat loop will clear all of the connected calls in turn. Repeat Start/End www.arcatech.com
1. To make a number of simultaneous calls put a repeat loop around the MakeCall call part 2. At this point all the calls are active By putting a RepeatStart and RepeatEnd around each call part we change to behavior of the script. The first repeat loop will make a call and wait for it to connect, then make the next call and so on until all of the calls are established. The second repeat loop will clear all of the connected calls in turn. Repeat Start/End 3. To end all of the calls put a repeat loop around the EndCall call part www.arcatech.com
2. Click Build to start building the executable script file which will be uploaded to the target Harmony Once the script has been completed you need to Build the script. This process involves turning all of the graphical information in the scripts into a format that the Harmony can understand as well as bundling in all of the resources necessary for the script to run. Building a Script 1. Once the script is complete right click on the project name www.arcatech.com
Once the script has been completed you need to Build the script. This process involves turning all of the graphical information in the scripts into a format that the Harmony can understand as well as bundling in all of the resources necessary for the script to run. Building a Script 3. Click Finish to complete the build process www.arcatech.com
The next step is to run the script and this is managed by a different application called harmony|Conductor. Running the Script www.arcatech.com