
Flexgard Net dipping EN
E N D
Presentation Transcript
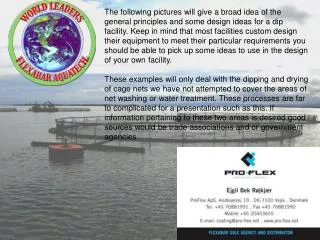
The following pictures will give a broad idea of the general principles and some design ideas for a dip facility. Keep in mind that most facilities custom design their equipment to meet their particular requirements you should be able to pick up some ideas to use in the design of your own facility. These examples will only deal with the dipping and drying of cage nets we have not attempted to cover the areas of net washing or water treatment. These processes are far to complicated for a presentation such as this. If information pertaining to these two areas is desired good sources would be trade associations and or government agencies
N This first net is a new net. The tank is constructed from cold steel and sized to accommodate the net being treated and sufficient coating The net is being handled by a forklift truck at this point, but the tank is sitting under a tall tower which you will see in future pictures. To ensure even coating the net is bundled very loosely and festooned on itself so it will unfold easily when it is hung to dry. Once the net is fully I the tank some type of weight will have to be placed on it to keep it submerged.
In this arrangement the net to be treated is loosely folded into a steel cage which just fits into the dipping tank. Ropes are attached to the grid work of the cage at a height that will keep the netting submerged when it is placed into the tank. The cage and netting are being handled by a construction crane which will maneuver the net throughout the process.
Back to our first net; after a sufficient soaking period, in this case one hour, the net is removed from the treatment. It is now being handled by a hoist attached to the top of the tower. The bundle will stay suspended over the tank until excess treatment all drains back into the tank, this can take several hours.
This again is our second net, in this design the steel cage and net are supported over the dip tank to drain The concept and results are the same as the previous method, One advantage you have here is provide by the steel cage, in case of inclement weather the net can be protected by a cover. Since this net station is in a locale that is frequently cold and rainy this is a very important feature,
Once the net as stopped dripping it is unbundled and attached to the hoist in the drying tower. Here you can see added a spreading frame this helps to minimize the net folding over on itself , this will help to maintain good airflow through the net to expedite drying.
The net has drained and is now being transferred to the drying house which is visible in the lower right-hand section of the picture. Notice the venting over the doorway
Our first net is now fully hung in one of the bays of the drying tower. As you can see it is very well spread and good airflow through and around the net can be achieved. Because this net station is located in n arid climate this is the ideal way to handle the treatment process, thorough drying here can be accomplished I three to six hours.
What we are looking at is a drying wheel, it is contained inside the drying house of our other net station. If you look closely at the core of the wheel you will see several slots, the core is a hollow pipe which acts as a duct to convey hat air from a furnace.
Here we see the net being attached to the perimeter of the drying wheel. The wheel is rotate to wrap te net onto the wheel.
The net is just about fully wrapped onto the wheel, as you can see the wrap is kept as even as possible and the layers kept to two or three so that airflow isn’t inhibited. Once the net is secured on the wheel the door is closed and the furnace is ignited, the flows from the interior through the net and out the vents, (there are other vents not visible for make-up air). The reason for the venting rather than just recycling the air is to remove the moisture so that the internal environment doesn’t become saturated with moisture.
At the end we have two finished nets ready for shipment. Not shown but highly recommended is wrapping the finished nets in black poly for storage prior to shipment.
As stated at the beginning this is a very broad stroke outline of net dipping steps. A complete examination of all equipment required would vary from facility to facility; it would be influenced by climate, capacity and goals. The final design will be achieved by extensive research and discussions. We would be glad to provide options during an ongoing dialog.