Download
1 / 37
370 likes | 585 Views
Extended Range DC Motor Controller. Sungjoon Cho Jeffrey Ma Project #47. ECE 345 Final Presentation April 28, 2004. Presentation Overview. Motivations Goals Basic Design High Power Challenges Control Circuit Challenges Results Recommendations / Summary. Motivations.

E N D
Extended Range DC Motor Controller Sungjoon Cho Jeffrey Ma Project #47 ECE 345 Final Presentation April 28, 2004
Presentation Overview • Motivations • Goals • Basic Design • High Power Challenges • Control Circuit Challenges • Results • Recommendations / Summary
Motivations • DC Motor Controllers have many practical applications • Having an extended range creates more widespread use for a motor controller • From small low power motors to high power motors (such as golf cart motor) • Control aspect allows for steady maintenance of desired speed/output
Goals • Converter Designed for 9-15V simulating inconsistencies of a Lead-Acid Battery • Output range of 0-15V for all input ranges, thus requiring Buck-Boost operation • Output power of up to 250W Continuous • Control aspect providing compensation and maintaining desired output
Switch Selection • FET: IRFP044N Power MOSFET • VDS(max) = 55V • RDS(on) = 0.020Ω • ID(max) = 53A • Diode: MBR4045WT • Vr = 45V • Imax = 40A • VF = 0.56V
The Gate Drive • Output applied to gate of MOSFET • Controls duty ratio of the converter • Low Power: Duty ratio controlled by feedback approach of control circuit. • High Power: Duty ratio controlled manually through use of potentiometer – controlled reference voltage compared to sawtooth waveform in order to determine shape of square wave • Switching frequency also controlled by pot in the gate drive circuit
Gate Drive Selection • TL494 vs. UC3843 • Initially built with UC3843, however, would not work with controller • Internal current source of UC3843 is in outward direction of PWM Feedback Input, whereas TL494 has current source in inward direction • With UC3843, feedback input was to small to make an effect. With TL494 feedback input was able to change the duty ratio for compensation
Two Separate Circuits • Both circuits have identical components • Only difference: Inductor • Connections between circuits drastically different
Low Power Circuit • Rated for about 100W due to limitations of power board • Duty cycle controlled by control circuit • Input Power supplied by Kenwood DC Power Supply • Output load consisted of motor • Initially tested with various resistances provided by HP DC programmable load.
High Power Load • 225W max output due to load limitations • Turned out to coincide with input current limitations • Duty cycle controlled manually through the use of potentiometers • Input power supplied by Xantrex DC Power Supply • Output load provided by programmable load • Tested range 10Ω ~ 1Ω
Dealing With High Current • High power means high current • Max output current = 225W / 15V = 15A • Max input current = 25A (Power Supply limit) • The Inductor: • 5 #14 AWG wires in parallel to deal with current levels through inductor • Every wire in parallel knocks the gauge level down by 2 • 5 in parallel = #6 AWG
Dealing With High Current • Capacitors • 100µF input cap rated for 63V blown due to heat • 470µF, 63V cap with significantly larger case used instead (rated up to 105°C) • Two 220µF, 63V output caps put in parallel for precautionary reasons
Current ratings for FET and Diode important Heat rating important as well First FET had proper current rating, but low heat rating Second FET had proper current rating and decent heat rating but couldn’t accommodate heat sink Third FET was just the one we were looking for 2 Heat sinks placed on FET versus one on diode Highest current levels with duty ratio high, which meant current would be flowing through FET for longest periods of times during those situations Dealing With High Current
Dealing With High Current • Component interconnections • 12-Gauge wire used for short connections on back of the vector board.
Dealing With High Current • Input source limitations • Kenwood DC Supply: Imax = 10A • Xantrex XHR DC Supply: Imax “only” 25A • Xantrex worked for 15V input • For 9V~14V inputs, current limit reached before 225W output could be achieved • Xantrex Display Inability • Received Xantrex with faulty display meters • Forced to view source values through wattmeter, which added to loss and inconsistency -Wattmeter limited to 20A, so after that we had to rely on current readings from oscilloscope
Theoretical Output Voltage FET ON: VLON = VIN – IL(RL + RDS) ILON = VC/ROUT VLOFF = -IL – VC – VD ICOFF = IL – VC/R
Theoretical Output Voltage Formulation DVLON + (1-D)VLOFF = 0 DICON + (1-D)ICOFF = 0 -Substitute expressions for VL and IC from previous slide -2 equations, 2 unknowns VC = (1-D)Rout[DVin + (1-D)VD] D(RL + RDS)+RL(1-D) + ROUT(1-D)2 RDS, VD, RL known…..
Efficiency • Decent efficiency • High efficiency was not a priority • Efficiency increases with higher duty cycle (as expected)
Vin = 9.5V Load = 5Ω
DC Motor Limitations • Permanent Magnet DC Motor • Litton 4Z143 12 Volt • Ra ~ 1 ohm • 1/7 hp ~ 100 W • Very inefficient for low power • PLOSS ~ 40 W
Motor Efficiency RLOAD = 1.5Ω
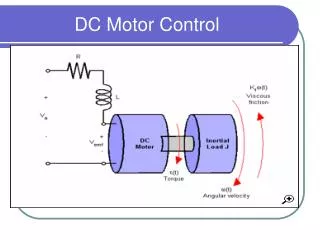
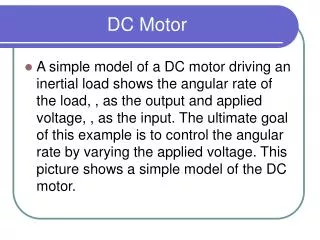
Control Circuit • -Senses the speed of the motor • Compares speed with a reference voltage, the difference being the error • -Integrates the error and feeds back to the duty cycle to keep motor at a certain speed • Has the ability to return controlled speed back to exact set point following a disturbance
Characterizing ω k ω = VT - RaI I -- VT
Motor Speed Sensing -0.1VT 0.33(VT – RaI) = V 4.7R1I Outputs a scaled version of the motor speed
Feedback Integral Control V (1/RC )∫(Vref – V) dt 5V Eliminates the error (Vref – V) Feedback into Duty Cycle of Gate Driver Vref
Control Functionality Range of Vref : 0V - 3V VT max = 10 V Applying resistance to motor shaft: VT will increase to compensate for the disturbance to the speed. Speed will remain relatively constant.
Challenges with Integrator • Integral controller responds very slowly to an error signal • This creates a large deviation at the moment the error is produced
Recommendations • Improve converter efficiency • Stabilize control • Possibly add a proportional control to the control circuit along with the integrator • This takes a proportion of the error and feeds back into the control
Summary • Successful Buck-Boost converter built, covering all possible specifications • Maximum possible output power achieved and maintained for extended lengths of time • Feedback Control implemented to maintain constant output