Download
1 / 15
180 likes | 717 Views
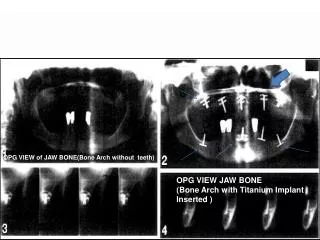
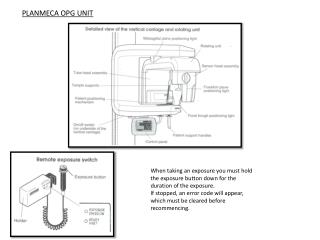
PLANMECA OPG UNIT. When taking an exposure you must hold the exposure button down for the duration of the exposure. If stopped, an error code will appear, which must be cleared before recommencing. The on/off switch is located on the underside of the vertical carriage.

E N D
PLANMECA OPG UNIT When taking an exposure you must hold the exposure button down for the duration of the exposure. If stopped, an error code will appear, which must be cleared before recommencing.
The on/off switch is located on the underside of the vertical carriage. A self-test will be performed when unit is switched on. The emergency stop button is located on the underside of the vertical carriage. Error 58 will appear on the main display if the emergency stop has been activated. To clear the error code, press OK and release the button
There are two supports available The disposable bite block can be removed entirely for edentulous patients Ensure that the support is pushed firmly onto the machine before positioning patient
Selecting a patient from the DICOM worklist Select DICOM worklist Ensure date is correct Select Find Double click on patient This field will now appear to confirm correct patient
Select IMAGING on menu Select Pan Exp for OPG Position patient in machine and select parameters as follows.
GRAPHIC USER INTERFACE Selecting panoramic exposure program Selecting patient size Touch the patient size field on the main display to change from adult to child. To change back to adult, touch the patient size field again NB: when child is selected, the height and width of the exposed area will be slightly reduced.
Selecting kV & mA values Select parameters and press OK
Selecting TMJ exposure program Select jaw size and kV & mA values as for OPG
PREPARATIONS FOR EXPOSURE OPG EXPOSURE
Patient places chin against the top bar of the chin rest, or: Bites the bite block with upper and lower incisors Touch temple support field to close the temple supports Align patient’s midsagittal plane with the light beam Touch either of the layer arrows to switch positioning lights on
Align the patient’s Frankfort plane with the light beam NB: The Frankfort plane light can be slid up and down to accommodate different head sizes When patient is in position, press “ready”
The main screen will now display “Waiting for exposure” Press and hold down the exposure button for the duration of the exposure (18 sec) Press done when exposure is finished Once exposure is finished, guide patient out of the machine and press ready on the graphic user interface to return the carriage to the start position
2) Select DICOM STORAGE to send to PACS 1) Return to “Imaging” screen