Download
1 / 18
180 likes | 344 Views
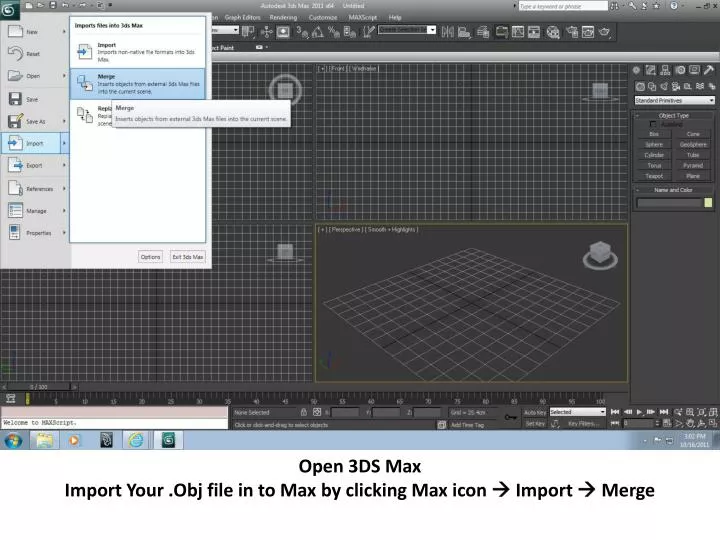
Open 3DS Max Import Your . Obj file in to Max by clicking Max icon Import Merge. That will pop up a window like this. Choose your file from where located in your H ard Drave. Click Open. That will pop up a new window like this. Just click Import.

E N D
Open 3DS Max Import Your .Obj file in to Max by clicking Max icon Import Merge
That will pop up a window like this. Choose your file from where located in your Hard Drave. Click Open
That will pop up a new window like this. Just click Import.
Your imported file will look like this Click out side the object any where in the view port
Select a surface click on red arrow indication first then green arrow. Select all polygons of the bottom where two surfaces connecting inner and outer And hit delete key on key board
Now select Element indicated by red arrow and select the inner part of model. Hit delete key
That will popup unit setup window like this choose Metric , Centimeters Hit ok
Imagine your created Box is the torso of your model head. Select all three objects head and two eyes hit R on key board to select scale tool click and hold in the middle of the gizmo which you are looking in yellow shaded.
Drag down to make small. And visualize the head proportions matching to your box. After finishing the scaling Click out side the Object. And select head surface only. By clicking on that.
From the modifiers list select Slice modifier. The Modifier will look like with a bulb and + icon click on that + icon the modifier will expand.
Select slice plane and Rotate the slice plane by selecting rotation tool (red arrow Indication) to slice vertically. And select slice type Remove top (Green Arrow indication)
After adjusting Slice plane. Click on Slice modifier to go top level of Modifier.(red Arrow Indication). Right Mouse Click on the Object Convert to Convert to Editable Poly.
From the modifiers list select Shell modifier. Make sure outer amount is 0 inner amount is 0.2cm.
Finally you need to add a turbo smooth modifier to your model and convert your model in to a editable poly.
feel free to contact any design needs banigandlapati@gmail.com http://bnarayanrao.wordpress.com Skype: narayanarao3dvisualizer