Download
1 / 6
90 likes | 282 Views
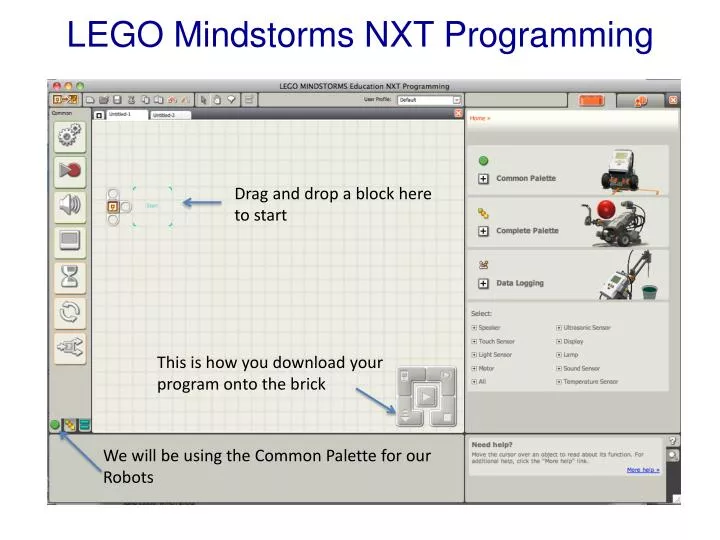
LEGO Mindstorms NXT Programming. Drag and drop a block here to start. This is how yo u download your program onto the brick. We will be using the Common Palette for our Robots. Controlling the Motors. Port: Indicates what motors you want turned on- Motors B & C used here.

E N D
LEGO Mindstorms NXT Programming Drag and drop a block here to start This is how you download your program onto the brick We will be using the Common Palette for our Robots
Controlling the Motors Port: Indicates what motors you want turned on- Motors B & C used here Power: 75% is the standard rate. Duration: How long you want your robot’s motor to go for; right now set at 1 rotation. Other Options: Unlimited, Degrees, Rotations, Seconds Check which direction you want your robot to move: a) Forward b) Reverse (backward) c) Stop
1. The letters at the top right corner of the block show which of your NXT’s ports will be controlled – Motors B & C will be used here 2. The icon shows which direction your robot will go 3. Power Level – Your robot’s speed – take into account conditions in the surrounding that might affect the speed you set 4. Duration Icon – Set your robot to either degrees, rotations, or seconds 1. Select the motors you would like to control. B & C here work together here - 2. Choose whether the motors will go forward, go backwards, or stop. Selecting Stop will also reset the motors. 3. If you’re using two motors to drive a vehicle (with one on each side), the Steering slider will appear with the chosen port letters indicated at each side. 4. This slider & input box will let you set the power level [0-100%] 5. With the Duration pull-down menu, you can set the motors to run for an unlimited interval or for a set number of seconds, rotations or degrees. By choosing Time, Rotation or Degrees you can control how far your robot will travel.
Wait Block & Touch Sensor This block lets your robot sense its environment for a certain condition before it continues. Use the slider or type in a value to set a trigger point so that the program continues when sensor values are below or above it. • The number or letter at the top right corner of the Wait block shows the port the sensor is plugged into. • 2. If you have chosen “wait for” a light or sound, this icon indicates at what level the trigger point is set • The more colored bars displayed, the higher the trigger point. • If you have chosen to wait for a touch sensor, the icon will display the touch sensor condition (bumped, pressed, or released) that will trigger the block and allow the program to move on.
1. The number shows which of your NXT’s port is connected to the sound sensor. 2. This icon indicates at what level the trigger point is set. The more colored bars displayed, the higher the trigger point. Sound Sensors 2. Use the slider to set the trigger value or type a value directly into the input box. Select the radio button to the right of the slider if you want the block to be triggered by sound levels higher than the trigger value; select the left radio button to trigger the block with sound levels lower than the trigger value. 3. Feedback box displays the current sound reading (0-100%). You can use it to try out different trigger values
Loop Block Use this block to repeat sequences of code. Set the condition that will end the loop: after an amount of time goes by, the number of repetitions, a logic signal or a sensor. You can also set a loop to go on forever. 1. A Loop block’s action property = “Forever,”; (∞) is displayed 2. Choose Current Count to control the loop itself 3. If you choose for a sensor to control the loop, the trailing portion of the Loop block will expand in size revealing an icon for the chosen sensor. Ex. If you choose a Light Sensor to control the loop, a Light Sensor icon will be displayed in the expanded portion of the block.