Download
1 / 17
170 likes | 352 Views
LEGO NXT Robot Programming. Introduction to Programming a Lego NXT robot in Java. Objectives. Software requirements Java Libraries Creating a Java forms application Running Java applications Creating objects and initialisation Robot navigation Using a timer The touch sensor

E N D
LEGO NXT Robot Programming Introduction to Programming a Lego NXT robot in Java
Objectives • Software requirements • Java Libraries • Creating a Java forms application • Running Java applications • Creating objects and initialisation • Robot navigation • Using a timer • The touch sensor • Displaying a message box • Pausing the program to enable the robot to respond • The ultrasonic sensor
Software Required • NetBeans Java development software • SE version is sufficient • LeJOS Java robot API • PC installer • Download special firmware to the robot • Programs can run on the PC (controlling the robot) • Programs can be downloaded and run on the robot
Libraries required • Copy libraries to folder within project: • C:\Program Files\leJOS NXJ\lib\pccomm.jar • C:\Program Files\leJOS NXJ\lib\pctools.jar • C:\Program Files\leJOS NXJ\3rdparty\lib\bluecove.jar • Link to project within NetBeans • Right click project • Select Libraries category • Add Jar/Folder button
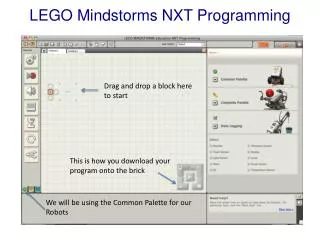
Forms Development • Select controls from palette • Set properties • Rename variable (right click control) • Attach an event handler • Double click control • Select “Create new action” • Choose a name for your event-handler • Code will be created for the method
Running a NetBeans App • To run from within NetBeans • Make sure the required project is the currently highlighted one • Right click project and select “Set as Main project” • Use the Green arrow on the toolbar • Or right click the project name and select “Run” • Interrupt if necessary using Run/Stop build/run from the menu • To run from outside NetBeans • Use the hammer icon on the toolbar or right click project and select “Build” • This will create an executable JAR in the dist folder of the project • Double click the JAR file to run
Java Coding (General) • Import external Java classes (similar to Using statements in C#) import lejos.nxt.*; import lejos.robotics.navigation.*; • Instance variables • Placed at the bottom of form code: private TachoPilot pilot; • DO NOT Modify auto-generated code
Initialisation and creating objects • This will normally be done in the constructor • The constructor already contains a lot of auto-generated code • Add your code at the end • Suggestion: • Write your own initialisation method • Call this from the bottom of the constructor • This means only one line needs to be added to the constructor and keeps your code separate
Auto-generated code Call custom initialisation Custom initialization method
Robot Navigation import lejos.robotics.navigation.*; • Create pilot object (in initialisation method) private TachoPilot pilot; pilot = new TachoPilot(2.1f, 4.4f, Motor.A, Motor.C, true); • Set speed of motion pilot.setMoveSpeed(3); pilot.setTurnSpeed(20); • Move and rotate pilot.travel(-12); pilot.rotate(90); The Tribot has the motors on backwards so needs negative number for distance
More Navigation Methods • Methods exist to move the robot continuously: pilot.backward(); pilot.forward(); pilot.stop(); • Remember if your robot has the motors on backwards then backwards will move forwards etc! • It is also possible to obtain the maximum available speeds: float fMaxMoveSpeed = pilot.getMoveMaxSpeed(); float fMaxTurnSpeed = pilot.getTurnMaxSpeed();
Creating a Timer • Create an instance variable private Timer touchTimer; • Create a timer object, which includes the interval and an “action listener” method which is called for each timer tick touchTimer = new Timer(50, new ActionListener() { public void actionPerformed(ActionEvent e) { touchTimerTick(); } }); • Start or stop the timer touchTimer.start(); touchTimer.stop();
The Touch Sensor • Create an instance variable private TouchSensortouchSensor; • Create the object and attach to the port touchSensor = new TouchSensor(SensorPort.S1); • Check if the sensor is pressed if (touchSensor.isPressed()) …………
Simple Message Box • Uses a class from the Java “Swing” library import javax.swing.JOptionPane; • A simple message box JOptionPane.showMessageDialog(null, "Message"); • A message box with a title and message type JOptionPane.showMessageDialog(null, "Message", "Title", JOptionPane.ERROR_MESSAGE); • A variety of other message types are available
Adding a Pause • Use the Thread.sleep command but requires exception handling to be added //include a 25ms delay to pick up values try { Thread.sleep(25); } catch(Exception e) { JOptionPane.showMessageDialog(null, "Error in pause"); return; }
The Ultrasonic Sensor • Created in the same way as the touch sensor • To obtain the value should first “ping” the sensor ultrasonicSensor.ping(); • Then pause for at least a 25ms delay (see previous slide) • Distance value can then be obtained iDist = ultrasonicSensor.getDistance();