Download
1 / 23
0 likes | 9 Views
The Accumax Micropipette Guide is your essential resource for mastering precise liquid handling with micropipettes. This comprehensive guide covers everything from choosing the right micropipette and tips to understanding their proper use and maintenance. Designed for accuracy and ease, the guide includes detailed information on various micropipette models and tips, helping you make informed decisions for your laboratory needs. Whether you're a seasoned professional or new to micropipetting, this guide offers valuable insights to enhance your pipetting skills and ensure reliable results.<br>

E N D
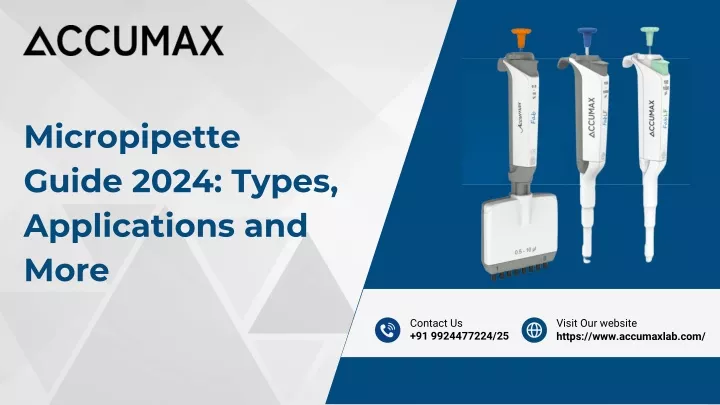
Micropipette Guide 2024: Types, Applications and More Contact Us +91 9924477224/25 Visit Our website https://www.accumaxlab.com/
Micropipettes or pipettes, are instruments used to measure liquid ranging between volumes of 1-10000 µl and transfer it from one sample container to another. This is a basic liquid-handling instrument for almost all scientific laboratories. Types of Micropipettes There is no 1 way to classify micropipettes. It can vary in a number of ways. 1. Number of Channels Single Channel Micropipettes A single-channel micropipette has only 1 channel to aspirate and dispense the liquid. It means you can handle only one sample at a time.
Multi-Channel Micropipettes Multi-channel micropipettes can handle 8, 12 or 16 samples in one go. It can attach multiple tips at the same time and you can get the work done faster especially if working in high-throughput labs. 2. Volume Adjustment Fixed Volume Micropipettes Here the volume a pipette can aspirate and dispense remains the same and you don’t have the option to adjust or choose between a range. They offer consistent and accurate results for repetitive pipetting.
Variable Volume Micropipettes Variable volume pipettes give you the flexibility to choose the volume you want to pipette (within the given range). You need to set the volume manually on the dial. High-performance pipettes also come with a volume lock feature for enhanced safety and reliability.
3. Operating Mechanism Mechanical Pipettes These are the standard pipettes widely used in all laboratories. Mechanical micropipettes operate on a piston-driven system, where users manually set the desired volume using a dial and apply thumb pressure on the plunger to aspirate and dispense liquids. Electronic Micropipettes Electronic micropipettes mechanical ones because they have digital controls, programmability and eliminates the element of human error to a certain extent. It has an electronic display and is ideal for high-throughput labs where reproducibility is paramount. are more expensive than
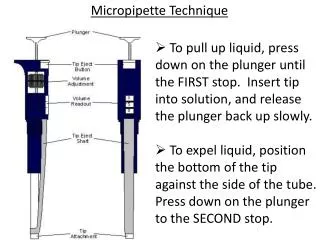
Components of Micropipette Plunger The plunger is one of the main components of the micropipette. Use your thumb to press down on the plunger to aspirate and dispense the liquid. Then, with a firmer push, sometimes called the “blow-out stop,” it ensures a thorough expulsion of any remaining liquid, guaranteeing accurate measurements—a two-step process of liquid control. Ergonomics are a key point here since lab professionals will be pipetting repeatedly for long hours. A low- force mechanism which does not require excessive plunge force, will minimize the RSI. Volume Adjustment Dial By twisting the volume adjustment dial, you dictate the micropipette’s plunger movement, determining your experiment’s liquid dosage. In micropipettes with adjustable volumes, this feature offers precise measurement control, no matter how small or large the quantity is. Tip Ejector Keep your hands and micropipette clean by disposing of used tips promptly. Utilize the convenient tip ejector button to effortlessly remove micropipette tips, ensuring a fuss-free and contamination-free experiment environment.
Tip Ejector Keep your hands and micropipette clean by disposing of used tips promptly. Utilize the convenient tip ejector button to effortlessly remove micropipette tips, ensuring a fuss-free and contamination-free experiment environment. Tip Cone The tip cone, also known as the shaft, is the crucial component of a micropipette where the disposable tip is inserted. Its primary function is to ensure a snug fit for the tip, ensuring precision in measurements and preventing air leakage. Its adaptable shape accommodates various sizes and styles of tips, allowing for versatile and secure usage without concerns of detachment or disruptions. Calibration Screw Inside the micropipette lies a crucial component, the calibration screw. This is what makes accuracy possible. Twisting this tiny screw adjusts the liquid output, fine-tuning the micropipette’s performance. Regular checks and tweaks, as advised by the manufacturer, ensure precision in your measurements, keeping everything flowing smoothly.
Calibration Screw Inside the micropipette lies a crucial component, the calibration screw. This is what makes accuracy possible. Twisting this tiny screw adjusts the liquid output, fine-tuning the micropipette’s performance. Regular checks and tweaks, as advised by the manufacturer, ensure precision in your measurements, keeping everything flowing smoothly. Applications of Micropipettes in Laboratory Micropipettes are used to measure any small amount of liquid samples for testing and research. They are crucial in lab settings like molecular biology and diagnostics, precisely transferring tiny liquid volumes, experiments. Mastery of their principles is key to effective scientific research and analysis. facilitating diverse
Some common applications include: 1. Molecular Biology 2. Biochemistry 3. Cell Culture 4. Microbiology 5. Analytical Chemistry 6. Clinical Diagnostics 7. Pharmaceutical Research How does a Micropipette work? Micropipettes operate on the principle of air displacement. They consist of a plunger connected to an internal piston, which moves to two distinct positions: Filling Position: When the plunger is depressed to the first stop, the internal piston displaces a volume of air equal to the desired volume shown on the volume indicator dial. This creates a vacuum, drawing the liquid into the tip. Dispensing Position: The second stop on the plunger is used solely for dispensing the contents of the tip without drawing in additional air.
How to use a micropipette? 1. Start with choosing the right micropipette and micropipette tips Select the one that is best for your application. While pipettes are similar in the way they function, what sets them apart is the accuracy and precision of the measurement, ergonomics and general durability of the instrument. Set the volume based on your requirement and ensure the tips match the volume of the pipettes. 2. Attach the micropipette tip to the micropipette Don’t use excessive force here because good quality pipettes will be quick and seamless to attach to the tips and should provide a leak-proof seal. Immerse the pipette in the liquid at 90 degrees Be mindful of your posture and keep the position upright. Aspirate and dispense 2-3 times before actually measuring the liquid
3. Forward or Reverse Pipetting First let’s talk about forward pipetting: To aspirate the liquid in the tip, press the plunger to the rst stop. Immerse the pipette tip vertically in the liquid. Slowly release the plunger while the tip is immersed. The liquid will be aspirated into the pipette tip. To dispense the liquid, place the tip on the inner wall of the receiving vessel at a steep angle Slowly press the plunger to the rst stop to dispense the liquid. To empty the tip completely, press the plunger to the second stop.
Now for reverse pipetting The reverse technique is suitable for dispensing reagents/solutions that have high viscosity or a tendency to foam easily. It is also recommended for dispensing very small volumes. To aspirate the liquid in the tip, press the plunger to the second stop and immerse the pipette tip vertically in the liquid. Slowly release the plunger while the tip is immersed. The liquid will be aspirated into the pipette tip. To dispense the liquid, place the tip on the inner wall of the tube at a steep angle. Slowly press the plunger to the rst stop. Finally, eject the tip and dispose it off
Calibration of Micropipettes Calibration is conducted through gravimetric testing, which involves weighing the amount of pure water delivered in a single operation of the pipette. The obtained mass is divided by the density of water to determine its volume. Variable volume pipettes should undergo testing at three or more points across their designated range, typically at maximum volume, 50% of maximum volume, and the lower limit of their range. Here’s a general guide on how to calibrate a micropipette: 1. Gather Materials Micropipette(s) to be calibrated Appropriate pipette tips Distilled water or a calibration solution Weighing balance with appropriate accuracy (usually in milligrams) Gloves and lab coat for safety
5. Set the Micropipette to the Desired Volume Adjust the micropipette to the volume you want to calibrate (e.g., if calibrating a 10-100 μL micropipette, set it to 50 μL). 6. Dispense Liquid into a Weighing Boat or Container Dispense the liquid from the micropipette into a weighing boat or a container placed on a weighing balance. Note down the initial weight (W1) of the liquid dispensed. 7. Weigh the Dispensed Liquid Carefully weigh the liquid dispensed using the weighing balance. Ensure the balance is calibrated and accurate. Record the final weight (W2) of the liquid. 8. Calculate the Dispensed Volume Subtract the initial weight (W1) from the final weight (W2) to determine the weight of the liquid dispensed (W). Convert the weight of the liquid dispensed to volume using the density of the liquid or the known density of the calibration solution.
9. Compare with Expected Volume Compare the calculated volume dispensed with the expected volume (e.g., 50 μL for a 10-100 μL micropipette). Calculate the percent error to assess the accuracy of the micropipette calibration: 10. Adjust if Necessary If the percent error is within an acceptable range (typically ±2-5%), the micropipette is calibrated. Otherwise, adjustments may be needed. Consult the micropipette’s user manual for instructions on how to adjust the volume settings. Adjust carefully and recheck the calibration until the desired accuracy is achieved.
11. Record Calibration Data Keep a record of the calibration process, including the micropipette serial number, date of calibration, volume settings, calibration solution used, measured weights, calculated volumes, and any adjustments made. 12. Final Checks After calibration, perform a final check to ensure the micropipette is dispensing accurately and consistently across the volume range. When is micropipette calibration required? Micropipette calibration is typically required in the following situations: Initial Use New micropipettes should be calibrated before their initial use to ensure accuracy and precision.
After Maintenance or Repair Calibration should be performed after any maintenance or repair work on the micropipette to verify that it meets the required specifications. Change in Operating Conditions If there is a significant change in the operating conditions, such as temperature or altitude, recalibration may be necessary to account for these factors’ effects on the micropipette’s performance. Compliance Requirements Laboratories may have regulatory or quality assurance requirements that mandate regular calibration of micropipettes to ensure traceability and compliance with standards.
Where do we get the best micropipette for the lab? When purchasing a micropipette for your lab, consider key factors such as accuracy, precision, ergonomics, and ease of maintenance. Research the brands and models, compare specifications, and read user reviews to make an informed decision. Evaluate additional features like adjustable volume settings and compatibility with automation systems. Set a budget and balance costs with desired features. Check warranty coverage and customer support options for added peace of mind. Cleaning and Maintenance of Micropipettes 1. External Cleaning Remove and Clean the Tip Ejector: Begin by detaching the tip ejector and giving it a thorough wipe-down. Wipe Down All Exposed Surfaces: Take a lint-free cloth or tissue and carefully wipe all visible parts of the micropipette, including the body, buttons, operating rod, and tip holder. Be diligent in cleaning any scuffs, marks, or accumulated debris in hard-to-reach areas.
2. Internal Cleaning Cleaning the inside of a pipette should be handled by trained personnel to avoid incorrect reassembly, which can damage the micropipette and affect its performance, leading to decreased accuracy and potential leakage. Disassemble the Micropipette: Carefully take apart the pipette, placing the upper part in a clean, dry area. Wipe with Alcohol-Coated Wipes: Use alcohol-coated wipes to thoroughly clean the entire interior, including the body, connecting nut, tip holder, O-ring, seal, and the stainless steel surface of the piston. Ensure the piston is completely dry to prevent corrosion. Allow Alcohol to Evaporate: Let the alcohol evaporate fully from the interior of the pipette. Check for Lubrication Needs: Refer to the instruction manual to determine if any parts, like the piston assembly and seals, require lubrication. Follow the manual’s guidance for reassembly, ensuring proper alignment and placement of components.
Maintaining Micropipettes When the pipette is not in use it should be stored in an upright position. The pipette should be inspected prior to use each day for any dust or contamination on outside surfaces. Special attention should be given to the tip cone. No solvent other than isopropanol should be used to clean the pipette. If the pipette is used daily, an internal parts inspection should be performed every three months. Choosing the right micropipette for your application Ensure that the micropipette can accommodate the desired range of liquid volumes for your pipetting needs. Verify if the micropipette features a universal tip cone to accommodate various types of pipette tips. Check if the micropipette is autoclavable at the necessary temperature to ensure proper sterilization. Check if the micropipette is UV resistant so that they can be kept inside the hood even when the UV mode is on.
Accumax Lab Devices specializes in manufacturing high-precision liquid handling instruments for top-tier laboratories worldwide. With a focus on innovation, it offers an advanced range of micropipettes designed to enhance user experience within real-world laboratory settings. Especially our range of FAB and FAB LF pipettes, which are specially designed for accuracy and precision with excellent ergonomics to elevate your pipetting experience like never before. Read More: https://www.accumaxlab.com/micropipette-guide/
CONTACTS Accumax Lab Devices Pvt Ltd 228/1/4, Dantali Industrial Estate, Gota-Vadsar Road, Dantali, Tal: Kalol, Dist. Gandhinagar, Gujarat – 382721, India contact@accumax-neuation.com +91 9924477224/25