Download
1 / 18
190 likes | 596 Views
DESCRIPTION. The M203 grenade launcher is a lightweight, single-shot, breech-loaded, pump action (sliding barrel), shoulder-fired weapon attached to either an M16A1 or an M16A2 rifle ( Figure 3-1 ). . 3-2. TECHNICAL DATA The technical data for the M203 grenade launcher is as follows:

E N D
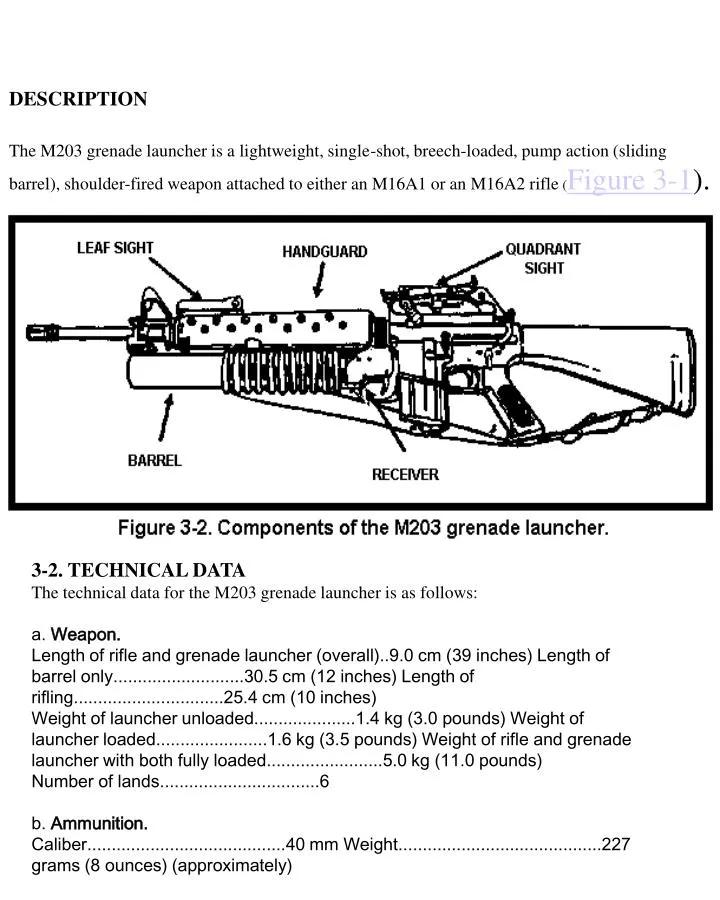
DESCRIPTION The M203 grenade launcher is a lightweight, single-shot, breech-loaded, pump action (sliding barrel), shoulder-fired weapon attached to either an M16A1 or an M16A2 rifle (Figure 3-1). 3-2. TECHNICAL DATA The technical data for the M203 grenade launcher is as follows: a. Weapon. Length of rifle and grenade launcher (overall)..9.0 cm (39 inches) Length of barrel only...........................30.5 cm (12 inches) Length of rifling...............................25.4 cm (10 inches) Weight of launcher unloaded.....................1.4 kg (3.0 pounds) Weight of launcher loaded.......................1.6 kg (3.5 pounds) Weight of rifle and grenade launcher with both fully loaded........................5.0 kg (11.0 pounds) Number of lands.................................6 b. Ammunition. Caliber.........................................40 mm Weight..........................................227 grams (8 ounces) (approximately)
WARNING • WHEN FIRING CLOSE-IN, SUCH AS IN URBAN AREAS, TRENCHES, ANDOTHER RESTRICTIVE TERRAIN, OBSERVE THE MINIMUM ARMINGRANGE TO ENSURE THE ROUND CLEARS OTHER FRIENDLY FORCES. c. Operational Characteristics. Action.......................................…………………………………Single shot Sights: Front......................................……………………………………Sight post Rear......................................…………………………………...Leaf Chamber pressure.............................………………….206,325 kilopascals (35,000 psi) Muzzle velocity..............................……………….76 mps (250 fps) Maximum range................................…………400 meters (1,312 feet) (approximately) Maximum effective range: Fire-team sized area target...................350 meters (1,148 feet) Vehicle or weapon point target.............…………………..150 meters (492 feet) Minimum safe firing range (HE): Training......................................165 meters (541 feet) Combat.....................................……………………………31 meters (102 feet) Minimum arming range............................14 to 38 meters (46 to 125 feet) (approximately) Rate of fire....................................5 to 7 rounds per minute Minimum combat load.............................36 HE rounds
WARNING • KEEP THE MUZZLE POINTED DOWNRANGE AND CLEAR OF ALL SOLDIERS. • USE THE RIGHT AMMUNITION; • NEVER USE HIGH-VELOCITY 40-MM • AMMUNITION DESIGNATED FOR OTHER 40-MM WEAPONS SUCH AS THE MK 19; • HIGH-VELOCITY ROUNDS ARE LONGER THAN THOSE USED IN THE M203, • AND MAY CAUSE IT TO EXPLODE. 2-2. LOADING To load the weapon, the grenadier must first press the barrel latch and slide the barrel forward. Once the barrel is in the forward position, the grenadier places the weapon on SAFE. Then he inserts clean, dry, undented ammunition into the chamber and slides the barrel rearward until it locks with an audible click (Figure 2-1).
2-3. UNLOADING To unload the grenade launcher, the grenadier must first depress the barrel latch and move the barrel forward. The cartridge case or round should automatically eject. If the case is stuck, he taps it with a cleaning rod to remove it (Figure 2-2). He places the weapon on SAFE, then slides the barrel rearward, locking it to the breech. WARNING • IF THE WEAPON HAS NOT BEEN FIRED, AVOID DETONATION BY EITHERCATCHING THE EJECTED ROUND OR HOLDING THE WEAPON CLOSE TOTHE GROUND TO REDUCE THE DISTANCE THE ROUND CAN FALL.
(3) Front sight post. The front sight post mounts on the sight post arm by means of a pivot bracket. The bracket is opened when the sights are to be used and, to prevent damage to the sights, is closed when they are not in use. Use the sight post as follows to make minor adjustments in elevation when zeroing the launcher: • (a) To decrease elevation, turn the elevation adjustment screw on the sight post right; turn it left to increase elevation. • (b) To move the impact of the projectile 5 meters at a range of 200 meters, turn the elevation adjustment screw one full turn. • (4) Rear sight aperture. The rear sight aperture is on the sight aperture arm, which is attached to the rear portion of the quadrant sight arm. Use the rear sight aperture to make minor adjustments in deflection (windage) when zeroing the launcher as follows: • (a) To move the impact to the left, press the rear sight aperture retainer and move the rear sight aperture away from the barrel, and vice versa. • (b) To move the impact of the projectile 1 1/2 meters at a range of 200 meters, move the rear sight aperture one notch.
The front sight post of the M16-series rifle serves as the front aiming post for the M203 leaf sight. • (1) Sight base. Two mounting screws permanently attach the sight base to the rifle handguard. The base protects the sight from damage when the sight is not being used or is in the down position. • (2) Sight mount and sight. The grenadier uses the sight mount, which is attached to the sight base, to raise or lower the sight. Though the range is not marked on the sight in meters, the sight is graduated in 50-meter increments from 50 to 200 meters, which are marked with a "1" at 100 meters and a "2" at 200 meters. • (3) Elevation adjustment screw and elevation scale. The screw attaches the sight to its mount. When the screw is loosened, the sight can be moved up or down to make minor adjustments in elevation during the zeroing procedure. The rim of a 40-mm cartridge case is useful for turning the screw. Raising the sight increases the range, lowering the sight decreases the range. The elevation scale consists of five lines spaced equally on the sight. The index line is to the left of the sight. Moving the sight one increment moves the impact of the projectile 10 meters in elevation at a range of 200 meters. • (4) Windage screw and windage scale. To make minor deflection adjustments during the zeroing procedure, a knob on the left end of the windage screw is turned. The scale has a zero line in its center and two lines spaced equally on each side of the zero line. Moving the knob one increment on the windage scale moves the impact of the projectile 1 1/2 meters at a range of 200 meters.
f. Trigger Guard. The trigger guard protects the trigger (A, Figure 3-5). Depressing the rear portion of the trigger guard rotates it down and away from the magazine well of the rifle, which allows the weapon to be fired while the firer is wearing gloves or mittens (B, Figure 3-5). g. Safety. The safety is inside the trigger guard, just in front of the trigger. For the launcher to fire, the safety must be forward. When the safety is rearward, the launcher is on SAFE. The safety is manually adjusted, (Figure 3-6).
3-5. CLEARING PROCEDURES The soldier must clear the weapon before performing maintenance on it. FM 23-9 provides instructions for clearing the M16-series rifles. To clear the grenade launcher-- a. Push in the release button, and pull the barrel forward. b. Watch to see if a round extracts. c. Place the safety on SAFE. d. Inspect the breech to ensure a round is not present. e. Pull the barrel to the rear until it clicks. This cocks the weapon. f. Place the safety on FIRE.
WARNING IF THE WEAPON HAS NOT BEEN FIRED, AVOID DETONATING THE ROUND BYEITHER CATCHING IT AS IT EJECTS OR REDUCING THE DISTANCE IT FALLS BYHOLDING THE WEAPON CLOSE TO THE GROUND. DO NOT DO THIS OVER AHARD SURFACE. • 4-3. IMMEDIATE ACTION • Immediate action refers to anything a soldier does to reduce a stoppage without taking time to look for the cause. Immediate action should be taken in the event of either a hangfire or misfire. Either can be caused by an ammunition defect or by a faulty firing mechanism. Any failure to fire must be considered a hangfire until that possibility is eliminated. • a. Hangfire. A hangfire is a delay in the functioning of the round's propelling charge explosive train at the time of firing. The length of this delay is unpredictable, but in most cases it ranges between a split second and 30 seconds. Such a delay in the functioning of the round (hangfire) could result from the presence of grit, sand, frost, ice, or excess oil or grease. • b. Misfire. A misfire is a complete failure of the weapon to fire. A misfire in itself is not dangerous; however, because it cannot be immediately distinguished from a hangfire, it must be considered to be a hangfire until proven otherwise. • c. Procedures. Because a stoppage may have been caused by a hangfire, the following precautions must be observed until the round has been removed from the weapon and the cause of the failure determined: • (1) Keep the M203 pointed downrange or at the target, and keep everyone clear of its muzzle. If the stoppage occurs during training, shout 'Misfire' and clear the area of any soldiers not needed for the operation. • (2) Wait 30 seconds from the time of the failure before opening the barrel assembly to perform the unloading procedure. • (3) After removing the round from the receiver, determine whether the round or the firing mechanism is defective. Examine the primer to see if it is dented. If the primer is dented, separate the round from other ammunition until it can be disposed of properly. However, if the primer is not dented, the firing mechanism is at fault. Once the cause of the failure to fire has been corrected, the round may be reloaded and fired.
WARNING • ENSURE THE SLING IS CLEAR OF THE WEAPON MUZZLEBEFORE FIRING. 5-1. FOUR FUNDAMENTALS OF MARKSMANSHIP • a. Steady Position. This varies according to the position. • (1) Prone position. If you fire prone, try to use a prone supported position (Figure 5-1). • (a) Lie face down, grasp the M16 pistol grip with your right hand and place the butt of the rifle into the pocket of your right shoulder. • (b) Lower your right elbow to the ground so your shoulders are level. This places the weight of your body behind the weapon, which enables you to recover quickly each time you fire. • (c) Grasp the rifle magazine with your left hand. Straighten your upper body, and spread your legs a comfortable distance apart. Try to point your toes outward and relax your ankles, so your heels will rest on the ground. Relax the weight of your upper body forward onto your left arm. • (d) For ranges greater than 150 meters, lower the buttstock of the weapon to obtain the proper sight alignment and sight picture. Grip firmly to prevent this from moving the weapon from your shoulder pocket.
(2) Kneeling position.Figure 5-2 shows the kneeling position. • (a) Kneel on your right knee while facing the target, with your left hand on the magazine and your right grasping the rifle' s pistol grip. • (b) Place your left foot about .45 meter (18 inches) to your left front, with your toes pointing in the general direction of the target. • (c) Keeping your right toe in place, sit on your right heel. • (d) Place your left elbow forward of your left knee, resting the flat portion of your upper arm on your knee. • (e) Move the rifle butt into the pocket of your right shoulder, pulling the rifle pistol grip with your right hand. • (f) With your left hand on the rifle magazine, place your left forefinger in the trigger guard of the grenade launcher. • (g) Pull the rifle firmly into your shoulder. • (h) Pull your right elbow in close to your body to help you apply rearward pressure to the weapon. Ensure that your leg completes a solid, three-point base for your position. For ranges greater than 150 meters, lower the buttstock of the weapon to obtain the proper sight alignment and sight picture. Grip firmly to prevent this from moving the weapon from your shoulder pocket.
(7) Fighting position. If you fire from a fighting position, try to use support (Figure 5-7). • (a) Place your right foot against the rear of the fighting position, then lean forward until your chest is against its forward edge. • (b) Grasp the magazine with your left hand. • (c) Place your left elbow on or against solid support. • (d) Use your right hand to position the butt of the stock in the pocket of your right shoulder, then grasp the rifle pistol grip properly. • (e) Place your right elbow on or against a solid support, and relax into a comfortable firing position. • (f) For ranges greater than 150 meters, lower the buttstock of the weapon to achieve proper sight alignment and sight picture. Grip firmly to prevent this from moving the weapon from your shoulder pocket. NOTE:The weapon must not touch the support.
8) Standing position.Figure 5-8 shows the standing position. • (a) Face the target standing, and spread your feet a comfortable • distance apart. • (b) Grasp the rifle pistol grip with your right hand and the rifle magazine with your left hand. Then place the butt of the stock into your right shoulder so that the sight is level with your eyes. • (c) Hold your right elbow high to form a good pocket for the butt of the stock and to permit a strong rearward pressure with your right hand. • (d) Hold most of the weight of the weapon with your left hand. • (e) Shift your feet until you achieve a natural aiming stance. • (f) For ranges greater than 150 meters, lower the buttstock of the weapon to obtain the proper sight alignment and sight picture. Grip firmly to prevent this from moving the weapon from your shoulder pocket.
b. Aiming. Aiming procedures for every position are as follows • (1) Aligning sight. When using the leaf sight, align it with the front sight post of the M16. When using the quadrant sight, align its rear sight aperture with its front sight post. Picture a horizontal line through the center of the leaf sight or rear sight aperture. The top of the M16's front sight post should touch this line. Picture a vertical line through the center of the leaf sight or rear sight aperture. This line should vertically dissect the front sight post (Figure 5-9). • (2) Focusing. For either sight, focus on the front sight post; a good firing position places your eye directly on line with the center of the leaf sight or rear sight aperture. Your eye's natural ability to center objects in a circle and seek the point of greatest light will help you align the sight correctly. • (3) Obtaining sight picture. To achieve a correct sight picture, align the front sight post and leaf sight or rear sight aperture with the target. For area targets, aim where the round's bursting radius will make the round most effective. For point targets, aim at the target's center of mass.
c. Breathing. The technique for breathing is the same for every position: Breathe naturally. Exhale most of your air, hold your breath, and fire before you become uncomfortable. In combat, just choke off your breath before firing. d. Trigger Control. The technique for trigger control is the same for every position. Place your trigger finger (the index finger of your left hand), between the first joint and the tip of your finger (not at the extreme end of your finger) on the trigger. Adjust for your hand size and grip. Then, squeeze your trigger finger to the rear without disturbing the lay of the weapon.
ZEROING THE M203 GRENADE LAUNCHER • a. Zeroing the Leaf Sight. A red mark at 50 meters on the leaf sight reminds the grenadier not to zero at this range. • (1) Select a target at 200 meters. • (2) Place the sight in the upright position. • (3) Place the center mark of the windage scale on the index line on the rear of the sight base. • (4) Loosen the elevation adjustment screw on the leaf sight; place the leaf sight's index line on the sight mount's center elevation mark. • (5) Tighten the elevation adjustment screw. • (6) Assume a prone supported firing position. • (7) Load one round of 40-mm HE or TP ammunition. • (8) Use correct sighting and aiming procedures to align the target with the front leaf sight. • (9) Fire a round, sense the impact, and adjust the sight. • (a) Windage. Turn the sight windage screw clockwise to move the leaf sight to the left, and vice versa. One increment moves round impact 1 1/2 meters at a range of 200 meters. • (b) Range. Use a 40-mm cartridge case and turn the elevation adjustment screw to raise the leaf sight (this increases range) or to lower the leaf sight (this decreases range). Turning the screw one increment moves round impact 10 meters at a range of 200 meters. • (10) Fire two more cartridges, readjusting the sight after each. Once a round impacts within 5 meters of the target, the weapon is zeroed. • (11) After you have zeroed the weapon, record the zero data on your scorecard. As soon as you can, transfer the information to a separate (small) piece of paper, and tape this inside the M16 pistol grip.
b. Zeroing the Quadrant Sight. • (1) Select a target at 200 meters. • (2) Ensure that the quadrant sight is correctly mounted on the rifle's carrying handle. • (3) Open the front sight post and rear sight aperture. • (a) Move the front sight post to its highest position, then back 2 1/2 turns. • (b) Depress the rear sight retainer. Slide the rear sight aperture to the left until its white index line aligns with the edge of the sight aperture arm. • (4) Move the sight latch rearward, and reposition the quadrant sight arm to zeroing range (200 meters). • (5) Assume a prone supported firing position. • (6) Use correct sighting and aiming procedures to align the target with the front sight post and rear sight aperture. • (7) Load one round of 40-mm HE or TP ammunition. • (8) Fire a round, sense the impact, and adjust the sight. • (a) Elevation. Turn the front sight post right to decrease or left to increase elevation. At a range of 200 meters, one full turn equals 5 meters. • (b) Windage. Press the sight aperture retainer; move the rear sight aperture away from the barrel to move the trajectory to the left, or vice versa. At a range of 200 meters, one notch on the rear sight aperture equals 1 1/2 meters. • (9) Fire two more cartridges, readjusting the sights after each. If the round lands within 5 meters of the target, the weapon is zeroed. • (10) After you have zeroed the weapon, record the zero data on your scorecard. As soon as you can, transfer this information to a separate (small) piece of paper, and tape this inside the M16 pistol grip.