Download
1 / 12
120 likes | 290 Views
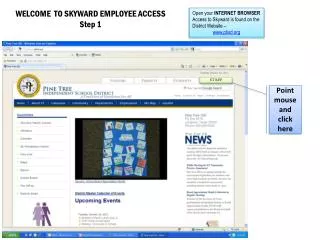
Open your INTERNET BROWSER Access to Skyward is found on the District Website – w ww.ptisd.org. WELCOME TO SKYWARD EMPLOYEE ACCESS Step 1. STAFF. Point mouse and click here. STEP 2. The next screen that appears lists all of the PTISD information available to District employees.

E N D
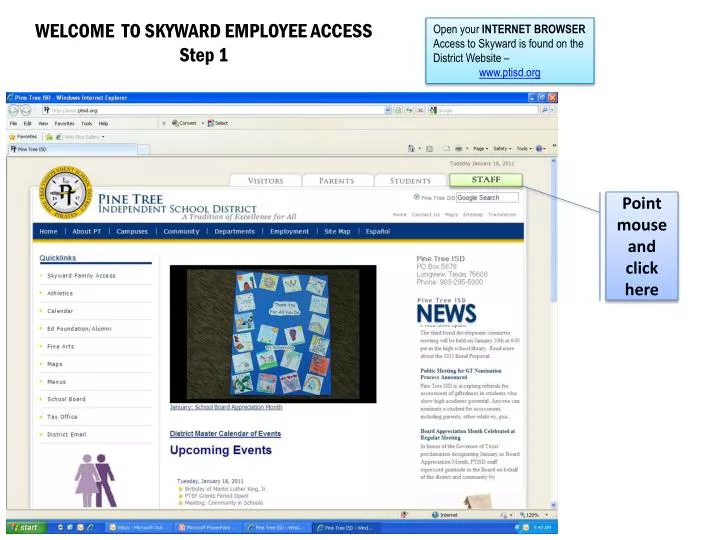
Open your INTERNET BROWSER Access to Skyward is found on the District Website – www.ptisd.org WELCOME TO SKYWARD EMPLOYEE ACCESSStep 1 STAFF Point mouse and click here
STEP 2 The next screen that appears lists all of the PTISD information available to District employees Point mouse and Click Here
STEP 3 A new window opens This is the “LOG IN” Screen Click INSIDE the “Login” box. Type your “Login” ID Your Login ID is the same as your email login. Click INSIDE the “Password” box. Type your Password. You are able to set your own Password within your Skyward Account. Click on “LOGIN”
STEP 4 A new window opens to display information available for viewing. We Use 3 Categories
This area contains information about the employee under the following categories: General Information – Password changes are done here Calendar – Contains District info and your scheduled days off Payroll – Contains all Payroll info – pay stubs, tax info, etc. AP Payments – Any payments issued from Accounts Payable (Reimbursements) Personal Info – Contains all personal info on record for the employee Employee Information - This area contains information about the employee’s Leave: Time Off Status – Shows allocated Leave and balances Time Off Requests – This is where Leave is requested and details stored. – View past and future requests. – View Approvals and Denials. Time Off - This area contains information about the employee timesheets: Quick Entry – Shows the current status and number of hours for current day. True Time History – Contains all timesheets organized by week and day. Timesheets – Displays all Unsubmitted timesheets in a separate category - Submit “Unsubmitted” timesheets from this area. - Displays the employee’s timesheet history True Time -
STEP 4 REQUEST FOR TIME OFF CLICK ON “TIME OFF” CLICK ON “… REQUESTS”
STEP 5 REQUEST FOR TIME OFF CLICK ON “APPLY FILTER”
STEP 6 REQUEST FOR TIME OFF This screen shows the 10 most current Time Off Requests for the employee. It is also the screen that you can Add, Edit, or Delete requests for time off. To Add A Time Off Request: Point and Click the “Add Button”
REQUEST FOR TIME OFF STEP 7 Your current Time Off Balances are displayed at the top of this page. Please refer to these balances as you request your time off. 1.) Click on the *Time Off Code drop menu. 2.) Choose the type of Time Off you are requesting. 3.) Click on the *Reason drop menu and choose an appropriate reason for the request. 4.) Click on the inside of the Description Box and type a reason for the request (optional). 5.) Choose either Single Day or Date Range by clicking on the appropriate circle. 6.) Click on the Calendar button and choose the date are requesting off. 7.) Click inside the Hours box and type the number of hours you are requesting off be careful of the decimal point.) 8.) Click on the Start Time boxes to display the time you wish to start your leave. 9.) Click on “Select Employee(s): - you can notify coworkers of your requested time. All Custodial Staff MUST include your Head Custodian’s email address.
STEP 8 REQUEST FOR TIME OFF Type the person’s last name and press “Enter” on your Keyboard. The next screen to appear will look the same as this one but should show the name you searched for. Check “Select” box next to the name. Click on “SAVE”
STEP 9 REQUEST FOR TIME OFF Review your request for accuracy. Click “SAVE” Click “BACK” to return to previous screen. The name you chose will appear in the box. This person will get an email alerting them of your Time Off Request. All custodians MUST include their Head Custodian of ALL Time Off Requests.
COMPLETION OF TIME OFF REQUEST The “Back” Button brings you back to this screen. Your new Request should be the first Request listed Click “BACK” to return to previous screen where you will “EXIT” You have successfully requested Leave within the SKYWARD System. The approval process begins with an email being sent to the department’s Admin Staff. The request is reviewed and the time off balances are verified. If the request is APPROVED, an email is sent to the department’s Director. The Director Approves the request and the employee is notified of the Approval via e-mail. • If the request requires adjustment and/or changes, it will be DENIED. • An email notification is sent to the employee. • Submit a new request with changes and/or adjustments made for Approval.