Download
1 / 15
150 likes | 156 Views
Getting Started with the EELD601. 1. After you remove your EELD601 from the box, check to make sure you have all accessories shown below. Click here for next screen. Dipstick. 2. Note: Power Cables, Water Separator / Filter & Accessories Compartment is in Back of Tester. Tool Box Hangers.

E N D
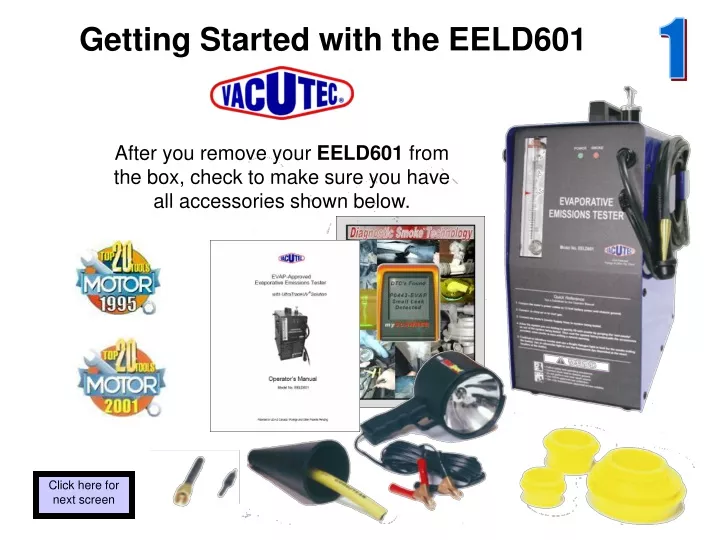
Getting Started with the EELD601 1 After you remove your EELD601 from the box, check to make sure you have all accessories shown below. Click here for next screen
Dipstick 2 Note: Power Cables, Water Separator / Filter & Accessories Compartment is in Back of Tester Tool Box Hangers Smoke Power Flow Meter with Pointer Flag EELD601 ON/OFF Button Smoke Supply Hose Click here for next screen
3 Nitrogen / Shop Air Connector Fitting Remote Smoke Button 12-Volt DC Power Cable Smoke Supply Hose Accessories Compartment Click here for next screen
Depending on the test you are performing, connect either an inert gas, such as Nitrogen, or shop air supply line to the EELD601 water-separator / filter connection located on the back of the tester 4 • Be sure the supply pressure to the tester is between 50 psi and 150 psi • When testing EVAP systems: Connect the tester to an inert gas, such as nitrogen. • When testing systems other than EVAP: Connect the tester to shop air. Click here for next screen
5 The EVAP port adaptor is used to connect to the vehicles EVAP service port. The Schrader removal tool is used for taking the core out of the EVAP service port. No. WVA-04 No. WVA-09 Click here for next screen
Before we start THINK SAFETY! Because of the volatile fumes that may be present in an evaporative emissions system, we recommend using an inert gas, such as nitrogen, for testing EVAP systems. Accidents do happen! Do not perform tests near a source of spark or ignition
TEST SAFELY Q: Why use Nitrogen to test EVAP system? A: SAE published Paper reports the hazards of using air instead of Nitrogen to test the EVAP system. http://www.sae.org/technical/papers/2007-01-1235 Q: What is BAR requiring on the California BAR-Certified equipment? A: BAR says only Nitrogen can be used in BAR-Certified equipment, citing “equipment requirements and safety concerns”. Q: Why do some other smoke machine companies say you don’t need to use Nitrogen with their machines? A: Most likely because their machines are not built with the licensed, patented technology to use nitrogen. Sounds like an attempt to put the best ‘spin’ on a product that CAN’T use Nitrogen. Note: All current Vacutec smoke machines contain patented technology designed to be used with Nitrogen for safer EVAP testing.
6 1. Remove the OBD-II service port adaptor cap. 2. With the Schrader removal tool turn clockwise and remove the core from the service port *. You must remove the core before testing. [After testing,don’t forget to reinstall the OBD-II service port Schrader core and cap]. * If the vehicle being tested does not have an EVAP service port, then access the EVAP system at the purge valve line that leads to the charcoal canister. Click here for next screen
If the car you are working on doesn’t have an EVAP service port and follow this procedure. Note: See Tech Tip Booklet for more details. To intake manifold Click here To Charcoal Canister / Fuel Tank . 7 Purge Valve Insert smoke supply hose into EVAP system line going to the charcoal canister. Note: This does NOT test the purge valve for leaks!
8 Let’s do a step by step EVAP test. Remember that you must use nitrogen! 1. Connect the red lead to positive on battery. 2. Connect the black lead to chassis ground. With power leads connected, the green light should be ON. A low battery will cause the Tester’s green Power light to blink. See Trouble Codes in your Operator Manual. Click here for next screen
9 Press and release the ON/OFF button to active the EELD601 The tester’s Smoke light will come on, indicating smoke production The timer will automatically turn OFF in 5-minutes. To turn the tester OFF before the 5-minutes are up, simply press the ON / OFF button again. Click here for next screen
10 Notice that at the beginning of the test procedure, the flow meter’s-ball will go to the top of the flow meter scale • This indicates two things; • The EVAP system is being filled and • There are no restrictions in the EVAP system at this time. • Note: • If the ball initially never goes to the top of the flow meter, this indicates a restriction in the EVAP system. • Did you remember to remove the Schrader valve from the EVAP service port? • Do you have your nitrogen supply turned on? Click here for next screen
11 Now close the vehicle’s EVAP System Vent Solenoid. Usually in less than 60 seconds of activating or closing the vent solenoid (depending on the capacity and fuel level) the flow meter’s indicator-ball will fall within the meter’s visible scale. Continue to fill the system until the ball stops descending (this could take an additional two minutes). Once the meter's indicator-ball has stopped descending, align the flow meter’s red flag to the indicator-ball. If the ball descends to the bottom of the meter, this indicates the system has NO leak. Click here for next screen
12 However, if the red flag indicates a leak greater than the allowable standard, continue to introduce smoke into the system and look for the smoke exiting the leak. .040” FAIL Above this line .040” PASS below this line .020” FAIL Above this line .020” PASS below this line Click here for next screen
Look for the smoke or the ultraviolet-activated fluorescent dye. 888-822-8832 www.vacutec.com Click here to Exit PowerPoint