Download

1 / 19
190 likes | 301 Views
Using Your Voicemail. M6 Release 7.1Business Feature Set Default Menu Options Revised August 31, 2007 TR-71-0007-102808. Voicemail. Message Waiting Indication

E N D
Using Your Voicemail M6 Release 7.1Business Feature Set Default Menu Options Revised August 31, 2007 TR-71-0007-102808
Voicemail • Message Waiting Indication • A stutter dialtone and/or visual indicator (depending upon the capabilities of your phone) indicates that there are unread messages in your voice mailbox. This indicator will remain lit as long as you have unread messages in your mailbox. • To Access Your Voicemail • From Your Own Phone • Lift the handset and either dial *09 or press the Messages button (if available) • Enter your voicemail password • If you have new messages, the messages will be identified and played. • After hearing any new messages, you will be presented with the Voicemail Main Menu. • From Another Phone • From an internal phone, dial 555 (or the code provided by your Service Provider) • From an external phone, dial the main telephone number for your Automated Attendant and enter 555. Alternately, your Service Provider may have provided a direct voicemail access number. • When prompted, enter your extension number • When prompted, enter your voicemail password followed by the # key • If you have new messages, the messages will be identified and played. • After hearing any new messages, you will be presented with the Voicemail Main Menu.
Voicemail (cont’d) • To Access Your Voicemail (cont’d) • Using the Web Portal • Log into your web portal account • Click the Voicemail tab • Click the Inbox subtab • To hear the message through the speaker on your PC, click the icon next to the message you wish to hear. • To have the system call your phone and play the message through your phone, click the icon next to the message you wish to hear. • Using Your Email Client • Open your email client • In order to retrieve voicemail messages using your email client, your service provider must provide POP/IMAP access to your voicemail account and your email client must be configured to retrieve voicemail messages from the voicemail server. Contact your service provider for further information. • Open the email message containing the voicemail you wish to hear • Open the voicemail attachment • The Email Player application will launch automatically • Press to hear the voicemail message.
Voicemail (cont’d) • Voicemail Main Menu
Voicemail (cont’d) • Message Playback Options
Voicemail (cont’d) • Replying to a Message • While listening to messages, you have the option to reply to the sender. To reply to the current message, press 2. • You will be prompted to record a message. • After the tone, record your message. Press the # key when finished. • Select an action • Press 1 to Send the message. The message will be sent and you will be disconnected from the voicemail system. • Press 2 to Change the message. The message will be deleted and you will be prompted to record the message again. • Press 3 to Review the message. The message will be played back and you will be prompted to select another action. • Press 4 to Set Message Options. Mark the message Urgent press 1, Private press 2, Return Receipt press 3, to Clear the Options press 4, or * to return to the previous menu and select send. • When retrieving messages, urgent messages will be played before any normal messages. The recipient may also choose to be paged whenever they receive an urgent message. Private messages cannot be forwarded. • Press * to Cancel.
Voicemail (cont’d) • Dialing the Originator • While listening to messages, you have the option to call back someone who left you a voicemail message. To dial the message originator, press 3. • This capability will not work if the voicemail system was not able to record the Caller ID information when the original voicemail was received or if your phone is configured with call restrictions which prevent you from calling the originator’s number.
Voicemail (cont’d) • Forwarding a Message • While listening to messages, you have the option to forward a message to another recipient. To forward the current message, press 6. • Enter an extension number or Distribution Group Number followed by the # key. Repeat this step until you’ve entered all the desired destinations. • Press the # key when finished entering destinations • You will be prompted to record an introduction. • After the tone, record your introductory message. Press the # key when finished. • Select an action • Press 1 to Forward the message. The message will be sent and you will be disconnected from the voicemail system. • Press 2 to Change the message. The message will be deleted and you will be prompted to record the message again. • Press 3 to Review the message. The message will be played back and you will be prompted to select another action. • Press 4 to Set Message Options. Mark the message Urgent press 1, Private press 2, Return Receipt press 3, to Clear the Options press 4, or * to return to the previous menu and select send. • When retrieving messages, urgent messages will be played before any normal messages. The recipient may also choose to be paged whenever they receive an urgent message. Private messages cannot be forwarded. • Press * to Cancel.
Voicemail (cont’d) • Composing a New Message • Access your voice mailbox • If you have new messages, the messages will be identified and played. To skip to the Main Menu, press * • From the Main Menu, press 7 to compose a new message • Enter an extension number or Distribution Group Number followed by the # key. Repeat this step until you’ve entered all the desired destinations. • Press the # key when finished entering destinations • Wait for the tone, record your message. Press the # key when finished. • Select an action • Press 1 to Send the message. The message will be sent and you will be disconnected from the voicemail system. • Press 2 to Change the message. The message will be deleted and you will be prompted to record the message again. • Press 3 to Review the message. The message will be played back and you will be prompted to select another action. • Press 4 to Set Message Options. Mark the message Urgent press 1, Private press 2, Return Receipt press 3, to Clear the Options press 4, or * to return to the previous menu and select send. • When retrieving messages, urgent messages will be played before any normal messages. The recipient may also choose to be paged whenever they receive an urgent message. Private messages cannot be forwarded.
Voicemail (cont’d) • Changing Your Voicemail Password • Access your voice mailbox • If you have new messages, the messages will be identified and played. To skip to the Main Menu, press * • From the Main Menu, press 3 to change your voicemail password • Enter your new voicemail password followed by the # key • Enter your new voicemail password again followed by the # key to confirm • Password Restrictions: • Passwords cannot match your telephone number (extension or full telephone number) (example my telephone number is 972-555-1212 and cannot be 1212 or the full digit string of 9725551212.) • Passwords cannot contain a string of your telephone number (extension or full telephone number) (example my telephone number is 972-555-1212 my password cannot be 912129 or 597255512125 because it includes my extension or telephone as a portion of the password) • Passwords cannot match your last 3 passwords • Passwords must be a minimum length defined by the administrator (example 4 digits minimum) • Passwords do expire at a value defined by the administrator (example every 60 days, etc)
Voicemail (cont’d) • Recording Your Personal Greetings • Access your voice mailbox • If you have new messages, the messages will be identified and played. To skip to the Main Menu, press * • From the Main Menu, press 5 to record your greetings • Select which greeting you’d like to record: • Press 1 to record your No Answer greeting. This greeting is played for your callers when you don’t answer your phone. • Press 2 to record your Do Not Disturb greeting. This greeting is played for your callers when you have the Do Not Disturb feature active. • Press 3 to record your Busy greeting. This greeting is played for your callers when you’re talking on the phone. • Press 4 to record your Name. • Press * to return to the main menu. • After the tone, record your greeting. Press the # key when finished. • Listen to the prompts to review or save and use this greeting. • If you don’t record a personal greeting, a generic greeting will be played for your callers.
Voicemail (cont’d) • Hearing Your Personal Greetings • Access your voice mailbox • If you have new messages, the messages will be identified and played. To skip to the Main Menu, press * • From the Main Menu, press 4 to hear your recorded greetings • Select which greeting you’d like to hear: • Press 1 to hear your No Answer greeting. This greeting is played for your callers when you don’t answer your phone. • Press 2 to hear your Do Not Disturb greeting. This greeting is played for your callers when you have the Do Not Disturb feature active. • Press 3 to hear your Busy greeting. This greeting is played for your callers when you’re talking on the phone. • Press 4 to hear your recorded Name. • Press * to return to the main menu.
Voicemail (cont’d) • Distribution Groups • Distribution Groups are used when you want to send messages to a group of users. • There are two types of Distribution Groups: • Personal Distribution Groups are managed by the end user and are available only to that user. A user may have a maximum of 20 Personal Distribution Groups (i.e., Groups 80-99). Administrators control the number of personal distribution groups per user. • Corporate Distribution Groups are managed by the Service Provider and can be used by anyone within the company. A company may have a maximum of 70 Corporate Distribution Groups.
Voicemail (cont’d) • Creating a Personal Distribution Group • Access your voice mailbox • If you have new messages, the messages will be identified and played. To skip to the Main Menu, press * • From the Main Menu, press 6 to manage Personal Distribution Groups • Press 3 to Create a new Personal Distribution Group • Enter the 2-digit Distribution Group number you’d like to create followed by the # key. Personal Distribution Groups must be in the range 80-99. • After the tone, record the group name followed by the # key. Press # again to confirm or * to re-record. • Enter each of the destination extensions followed by the # key. After entering all the destinations, press # again.
Voicemail (cont’d) • Editing a Personal Distribution List • Access your voice mailbox • If you have new messages, the messages will be identified and played. To skip to the Main Menu, press * • From the Main Menu, press 6 to manage Personal Distribution Groups • Press 2 to Edit an existing Personal Distribution Group • Enter the 2-digit Distribution Group number you’d like to edit followed by the # key. • Select the type of modification you’d like to make: • To list all members, press 1. • To add a member to the group, press 2. Enter the extension number followed by the # key. Press # to confirm or * to cancel. • To delete a member from the group, press 3. Enter the extension number followed by the # key. Press # to confirm or * to cancel. • To hear the group name, press 4. • To change or re-record the group name, press 5. After the tone, record the group name followed by the # key. • To return to the Distribution Group Menu, press *
Voicemail (cont’d) • Deleting a Personal Distribution Group • Access your voice mailbox • If you have new messages, the messages will be identified and played. To skip to the Main Menu, press * • From the Main Menu, press 6 to manage Personal Distribution Groups • Press 4 to Delete a Personal Distribution Group • Enter the 2-digit Distribution Group number you’d like to delete followed by the # key. • Press # to delete the group or * to cancel • Hearing the List of Personal Distribution Groups • Access your voice mailbox • If you have new messages, the messages will be identified and played. To skip to the Main Menu, press * • From the Main Menu, press 6 to manage Personal Distribution Groups • Press 1 to Hear the listing of Personal Distribution Groups • To skip ahead to the next entry, press #.
Voicemail (cont’d) • Custom Operator Assistance Number • Your Operator Assistance Number is the number or extension where callers are transferred if they press 0 during your outgoing greeting. • To Hear or Change Your Operator Assistance Number • Access your voice mailbox • If you have new messages, the messages will be identified and played. To skip to the Main Menu, press * • From the Main Menu, press 8 to hear or change your Custom Operator Assistance Number • You will hear that you have the default operator assistance number or your custom operator assistance number • Press 1 to Change Your Custom Operator Assistance Number • Enter the new operator assistance number followed by the # key. Press * to cancel. When entering an internal extension, simply enter the extension number. When entering an external number, do not use an Outside Access Digit (e.g., 9) or a leading 1 for long distance calls. • You will hear your new operator assistance number and be returned to the main menu • Press 2 to restore your default Operator Assistance Number. Your default Operator Assistance Number is usually your company’s main telephone number.
Voicemail (cont’d) • Voice Mail Notifications • Voice Mail Notifications are used to notify you when you receive voicemail messages. You select when to be notified: Never, For Urgent Messages Only or for All New Messages. • You can be notified three different ways: • Numeric Pager – A numeric code will be sent to your pager. • Voice – The system will call you at a specified number and ask for your voicemail password. After entering your voicemail password, you’ll be able to listen to your messages. If the system doesn’t reach you, it will try to reach you three times at five minute intervals. • Email – You’ll receive an email that identifies the Date, Time, and identification (Name and Number, if available) of the caller. • Voice Mail Notifications are configured using the Web Portal. For more information about configuring Notifications, refer to the Web Portal User Guide.
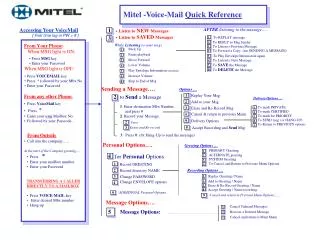
Main Voice Mail Menu 1 - Play Inbox Msgs 2 - Play Saved Msgs 3 - Change Password 4 - Play Greetings 5 - Record Greetings 6 - Access Dist Grps 7 - Compose Msg 8 - Custom Operator M6 Voice Mail Flow Chart – Default Menu After Playing Inbox Msgs 2 - Reply3 - Call Originator4 - Delete5 - Save6 - Forward7 - Replay8 - Continue* - Main Menu Playing Inbox Messages 2 – Reply3 - Call Originator4 – Delete5 – Save6 – Forward7 – Replay77 - Beg of Msg8 - Pause/Cont.9 - Fast Forward99 - End of Msg# - Skip Envelope Play Greetings 1 - Play No Answer2 - Play DND3 - Play Busy4 – Play Name* - Exit Record Greetings 1 - Record No Answer2 - Record DND3 - Record Busy4 – Record Name5 - Replace w/Default* - Exit Post Greetg Recording 1 – Review2 – Delete & Rerecord3 – Save & Use* - Cancel Custom Operator 1 - Change Operator2 - Restore Default* - Exit Playing Saved Messages 2 – Reply3 - Call Originator4 - Delete6 – Forward7 – Replay77- Beg of Msg8 - Pause/Cont.9 - Fast Fwd99 - End of Msg# - Skip Envelope Access Personal Distribution Grps 1 - List Groups2 - Edit Groups3 - Create Groups4 - Delete Groups* - Exit After Playing Saved Msgs 2 – Reply3 - Call Originator4 – Delete6 – Forward7 – Replay8 - Continue* - Main Menu Compose Msg. 1 - Send2 – Change3 – Review4 - Set Msg Opts Set Msg. Option 1 - Urgent2 – Private3 – Return Receipt9 – Clear All* - Main Menu